Jump to content


Photo
- - - - -

Clubman S'tate Rebuild


  • Please log in to reply
185 replies to this topic

#151 Mart!

Mart!

    Speeding Along Now

  • Traders
  • PipPipPipPipPip
  • 303 posts
  • Location: Shefford
  • Local Club: www.MainlyMinisMontreal.com

Posted 07 January 2011 - 05:19 PM

FINALLY, the mini is in its new home!!!!!!!!
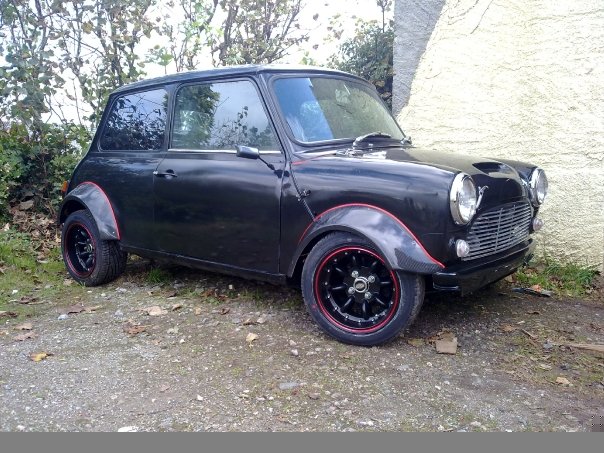
started to work on it, installed the acewell speedo sensor, rear sway bar and test fitted the banded wheel just for fun...

Posted Image

Posted Image


it feels great to get my hands dirty again! :thumbsup:
stay tuned for periodical updates...

#152 tedmcedd

tedmcedd

    Up Into Fourth

  • Traders
  • PipPipPipPipPipPipPipPipPip
  • 2,751 posts
  • Location: Huddersfield

Posted 07 January 2011 - 10:28 PM

looks fantastic! love love love the steelwheels! and the anti roll bar! looking forward to more updates!

Ed

#153 minibarnerz

minibarnerz

    Speeding Along Now

  • Members
  • PipPipPipPipPip
  • 479 posts
  • Local Club: torbay mc, somerset rusteez

Posted 07 January 2011 - 10:34 PM

love the colour!!! and the 10's!! :thumbsup: noticing a comeback on them! was a time everyone was goin bigger is better, now reverting back to the small ones!! whoooo!! :techsupport:

#154 Mart!

Mart!

    Speeding Along Now

  • Traders
  • PipPipPipPipPip
  • 303 posts
  • Location: Shefford
  • Local Club: www.MainlyMinisMontreal.com

Posted 08 January 2011 - 01:42 PM

love the colour!!! and the 10's!! :) noticing a comeback on them! was a time everyone was goin bigger is better, now reverting back to the small ones!! whoooo!! :teehee:


i drove minis with 10, 12 and 13in wheels and its safe to say i will never own a 13in wheeled mini! i found it striped all the great handling capabilities off of the car.
12in wheels with yokos a048 are nice (and have pretty much the same circumference as a 10 tire) but there's nothing like a fat and lowered mini on 10" wheels!!!!

#155 Mart!

Mart!

    Speeding Along Now

  • Traders
  • PipPipPipPipPip
  • 303 posts
  • Location: Shefford
  • Local Club: www.MainlyMinisMontreal.com

Posted 23 February 2011 - 05:58 PM

well, finally i decided to go with real carbon fibre instead of the sticky vinyl crap. so much more fun to work with than glass fibre!!!
still have to give another coat of epoxy, then sand down, then add the red pinstripe, then give it a final coat of clear, but its getting there!

Posted Image
Posted Image
Posted Image

cheers

#156 olds_kool_lews

olds_kool_lews

    Up Into Fourth

  • Traders
  • PipPipPipPipPipPipPipPipPip
  • 3,602 posts

Posted 23 February 2011 - 06:01 PM

the side strips look amazing mate! and so does the estate! doing a brilliant job! keep it up!

#157 Mart!

Mart!

    Speeding Along Now

  • Traders
  • PipPipPipPipPip
  • 303 posts
  • Location: Shefford
  • Local Club: www.MainlyMinisMontreal.com

Posted 27 February 2011 - 04:58 PM

quick update before final rubdown and clear coat:

Posted Image
Posted Image

still unsure if i should order the original rivets (need 96 at £0.38 each plus shipping to canada) for the trims or use modern automotive trim glue... any advice?

#158 Tupers

Tupers

    Up Into Fourth

  • Members
  • PipPipPipPipPipPipPipPipPip
  • 4,156 posts
  • Location: Devon

Posted 27 February 2011 - 05:07 PM

I love the carbon trims, I take it you've laminated the original faux wood ones?


Personally I would buy the original popper rivets things.

#159 Mart!

Mart!

    Speeding Along Now

  • Traders
  • PipPipPipPipPip
  • 303 posts
  • Location: Shefford
  • Local Club: www.MainlyMinisMontreal.com

Posted 27 February 2011 - 06:46 PM

I love the carbon trims, I take it you've laminated the original faux wood ones?


Personally I would buy the original popper rivets things.


thanks!


yeah, i cleaned the fake wood vinyl crap off of the alloy plates and laminated the carbon over it. on the pics its still on the alloy plate (the silver you see between the weaves), but when i remove it you wont see it.

#160 tedmcedd

tedmcedd

    Up Into Fourth

  • Traders
  • PipPipPipPipPipPipPipPipPip
  • 2,751 posts
  • Location: Huddersfield

Posted 02 March 2011 - 01:00 PM

seriously cool mart!! looks much better than the fake stuff!! looking forward to seeing it fitted!! I'd go for the rivets too... bonding stuff on makes it much more perminant...

Ed

#161 ajperry

ajperry

    Speeding Along Now

  • Members
  • PipPipPipPipPip
  • 316 posts
  • Location: Wokingham
  • Local Club: Thames Valley Mini Club

Posted 02 March 2011 - 08:40 PM

this is amazing! loving the carbon instead of the wood, and against that grey it'll look amazing. always loved deep 10's too esp black with the chrome caps! haha glad to see your house is finisHed enough to move in and get on!
can't wait to see it finished! >_<

#162 Mart!

Mart!

    Speeding Along Now

  • Traders
  • PipPipPipPipPip
  • 303 posts
  • Location: Shefford
  • Local Club: www.MainlyMinisMontreal.com

Posted 03 March 2011 - 04:30 AM

thanks guys!
i did a lot of tests in the past months, at first i was having a hard time to get the carbon to follow the curves of the trims, i was using a de-molding agent to be able to remove the carbon from the trims to be able to reuse them (all the mods on my car are reversible, in case i ever want to bring back to original). the de-molding agent plus the fact that the carbon i bought was too thick a weave made it impossible to get a good result. then, seeing this car made me think about using a different kind of fabric with the epoxy resin. i liked the red gray black plaid fabric (i am canadian after all) but couldnt find any except thick flanel, but i did find a nice black and white hound's tooth pattern which would've looked awesome if it wasnt for the fact that the white became completely transparent when mixed with the resin which destroyed the look of the pattern.

then i thought fuc4it if i cant reuse the alloy trims, i'll do with what i have. i bought a can of 3M super 77 spray glue and glued the carbon fibre straight to the alloy trims which forced it to follow the curves. then i applied the resin over it. i really thought these where glued for life, but i messed the angle of the carbon on one of the little a-panel trim and had to re-do it - i just heated the back of the alloy plate with a heat gun which softened up the glue and the carbon just peeled off super easy!

so i'm doing a set of the carbon + red pinstripe just so i get the car finished and drivable, but i'll also be able to experiment with other different fabrics and patterns for a later incarnation of the car...

cheers!

#163 Mart!

Mart!

    Speeding Along Now

  • Traders
  • PipPipPipPipPip
  • 303 posts
  • Location: Shefford
  • Local Club: www.MainlyMinisMontreal.com

Posted 21 April 2011 - 05:07 PM

finally ordered my trim clips from Somerford's, i say clips because they arent rivets anymore. not sure if i like them or not yet, you dont have a lot of margin for thickness compared to regular rivets, and they dont seem to hold the chrome trim as tightly as the snaps on the original rivets. i think i'll add a dab of trim glue to the clips just to be extra safe... still, very happy with the results!

Posted Image

Posted Image

#164 project mini chris

project mini chris

    have a break, have a...

  • Members
  • PipPipPipPipPipPipPipPip
  • 1,894 posts
  • Location: Bedfordshire
  • Local Club: Mini Designer Register

Posted 21 April 2011 - 05:19 PM

Love it!! I admire your craftsmanship :unsure: Excellent! Cant wait to see it completed! ;)

#165 tedmcedd

tedmcedd

    Up Into Fourth

  • Traders
  • PipPipPipPipPipPipPipPipPip
  • 2,751 posts
  • Location: Huddersfield

Posted 21 April 2011 - 06:37 PM

im not sure what the clips/rivets difference is, never seen them before... im sure a little adhesive just to be safe wouldnt be a bad thing?? however, looks great! should look even better when its all on all the way round!

Ed


4 user(s) are reading this topic

0 members, 4 guests, 0 anonymous users