ta but i think i read from something Dan wrote(not surprisng really)

The Great Estate
Started by
Pooky
, Dec 20 2005 02:08 PM
187 replies to this topic
#92

Pooky
-
- TMF+ Member
-

- 5,691 posts
Crazy About Mini's
- Location: Sunny Sussex
Posted 25 May 2006 - 05:54 PM
Got some underseal on one side!

Just a bit more welding and some filling then this side is done! Then I'll flip it over do the small amount of welding on the other side! Woo
Just a bit more welding and some filling then this side is done! Then I'll flip it over do the small amount of welding on the other side! Woo
#93
miniboo
-

- Members
-
- 9,327 posts
Lord of Original Thinking
Posted 25 May 2006 - 06:07 PM
looking good
wish i had the space(well just a garage would do) and time to do something like this.
i think i would make a shorty though if i had room.
wish i had the space(well just a garage would do) and time to do something like this.
i think i would make a shorty though if i had room.
#94
Ollie180
-
- Members
-
- 2,781 posts
Up Into Fourth
- Local Club: Sasmog.co.uk
Posted 25 May 2006 - 06:40 PM
don't know how much help I'll get in here regards to this so lets see!
Just been having a closer look at my crank+conrods (deciding whether to take them out) when i noticed a few things!<-click to enlarge
Red arrows - Definately looks like its been ground down here and another place, was this done in the factory or could i have a balanced crank?
Blue arrows - Numbers scored into the big ends. Again was this factory or could someone have inspected these in the past?
Green arrow - bit of green paint on here and on other parts of the crank. What's that about?!
Any idea?

where u marked the pic in red thats like that so it doesnt hit the gears under it

also coming along very nicely
#95
Pooky
-
- TMF+ Member
-
- 5,691 posts
Crazy About Mini's
- Location: Sunny Sussex
Posted 16 June 2006 - 08:10 PM
Finally finished all of welding on floor/sills!
Rear corner valence went from this to this after some tricky patching.
near side used to look like this now it doesn't! (forgot to take an after shot of this, but you can nearly see results in the other 'after pic' !
! 
Its also had a nice fresh coat of underseal and a load of waxoyl put in everyywhere!
Next Job: Subframes
Rear corner valence went from this to this after some tricky patching.
near side used to look like this now it doesn't! (forgot to take an after shot of this, but you can nearly see results in the other 'after pic'
! Its also had a nice fresh coat of underseal and a load of waxoyl put in everyywhere!
Next Job: Subframes
#96
Bungle
-

- Members
-
- 28,971 posts
Original Spamster
- Location: Cornwall
- Local Club: cornish mini club
Posted 17 June 2006 - 08:08 PM
a solid shell a good start 
#97
Pooky
-
- TMF+ Member
-
- 5,691 posts
Crazy About Mini's
- Location: Sunny Sussex
Posted 17 June 2006 - 11:03 PM
Hammeriting rear subframe
Got to get some late subframe mounts to match up with the bushes and bolts I've got! Then paint them all up black to contrast the silver subframe and set off the yellow bushes!

Got to get some late subframe mounts to match up with the bushes and bolts I've got! Then paint them all up black to contrast the silver subframe and set off the yellow bushes!

#98
DenZal
-

- Members
-
- 177 posts
Mini Mad
Posted 18 June 2006 - 10:16 AM
weve gone for inca yellow for our minivan  coming along nicely dood! ponswood paint are running out of some cellulose paints aswell so best to get ya paint before they run out before the change over to water based paints!
coming along nicely dood! ponswood paint are running out of some cellulose paints aswell so best to get ya paint before they run out before the change over to water based paints!
#99
Pooky
-
- TMF+ Member
-
- 5,691 posts
Crazy About Mini's
- Location: Sunny Sussex
Posted 18 June 2006 - 12:10 PM
I was gonna go for Inca Yellow! but then I saw an MG in it and changed my mind. Thinking of going for a bike colour (not ducati ) would they be able to do bike colours up there do you know?
What's wrong with water based paints? I'm not spraying the exterior myself.
Ps Finished painting the frame, pretty impressed with the hammerite, rolled on the second coat to keep it smoooooth
) would they be able to do bike colours up there do you know?What's wrong with water based paints? I'm not spraying the exterior myself.
Ps Finished painting the frame, pretty impressed with the hammerite, rolled on the second coat to keep it smoooooth
#100
DenZal
-
- Members
-
- 177 posts
Mini Mad
Posted 18 June 2006 - 12:47 PM
yup they do bike colours because we were looking at a suzuki colour, with water based she was saying u need a hvlp gun? and special heaters to dry the paint with, plus its more expensive our 2 litres of inca yellow celly was only £25 i think which aint bad!
#101
Dom
-
- TMF+ Member
-
- 10,685 posts
Moved Into The Mazda
- Location: Nürburgring
Posted 18 June 2006 - 01:20 PM
Good stuff, well done Joe 
#102
retrodan
-
- Members
-
- 186 posts
Mini Mad
- Local Club: kentish mini's
Posted 18 June 2006 - 02:14 PM
finally some progress on ur estate, looking good by the way
#103
Pooky
-
- TMF+ Member
-
- 5,691 posts
Crazy About Mini's
- Location: Sunny Sussex
Posted 20 June 2006 - 05:28 PM
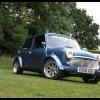
Anyone got any ideas on the wheel and arch combination I should have on the estate? 
I want it low and wide with bodycolour arches and would prefer 12's over 13's but I don't know what would look ok on a clubby estate.
So I'd like advice on type of arches, and type, size and colour of wheels
Ta!
I want it low and wide with bodycolour arches and would prefer 12's over 13's but I don't know what would look ok on a clubby estate.
So I'd like advice on type of arches, and type, size and colour of wheels
Ta!
#104
Bungle
-
- Members
-
- 28,971 posts
Original Spamster
- Location: Cornwall
- Local Club: cornish mini club
Posted 20 June 2006 - 06:27 PM
if you want it low while you have the grinde and welder out cut out the lip on the rear arches
i think its called tubing them
i think its called tubing them
#105
Pooky
-
- TMF+ Member
-
- 5,691 posts
Crazy About Mini's
- Location: Sunny Sussex
Posted 20 June 2006 - 06:29 PM

Seems a bit radical! Is that so the wheels can come right out past the body?! Crikey, don't think I'll be up for that!
Was just thinking more or soem deep dish wheels or something!


1 user(s) are reading this topic
0 members, 1 guests, 0 anonymous users


