Thats neat and tidy on the heater front, good work, less holes the better, there is a helluva lot of heat in that small tightly packed engine bay when your sitting in traffic and its got no room to move around so will find itself going through holes that are not covered up, can get toasty in the cabin in the summer......


Honda B18c Mini
Started by
paul190181
, Dec 30 2010 01:44 PM
187 replies to this topic
#91

Kam
-

- TMF+ Member
-

- 4,144 posts
Straight to the Point
- Location: Hampshire
- Local Club: 16vMini club
Posted 26 July 2011 - 12:28 AM
#92
ZKruly87
-

- Noobies
-
- 114 posts
Mini Mad
- Location: RAF Mildenhall
- Local Club: Mini Wips
Posted 26 July 2011 - 07:49 AM
hey man, awesome work. I absolutely love how clean an install this is. I live up in Brandon so right around the corner from you. if you still need help with the wiring or anything else let me know. i know my way around electronics. if not then i will see you at mini in the park.
#93
paul190181
-
- Members
-
- 193 posts
Mini Mad
Posted 26 July 2011 - 06:28 PM
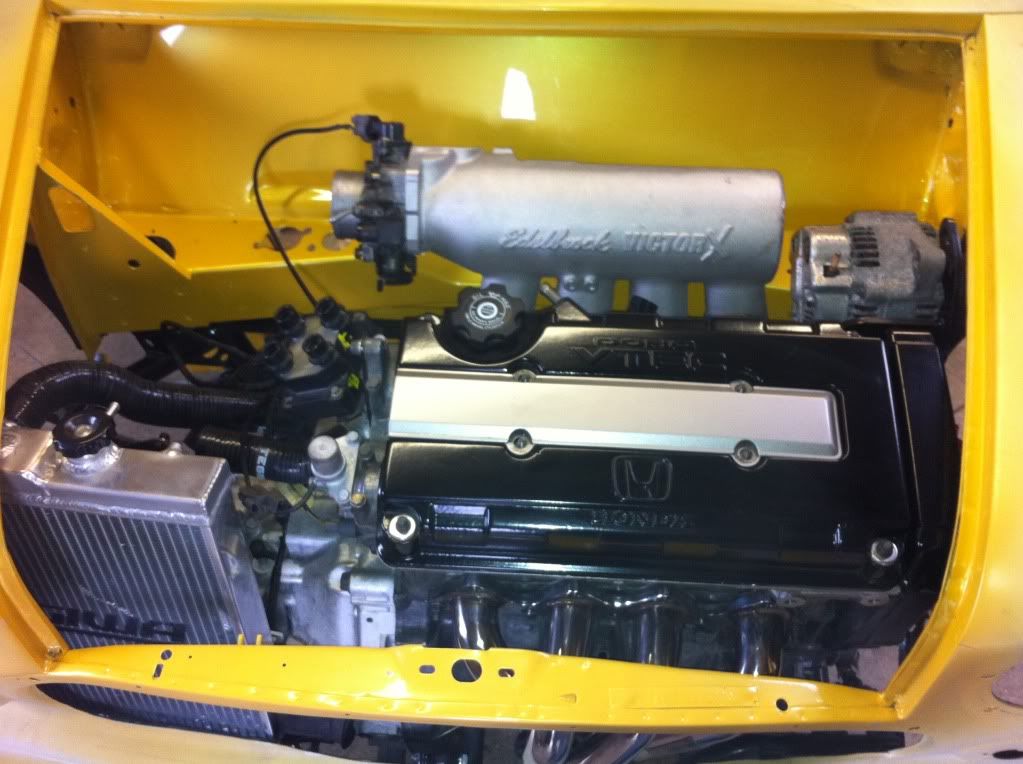
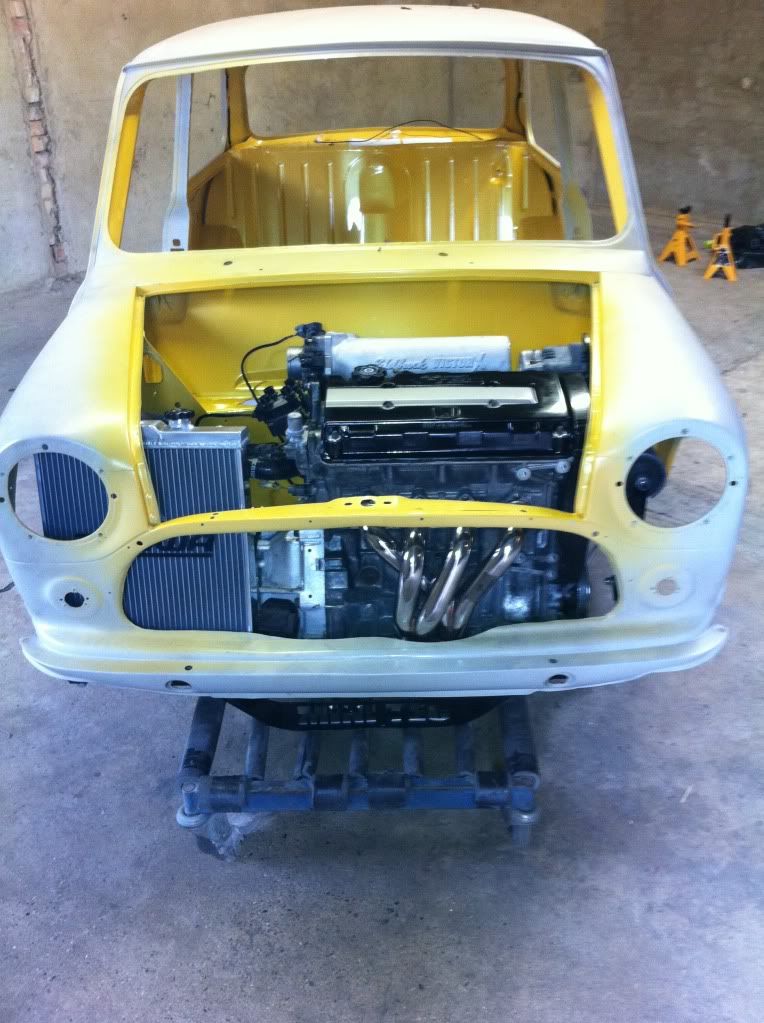
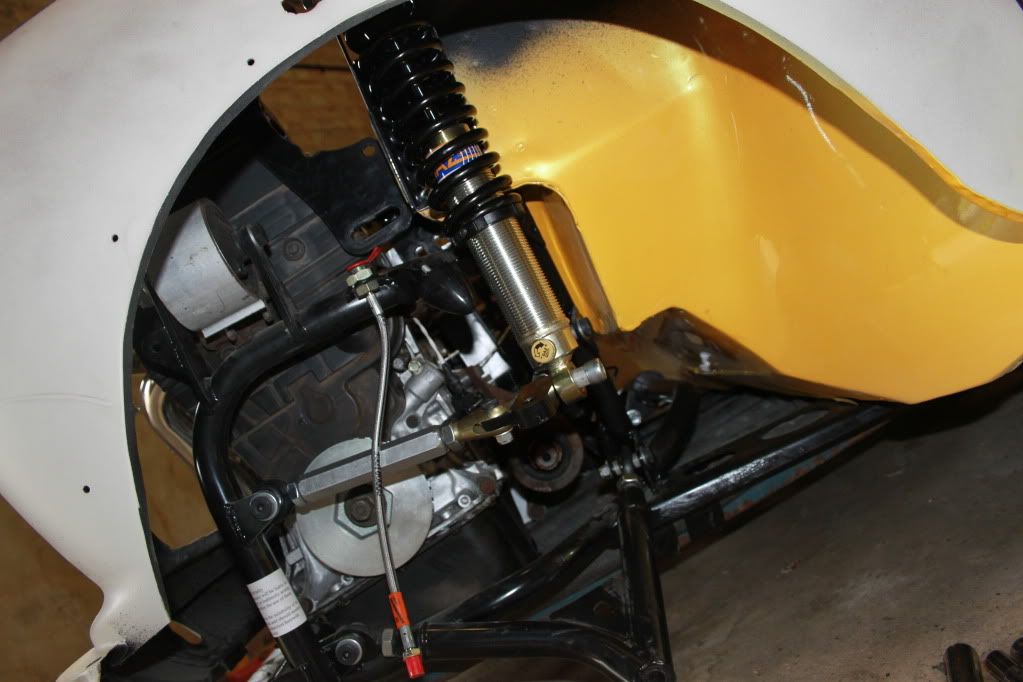
Hey made some progress today , managed to get the engine back into the car and trial fitted all of of the components and everything finaly fits inside the car without catching on other bits so prety good , ive got all the wiring threaded through the bulkhead , next job is to get some new bolts to fit everything and start to bolt things up for the final time still got a few more bits to buy but need to save for them for a few weeks .
#94
paul190181
-
- Members
-
- 193 posts
Mini Mad
Posted 26 July 2011 - 06:36 PM
Hi i may be interested in your help when i get to the electronics stage if you dont mind . Just had a look through your mini photos and that is one hell of a lovely motor , Will you be taking it to mini in the park because id like to have a look at that . thanks paulhey man, awesome work. I absolutely love how clean an install this is. I live up in Brandon so right around the corner from you. if you still need help with the wiring or anything else let me know. i know my way around electronics. if not then i will see you at mini in the park.
#95
Kam
-
- TMF+ Member
-
- 4,144 posts
Straight to the Point
- Location: Hampshire
- Local Club: 16vMini club
Posted 26 July 2011 - 08:07 PM
Nice work Paul, that welding company you used have done a neat job of sorting out those issues, nice and tidy. Don't worry about wiring up your DTA, I mean if I can do it anyone can! But I did leave the mini side of wiring as it was
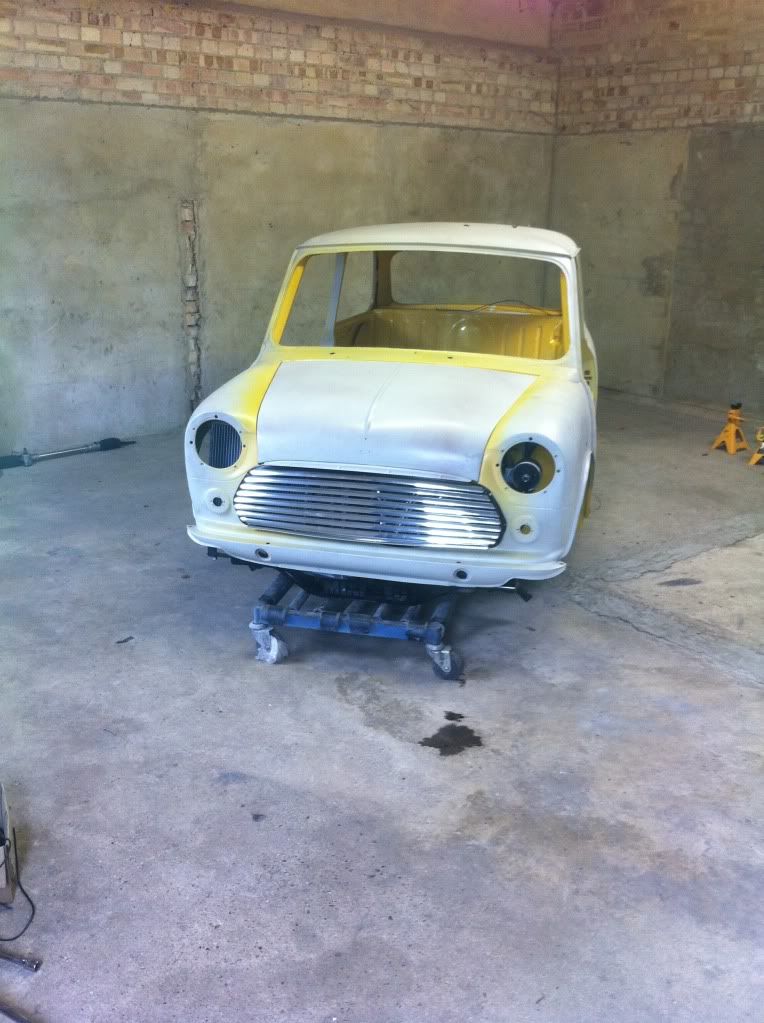
Whats up with your front bonnet? Looks like it mated with a lamppost or is it the picture?
Whats up with your front bonnet? Looks like it mated with a lamppost or is it the picture?
#96
paul190181
-
- Members
-
- 193 posts
Mini Mad
Posted 26 July 2011 - 08:56 PM
Yeah im realy impresed with the welding work he done , Looking forward to seeing what majic he can work on building the role cage for it , he rekons hes got some realy good ideas what to do with that so should be interesting looking at the work he does on bike frames etc. The bonnet is strait think its where dave put a mist coat on when preping it up . Yeah the dta side of the wiring seems ok just got to work out wich pipe goes to the heater etc bit comfused because their is 4 outlets of the engine and head and i stupidly didnt take any pics as to where they go .Nice work Paul, that welding company you used have done a neat job of sorting out those issues, nice and tidy. Don't worry about wiring up your DTA, I mean if I can do it anyone can! But I did leave the mini side of wiring as it was
Whats up with your front bonnet? Looks like it mated with a lamppost or is it the picture?
Edited by paul190181, 26 July 2011 - 08:59 PM.
#97
Kam
-
- TMF+ Member
-
- 4,144 posts
Straight to the Point
- Location: Hampshire
- Local Club: 16vMini club
Posted 26 July 2011 - 10:37 PM
Yeah its the right hand side on the bonnet (as you look head on) it looks like its got two divets where the headlamp area is, but then again its probably just the picture, I can see the prep red mist on it
I've got some pics somewhere (obviously) of where the heater pipes goes so I'll try and dig them out, but I'm sure it doesn't matter going by some folk over on 16v, will let you know though before you start hooking them up
Another thing, on my allspeed frame we need to 'trim' down one of the heater outlet pipes on back because you can't get a hose on there without some serious bend on it, trimming it back gives enough clearance and lets a hose go on easy, I'm not sure how close your heater pipes are to the back of the frame but on the allspeed the back 'bar' is inline with them

After a trim on the main pipe

If we still have trouble we trim the 'lip' of the same pipe down and the hose goes on nicely, I'm not sure how much the minitec angle positions the engine compared with the allspeed but its worth noting now incase you need to trim the pipe
I've got some pics somewhere (obviously) of where the heater pipes goes so I'll try and dig them out, but I'm sure it doesn't matter going by some folk over on 16v, will let you know though before you start hooking them up
Another thing, on my allspeed frame we need to 'trim' down one of the heater outlet pipes on back because you can't get a hose on there without some serious bend on it, trimming it back gives enough clearance and lets a hose go on easy, I'm not sure how close your heater pipes are to the back of the frame but on the allspeed the back 'bar' is inline with them
After a trim on the main pipe
If we still have trouble we trim the 'lip' of the same pipe down and the hose goes on nicely, I'm not sure how much the minitec angle positions the engine compared with the allspeed but its worth noting now incase you need to trim the pipe
#98
ZKruly87
-
- Noobies
-
- 114 posts
Mini Mad
- Location: RAF Mildenhall
- Local Club: Mini Wips
Posted 27 July 2011 - 06:40 AM
yes. im bringing my mini to mini in the park. just need to figure out if im going to enter into concourse or just leave it in the club stand. but yeah, just shoot me a message if you need any help. im free most nights and weekends.
#99
Kam
-
- TMF+ Member
-
- 4,144 posts
Straight to the Point
- Location: Hampshire
- Local Club: 16vMini club
Posted 30 July 2011 - 11:54 AM
just got to work out wich pipe goes to the heater etc bit comfused because their is 4 outlets of the engine and head and i stupidly didnt take any pics as to where they go
I've been going through most of my pics to see if theres anything there to help
The rear pipes on the back of the block do seem to be different depending on the model i.e on my B16 there are four pipes to hook up (fifth being a sender switch which screws in) on my B18 and B20 there are three pipes to hook up with the fourth being the sender switch, hopefully yours is the same as my B16
First up I'm not trying to teach you how to suck eggs here, I don't know how how much you know so I'll just throw most of it in here

Ok, the coolant flow is a bit different here to say a mini, the thermostat is in the LOWER hose and not the top, so make sure you got the right hose running to the rad

Don't ask me why the thermostat is in the lower hose, it just is!
 This means before the thermostat is ready to be opened the coolant is just sitting around the block/head and comes out into the top hose of the rad sits in there doing squat and then out the bottom hose and stops at the thermostat, then it opens and all the coolant then flows as opposed to something like a mini where it only enters the top hose of the rad after the thermostat has opened, with these hondas its already sitting there in the top and bottom hoses, so if your thinking of splicing a water temp sender in the top hose then don't
One of you mini heater pipes goes from the matrix to the heater pipe just to the right of the top hose on the head
The other pipe (with the heater valve) goes from the matrix to the back of the block next to the small right angle pipe (so with the bonnet up its the second pipe on the right)
The other outlet (next one along) is the 'loop' pipe which needs to be cut down depending on clearance, this goes from the block to the inlet manifold
The other one (largest one) is obviously the lower hose pipe
The optional pipe is either blanked off from the factory or not, on my B16 there is a hole, on my B18 and B20 they both cast blanked, I'm either gonna help or hinder you now so hopefully not the latter!
The 'breather' pipe from the top of the rocker needs to errrm breathe, DO NOT block this pipe off! Put a small filter on it
The underside of the above breather pipe has two ends which connects up different depending on your model, on my B16
Heres the breather pipe
A goes to the smallest pipe next to the oil breather box, next to the two larger pipes
B goes to the small pipe directly under the dizzy
In action!


So on mine its just a pipe from the optional pipe (back of the block) to the back of the top hose as you can see here, number 13 pipe to number 10
http://www.hondaorig...;block_03=10900
On my B18/B20 that optional pipe on the back of the block has no hole, neither is there a hole on the back of the top hose so it needs to be hooked up differently, so in this case it goes from the inlet to the bottom of the throttle body, pipe 8 to 9
http://www.hondaorig...;block_03=19763
You should be able to find your donor car on that website above if you do a manual search, but hopefully you got an idea of how it hooks up
Edited by Kam, 31 July 2011 - 01:10 AM.
#100
paul190181
-
- Members
-
- 193 posts
Mini Mad
Posted 31 July 2011 - 09:54 AM
Cheers kam those pics are a great help
#101
paul190181
-
- Members
-
- 193 posts
Mini Mad
Posted 14 August 2011 - 06:22 PM
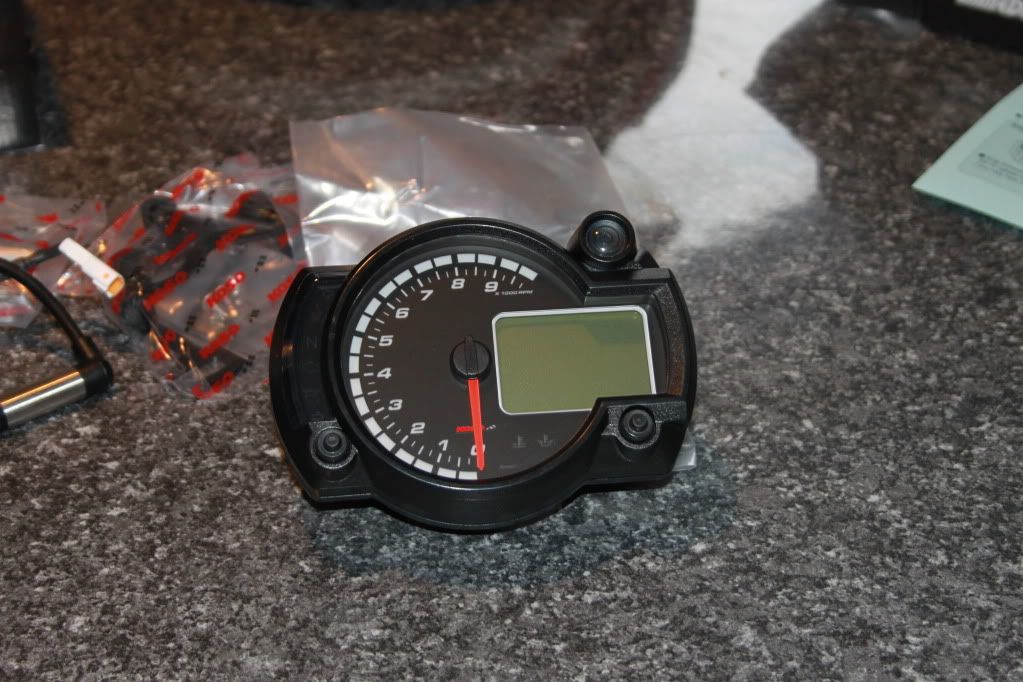
Well ive been to mini in the park today and got my wheels and my spedo , still awaiting on the front coilovers to arive , but ive been told this week , im now going to atempt the wiring of the car this week if i get a spare day or 2 ,
#102
aaronbrown8520
-

- Noobies
-
- 47 posts
On The Road
- Local Club: robin hood mini club
Posted 15 August 2011 - 01:19 AM
hi iv been looking thought your pictures your mini looks ike its coming on well im wanting to put this engine into my mini but i wanted to be cheeky and as how much did you pay for all the parts, so i know how much i will be looking at to get this done ?? Aaron
im wanting to put this engine into my mini but i wanted to be cheeky and as how much did you pay for all the parts, so i know how much i will be looking at to get this done ?? Aaron
#103
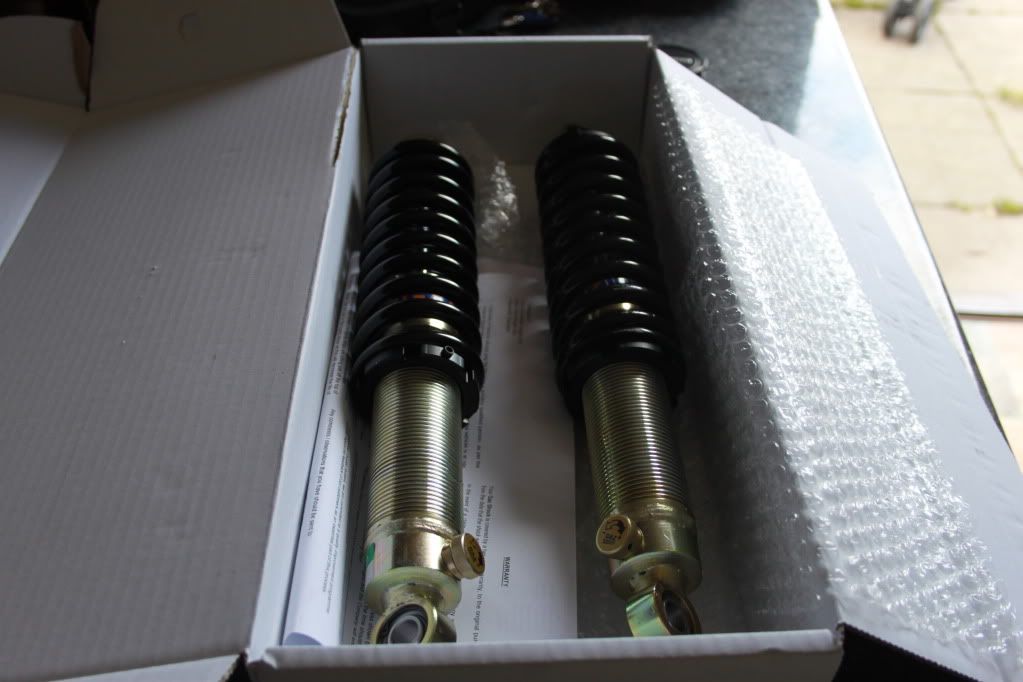
paul190181
-
- Members
-
- 193 posts
Mini Mad
Posted 16 August 2011 - 08:04 PM
My coilovers finaly arived today and looks like they should fit nicely , with a little modification ,
#104
Dannnn
-

- Noobies
-
- 62 posts
Stage One Kit Fitted
Posted 16 August 2011 - 09:14 PM
Loving the work so far! those coilovers look lovely! and what spedo is that?
#105
Kam
-
- TMF+ Member
-
- 4,144 posts
Straight to the Point
- Location: Hampshire
- Local Club: 16vMini club
Posted 17 August 2011 - 08:47 AM
Looking good Paul
Whats up with the coilovers then? are they not playing ball?
Whats up with the coilovers then? are they not playing ball?


1 user(s) are reading this topic
0 members, 1 guests, 0 anonymous users


