doooohhhhhhhhhhhhhhhhhhhhh!!!!
Think i am going to be splashing out on another seal awwwwwwwww
shiiiiiiiiiiiiiiiiiiiiii*****e

HUGE project near compleation....WAHOO!
Started by
philly c
, Feb 08 2006 06:13 PM
76 replies to this topic
#47

philly c
-
- Members
-

- 316 posts
Speeding Along Now
Posted 17 July 2006 - 08:18 PM
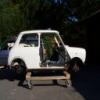
The roof liner is in and all finished!
Its almost perfect but two of the steep angles at the rear have very small ripples in them but i dont think i can get it much better that it is and i have stuck it all in now too.
The job wasnt hard just frustraiting. A well deserved session in the pub went down after we finished.A few large portions were had but was well worth it!!

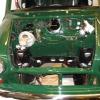
Fitted the quick release engine mounts which were a bit of a pain to fit and will only make taking the engine out easy and quick as appose the to putting it back in.lining up the holes wasnt such an easy job >
here are a few pics of the enngine goin in....


I am thinking of fitting a differant engine stabalizer something a bit tougher what are your thoughts peeps?
Cheers
Phil
Its almost perfect but two of the steep angles at the rear have very small ripples in them but i dont think i can get it much better that it is and i have stuck it all in now too.
The job wasnt hard just frustraiting. A well deserved session in the pub went down after we finished.A few large portions were had but was well worth it!!
Fitted the quick release engine mounts which were a bit of a pain to fit and will only make taking the engine out easy and quick as appose the to putting it back in.lining up the holes wasnt such an easy job >
here are a few pics of the enngine goin in....
I am thinking of fitting a differant engine stabalizer something a bit tougher what are your thoughts peeps?
Cheers
Phil
#48
MikeyB
-
- Noobies
-
- 65 posts
Stage One Kit Fitted
- Location: West Midlands
Posted 18 July 2006 - 08:36 PM
Hi very nice project u got going there just like to ask you a question where did you get your air intake from on your bonnet
#49
philly c
-
- Members
-
- 316 posts
Speeding Along Now
Posted 18 July 2006 - 09:09 PM
Alright MikeyB
Cheers its getting there. The air intake is a subaru bonnet vent. I cant remeber where i got it from now but most modification shops stock them. try here...
http://cgi.ebay.co.u...1QQcmdZViewItem
I simply cut out two sections in the bonnet and then pop riverted the air intake to the bonnet and finished it all off with some filler work
Hope this helps
#50
Mincento
-

- Members
-
- 443 posts
Speeding Along Now
- Location: Stoke-On-Trent
Posted 19 July 2006 - 12:20 AM
Looking good the body AND engine bay look tidy which makes a change from many which just look reasonable on the outside
The headling and windows are some of the hardest jobs IMO and doing it with a cage in place must be even harder :'(
wayne
The headling and windows are some of the hardest jobs IMO and doing it with a cage in place must be even harder :'(
wayne
#51
philly c
-
- Members
-
- 316 posts
Speeding Along Now
Posted 19 July 2006 - 08:37 AM
Thanks for the comments guys!!
Really makes it feel worth while.The head lining was a pain, and suprizingly the cage didnt cause too many probblems as i didnt put any foam above it to allow a nive gap.
It was trickey in various places such as the center of the car on either sides as a result of the cage but wasnt as bad as i thought.
Think i was expecting the worst!
The worst part of the liner was ensuring i didnt pull it too and and mantaining the tension whilst trying to glue it.
You would have the center looking perfect then the sides wouldny be right.Was a case of making sure all the rods were in the middle correctly glueing the front then working your way back pulling constantly from the back to make it all taught and then pulling the sides and slowly sticking them working yur way to the back of the car.
Glad i worked from the front to the back as when in the car its important that the front is as perfect as you can get as thats whet you will have to look at all the time!.
#52
philly c
-
- Members
-
- 316 posts
Speeding Along Now
Posted 09 August 2006 - 08:57 AM
Hey all
Hope everyone is keeping well!
Just a little question for you all...Has anyone bought a stailess steel rad bracket?
If you have did you have the bend it to the same shape as your old brackets as i have received myne and it appears flat and c urrently doesnt fit at all.....
Any help at all would be most apriciated!
Many Thanks
Phil
#53
camp freddy
-

- TMF+ Member
-
- 3,696 posts
Definitely Not Camp Or A Freddy
- Local Club: Wreake Mini Wanderers
Posted 22 August 2006 - 10:02 PM
window rubbers.
starting at the bottom ( centre )feed the window rubber around the window aperture
and knock into corners,at the joint cut the rubber about 10mm too big , pull out about
200mm of rubber from the frame ,join the two ends together then feed the rubber back
onto the frame.
to fit the glass, generously spray the rubber with a soapy water solution
then lower one corner of the glass into the rubber and slide the other down the opposite
rubber channel and into the other corner, then make sure the glass has bedded into the
bottom channel, using a rounded off screwdriver ( and ensuring rubber is still well soaped up )
push the screwdriver between the glass and rubber then work the rubber round
the glass ( do the sides first then the top)
using a proper window mastic apply mastic around the outside of the rubber ( top and sides )
and around the glass ( sides and bottom ) then spray the wedge channel with wd40 and
starting at top centre feed in wedge ( you may need a wedging tool for this) when fed in
cut a bit longer and feed in.
#54
philly c
-
- Members
-
- 316 posts
Speeding Along Now
Posted 23 August 2006 - 09:33 AM
cheers camp freddy!
I will have a whirl at that tonight.
Latest updates....
Pictures yet to come but i have had her running and have bought another load of parts including a quick shift gear lever.
Has anyone got a non genuine KAD quick shift gear lever and had a few fitting problems?
I hear that you have to sand the nylon ball slightly if you struggle to get it to select 3rd and 4th??
Any ideas peeps?
Shall post some pics of the current state of play...its getting closer and closer to being finished though!!!!!
#55
neil_g
-
- Members
-
- 880 posts
One Carb Or Two?
Posted 23 August 2006 - 12:44 PM
tip - dont use soapy water as it contains salt (bad).
use a silicone lubricant..
use a silicone lubricant..
#56
camp freddy
-
- TMF+ Member
-
- 3,696 posts
Definitely Not Camp Or A Freddy
- Local Club: Wreake Mini Wanderers
Posted 23 August 2006 - 08:46 PM
tip - dont use soapy water as it contains salt (bad).
use a silicone lubricant..
We use a liquid soap at work when we fit windows in the mini coach conversions,
and we don't have any problems. I'll check to see what type of soap it is
#57
philly c
-
- Members
-
- 316 posts
Speeding Along Now
Posted 03 September 2006 - 12:55 PM
Has anyone got a non genuine KAD quick shift gear lever and had a few fitting problems?
#58
clubman katie B.F
-

- TMF+ Member
-
- 1,524 posts
Camshaft & Stage Two Head
Posted 03 September 2006 - 01:15 PM
not had one myself...but do know of several people who have bought them and had nightmares fitting them...guessworks had a thread on this somewhere...he ended up sending it back
#59
philly c
-
- Members
-
- 316 posts
Speeding Along Now
Posted 04 September 2006 - 10:00 AM
cheers katie
I hear that you have to use wet and dry to wear the nylon ball a bit so that selecting 3rd and 4th doesnt become a problem
I hear that you have to use wet and dry to wear the nylon ball a bit so that selecting 3rd and 4th doesnt become a problem
Edited by philly c, 04 September 2006 - 10:02 AM.
#60
minivanman
-

- TMF+ Member
-
- 3,454 posts
Up Into Fourth
- Local Club: Backstreet Minis
Posted 04 September 2006 - 04:46 PM
yes... I had problems with one.  ing thing. just send it back and either go back to standard, or bite the bullet and get a proper KAD one. Its just not worth the hastle IMHO.
ing thing. just send it back and either go back to standard, or bite the bullet and get a proper KAD one. Its just not worth the hastle IMHO.


2 user(s) are reading this topic
0 members, 2 guests, 0 anonymous users


