Jump to content


Photo
- - - - -

Aussie Clubby


  • Please log in to reply
73 replies to this topic

#46 buddylove

buddylove

    Camshaft & Stage Two Head

  • TMF+ Member
  • PipPipPipPipPipPipPipPip
  • 1,640 posts
  • Location: North America
  • Local Club: SAMOA

Posted 09 November 2013 - 11:23 AM

03/12/2012


No pics today, I will try to get some later today when I head over to Chuck's.
 
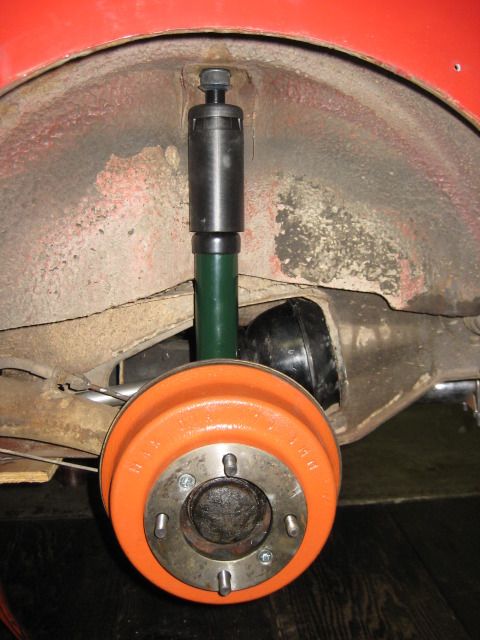
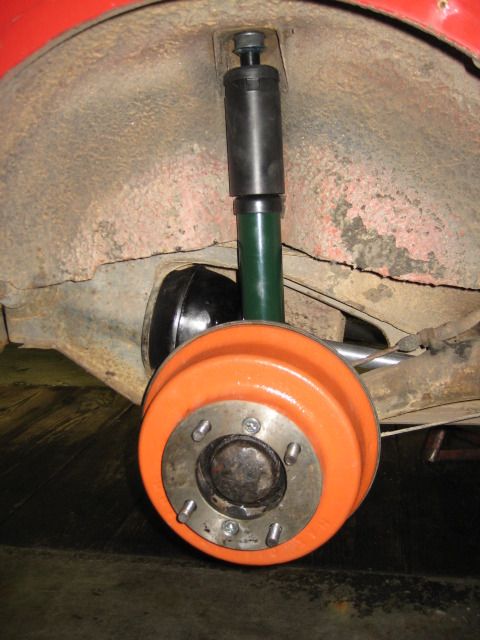
When I got to Chuck's (I dropped off the car Friday afternoon so it would be dry.), he had already finished the rear suspension (gah!).  I guess he gets bored...  He had both rear hi-lo's, cones, and shocks on.  He said that one of the shock absorbers had given him some grief so he ended up having to cut the top off.  They were all seized up anyways.  
 
Note to self:  When ordering new suspension, don't forget to order knuckle joints!  Ya, I forgot...  Thankfully Chuck has some decent spares laying around.
 
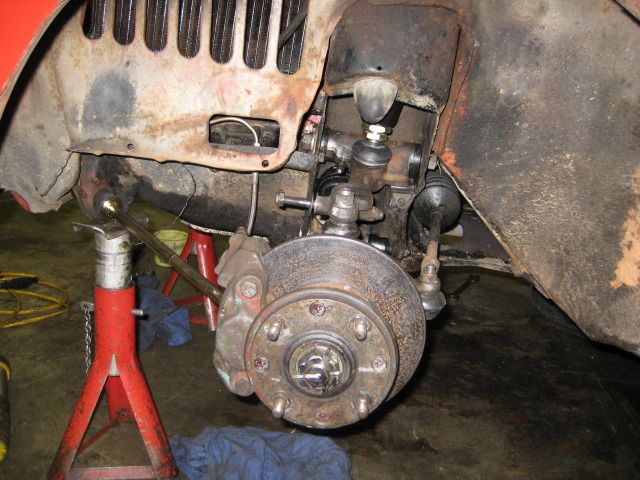
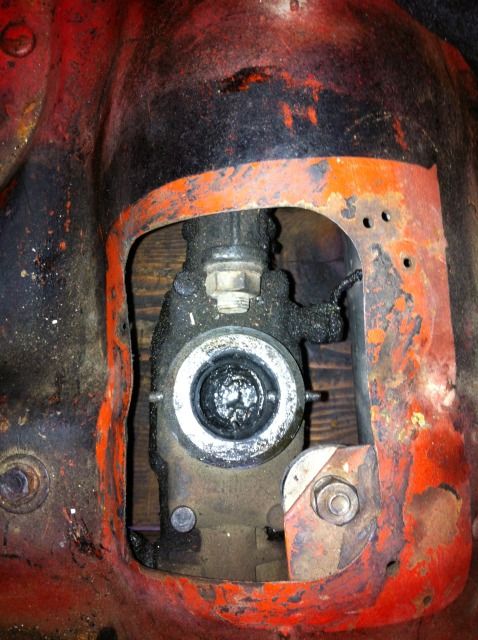
So, I got to work on the front suspension while Chuck ran some errands.  We decidede to pull everything out including the driveshafts for easier working.  The passenger side came out fine, but the driverside ball joint didn't want to be split.
 
Lunch time...  We had some Thai food from a local restaurant, it was pretty good.  :P
 
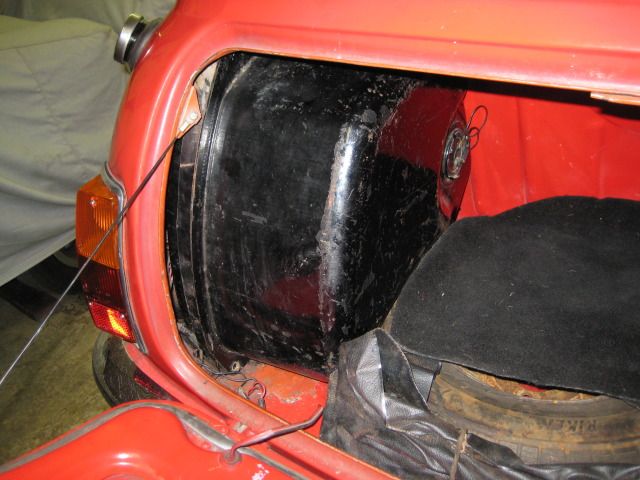
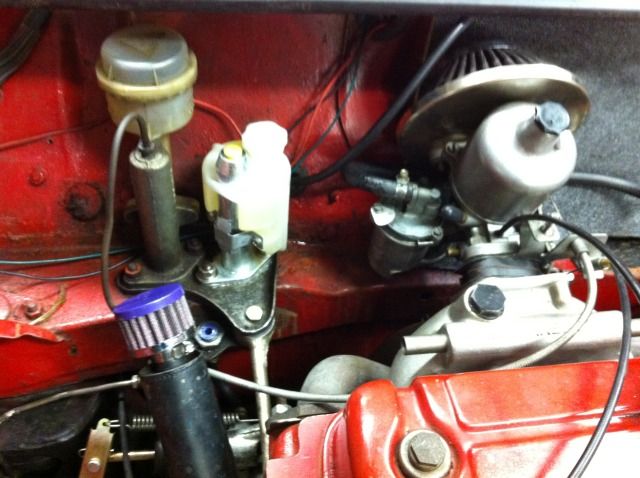
Once we got back, I set to work on the front again.  Removed the bonnet and started getting the upper arms ready to come out.  Chuck was able to get the driver side lower ball joint to split, so all of that was pulled out.  He then set to work on putting in the new to me 9 gallon tank (looking forward to fewer fill ups) and adjusting the rear drums.
 
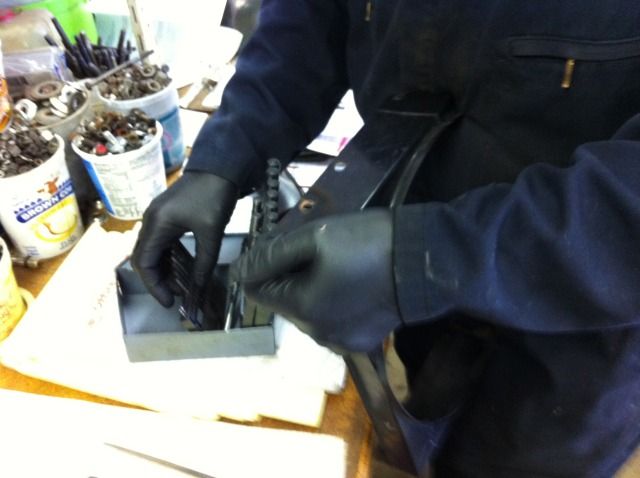
Once, I finished getting the upper arms ready to come out, we checked to see if the cone compression tool was going to thread into the rubber cones fine.  It turns out that the cones threads were pretty screwed up (they are new, I might add) and the tool didn't want to thread in too nicely.  We went on a hunt for a 14mm tap, but we had no such luck other then there being one in a $80 kit from Harbor Freight.  So, we went back to Chuck's and got the cutting oil out and set to trying to rethread them with the tool.  After some time spent, we were able to get the threads mostly fixed on one of them.  Chuck had a mildly genius idea of correcting the top of it by slightly drilling into it.  It ended up working!  Hopefully today, we can get to buttoning up the front suspension.


#47 buddylove

buddylove

    Camshaft & Stage Two Head

  • TMF+ Member
  • PipPipPipPipPipPipPipPip
  • 1,640 posts
  • Location: North America
  • Local Club: SAMOA

Posted 09 November 2013 - 11:23 AM

3/21/2012


Pics from the other day.  Hoping to be able to wrap it up this weekend.  I also picked up some -1.5 rear camber brackets.
 
Rear setup.  you can see the new cone, hi-lo bar, and Spax shock.
 
IMG_5973.jpg
 
IMG_5975.jpg
 
 
9 Gallon tank, maybe I'll repaint it in the future...
 
IMG_5974.jpg
 
Speaking of which, I'll need to find a new spare...  My spare is a super old riveted steel wheel.  It won't work with the 7.5" disc setup.
 
Front Suspension.  You can't see the adjustable lower arm or new cone.  The Spax shock hadn't been installed yet.
 
IMG_5976.jpg


#48 buddylove

buddylove

    Camshaft & Stage Two Head

  • TMF+ Member
  • PipPipPipPipPipPipPipPip
  • 1,640 posts
  • Location: North America
  • Local Club: SAMOA

Posted 09 November 2013 - 11:24 AM

03/26/2012


So, I have been a little vacant from this forum for a few days.  It's because the Mini is driving me nuts!
 
Saturday, I went down to Chuck's.  I played "Supervisor" while Chuck was performing a check out on a Mini.  Once that was complete, I got to work on the clutch assembly in the car.  Chuck was working on removing the radiator, so that we could replace the speedo cable.  It wasn't long before Lisa swung by and told me play time was over.  So, I finished up and left for the day.
 
Sunday, the clutch assembly was still giving us grief.  The clevis pin did not want to come out of the fork and clutch pedal.  The speedometer cable was replaced and the radiator was put back in, along with a good used fan from Chuck's magic shelves.  We knew that the old fan had some clearance issues so, we tried to correct it while we were in there.  We put in a different spacer setup for the fan and put everything back together.  We thought that it had enough clearance, but on start up and it very noisily hitting something.  So, the radiator shroud came back out and we notched it to see if we could get more clearance.  After that, it went back in, but it ended up hitting again.  When we initially took it out, there were manifold washers on the bottom bracket to push it up, but we had no idea why they were down there.  We still think that they were unnecessary.
 
Today, Chuck set to work on the clutch assembly and finally got it apart by dremeling off the fork and removing the brake and clutch pedals.  The new master cylinder is now in place and ready to bleed.  I took the radiator out completely today and tried to reset it up.  After assembly and further messing about with it, the fan is still hitting.  We will see how tomorrow goes, the radiator might be coming out again.  Thanks to Chuck again, for keeping the progress going, without his knowledge I have no idea where I would be right now.
 
 
The clutch pedal to the left is the one that caused the issue.  You can see the clevin pin setup in the brake pedal.
 
 
IMG_0305.jpg
 
 
The master cylinder (one on the right) that doesn't want to be removed.
 
 
IMG_0306.jpg
 
 
Radiator out:
 
 
IMG_0307.jpg
 
 
New speedo cable in:
 
 
IMG_0308.jpg
 
 
Fuel line re-run and breather hose in:
 
 
IMG_0309.jpg
 
 
Getting ready to modify the radiator shroud:
 
 
IMG_0310.jpg
 
 
New clutch master in, yay!:
 
 
IMG_0312.jpg


#49 buddylove

buddylove

    Camshaft & Stage Two Head

  • TMF+ Member
  • PipPipPipPipPipPipPipPip
  • 1,640 posts
  • Location: North America
  • Local Club: SAMOA

Posted 09 November 2013 - 11:25 AM

03/28/2012


Thanks, ya.  I told him I wanted a gunmetal color and he showed me some brackets that he had for you.  I am looking forward to running them, I still need to order tires for them though.  
 
The Mini is back home.  The clutch master has been bled, and the catch point has been adjusted.  The clutch feels a lot snappier now, as there was probably air in the lines from the leaking master.  The speedo is still not working, I think its because they cheaped out with the new cable.  It is more of an oval shape where it goes into the transmission instead of the old square peg design.  The diameter was the same, so we decided to try it.  Chuck said that he has run into that issue before.  The radiator is in and there is no more squeeling.  It ended up being a bolt head on the bottom brack scraping against one of the pulleys.  Chuck already set the camber and toe so I can drive it a bit.  I am hoping that the suspension settles quite a bit as it is too high right now and the front hilo's are all the way down.  In terms of driving, with the new suspension and clutch master, it is way more enjoyable to drive.  I just wish I had a speedometer.  
 
I am still a bit iffy on taking it to the PT Cruise, but it would be fun to bring it.


#50 buddylove

buddylove

    Camshaft & Stage Two Head

  • TMF+ Member
  • PipPipPipPipPipPipPipPip
  • 1,640 posts
  • Location: North America
  • Local Club: SAMOA

Posted 09 November 2013 - 11:26 AM

04/10/2012


So, last Thursday, I drove the Mini to work.  It did ok, but it was doing it's whole die when coming to a stop thing...  I was getting decent at giving it a bit of a rev before it came to a stop, so it would keep running.  After I got home from work, I was going to take the Mini to the gym, but it had other plans.  About a block and a half from my house, I came up to a stop, it died like normal, but this time it kept dieing on start up.  I took it back home and drove another car to the gym.  
 
Saturday, I dropped off the Mini so that I could work on it on Monday.  Chuck got bored or something and had it fixed pretty quickly.  It was idling too low and running too lean.  The weird part is that the exhaust would pop when going down a hill in 2nd gear, which made me think that it was running too rich.  Acceleration is much smoother now and it doesn't die at stops.  The main issue is that the idle screw doesn't have a spring to keep it in position, so it keeps going out of adjustment.  It is a part I am going to look into trying to source.
 
Yesterday's project was the shifter assembly / rod change setup, it has been super sloppy for awhile now.  We first pulled the shifter out to compare it against other ones, but the only thing we found was that the spring in it seemed a bit soft.  Next up, we inspected the interesting home made mount setup for the rod change, one of the mounts was pretty shot.  The final part we inspected was the rod change coupler, and it was the worst that Chuck has ever seen.  We replaced the rod change coupler with a good used item and replaced the mounts that they had on their home made setup with rear exhaust mounts.  The car shifts a whole lot nicer now and you actually feel like you can find the gears now.
 
IMG_0316.jpg
 
IMG_0317.jpg
 
 
Destroyed coupler, too much play...
 
IMG_0318.jpg
 
Interesting mount setup for the rod change...
 
IMG_0320.jpg
 
New to me coupler...
 
IMG_0322.jpg
 
Roll pins wired in to stiffen it up a bit more.
 
 
Teaser shot of the wheels I got awhile back, some issues are still getting sorted out with the inner spokes.
 
IMG_0315.jpg


#51 buddylove

buddylove

    Camshaft & Stage Two Head

  • TMF+ Member
  • PipPipPipPipPipPipPipPip
  • 1,640 posts
  • Location: North America
  • Local Club: SAMOA

Posted 09 November 2013 - 11:27 AM

05/01/2012


Been awhile since there has been more progress on the Mini.  I dropped off my wheels awhile back at Fine Tuning to get the tires switched over, hopefully they get time to switch them over in the next week or so.  I just placed an order that I hope is my last one for a good long while.
 
 
42H1116
ROD CHANGE EYE BOLT SLEEVE
1
Ł23.30
 
 
RPS1416
ROD CHANGE ROLL PIN
2
Ł1.80
 
 
SIB110
TIME CLOCK GAUGE
1
Ł46.31
 
TIM007
VOLTMETER GAUGE BY TIM
1
Ł16.50
 
 
TIM014
TACHOMETER SMALL 52mm FACE GAUGE BY TIM
2
Ł63.76
 
 
MSSK001
GEARBOX STABILISER L/H KIT
1
Ł15.67
 
 
SIB130
WATER AND OIL DUAL SMITHS GAUGE
2
Ł135.64
 
 
GEX9007
EXHAUST U BOLT CLAMP 1 3/4" 45mm
1
Ł0.67
 
 
PM05
SPEEDO CENTRAL CLOCK WIRING HARNESS
1
Ł27.00
 
 
GTS104
THERMOSTAT 82 DEGREE
1
Ł2.59
 
 
GWP134
WATER PUMP LARGE CAST IMPELLOR
1
Ł13.91
 
 
88G221
HEATER TAP GASKET
1
Ł0.41
 
 
C-AJJ1572
TRACK ROD END LONGER TYPE
2
Ł11.90
 
 
GSV1118MS
SUSPENSION KNUCKLE JOINT
2
Ł5.40
 
 
14A9942
GAITER RING FOR REMOTE CHANGE
1
Ł9.78
 
 
12G2453
RADIATOR TOP BRACKET 1275GT ONLY
1
Ł7.15
 
 
2A180
HEATER VALVE BLANKING PLATE FOR CYLINDER HEAD
1
Ł2.75
 
 
22A608
GEAR LEVER RUBBER GAITER REMOTE TYPE
1
Ł23.65
 
 
21A1882MS
LOWER ARM BUSH UPGRADE BLACK POLY TYPE
1
Ł1.30
 
 
TE5
TEMPERATURE GAUGE ADAPTOR
2
Ł9.76
 
 
DAM3022
GAITER FOR ROD CHANGE SEAL
1
Ł1.95
 
 
C-ARA4442
RADIATOR UNIT HI PERFORMANCE 2 CORE SUPER RADIATOR
1
Ł93.80
 
 
GUG705009VC
GASKET ROCKER COVER EXCEPT 11 STUD HEAD
1
Ł1.10
 
 
MSSK
GEARBOX STABILISER R/H KIT
1
Ł14.46
 
 
12G103FK
MINI THERMOSTAT HOUSING FITTING KIT (SINGLE TIER TYPE)
1
Ł3.35
 
 
GWP134FK
WATER PUMP FITTING KIT FOR GWP134 AND GWP132
1
Ł8.00


#52 buddylove

buddylove

    Camshaft & Stage Two Head

  • TMF+ Member
  • PipPipPipPipPipPipPipPip
  • 1,640 posts
  • Location: North America
  • Local Club: SAMOA

Posted 09 November 2013 - 11:27 AM

05/09/2012


Got the wheels mounted on the Mini and balanced by Dependable Wheel Repair.  They were only able to balance the fronts because of how much wobble they were getting the rear.  I am hoping that I won't get too much shake on the freeway.  Also, they had to balance them on the car because their machine couldn't fit the wheels due to the rear spoke design.  Les Schwab couldn't balance them off the car either.  Thanks to Rabbit 16v for getting them mounted up!
 
Unfortunately they also had to put the weights on the front side of the rim due to the design of it.
 
DSC_0004.jpg
 
DSC_0006.jpg


#53 rally515

rally515

    Up Into Fourth

  • Members
  • PipPipPipPipPipPipPipPipPip
  • 3,848 posts
  • Location: ask!

Posted 09 November 2013 - 05:43 PM

Looks lovely mate, shame about the wheels being so complex, but look good none the less, can't you brush abit of paint onto the weights to blend them in colour wise ?


Cheers,

Cliff


#54 buddylove

buddylove

    Camshaft & Stage Two Head

  • TMF+ Member
  • PipPipPipPipPipPipPipPip
  • 1,640 posts
  • Location: North America
  • Local Club: SAMOA

Posted 09 November 2013 - 09:45 PM

Looks lovely mate, shame about the wheels being so complex, but look good none the less, can't you brush abit of paint onto the weights to blend them in colour wise ?
 
Cheers,
Cliff


Thanks! I was going to look into trying to colour match them, but I am not planning on keeping them on the car. Major plans have changed for it, so I am going to get wheels that fit in more with that style.

#55 rally515

rally515

    Up Into Fourth

  • Members
  • PipPipPipPipPipPipPipPipPip
  • 3,848 posts
  • Location: ask!

Posted 09 November 2013 - 09:48 PM


Looks lovely mate, shame about the wheels being so complex, but look good none the less, can't you brush abit of paint onto the weights to blend them in colour wise ?
 
Cheers,
Cliff


Thanks! I was going to look into trying to colour match them, but I am not planning on keeping them on the car. Major plans have changed for it, so I am going to get wheels that fit in more with that style.


Ahh right, shame, i think they look georgous Buddy, must be hard finding mini stuff in America though right ? or just costly on shipping :blink:


#56 buddylove

buddylove

    Camshaft & Stage Two Head

  • TMF+ Member
  • PipPipPipPipPipPipPipPip
  • 1,640 posts
  • Location: North America
  • Local Club: SAMOA

Posted 09 November 2013 - 11:15 PM

Looks lovely mate, shame about the wheels being so complex, but look good none the less, can't you brush abit of paint onto the weights to blend them in colour wise ?
 
Cheers,
Cliff


Thanks! I was going to look into trying to colour match them, but I am not planning on keeping them on the car. Major plans have changed for it, so I am going to get wheels that fit in more with that style.
 
 
Ahh right, shame, i think they look georgous Buddy, must be hard finding mini stuff in America though right ? or just costly on shipping :blink:

Definitely more difficult finding used stuff over here. For the new stuff, the local mini suppliers are 2 to 3 times the cost of Minispares. I just make sure to buy as much stuff in bulk from Minispares to maximize how much I have to pay for shipping.

#57 buddylove

buddylove

    Camshaft & Stage Two Head

  • TMF+ Member
  • PipPipPipPipPipPipPipPip
  • 1,640 posts
  • Location: North America
  • Local Club: SAMOA

Posted 10 November 2013 - 06:05 AM

05/23/2012


So, I spent the last couple of afternoons at Chuck's.  We installed the following"
 
New Super 2 Core Radiator
New to me aka from that magic shelves: Tropical Fan
New central mount speedometer cable
New 82 degree thermostat.
 
    We had some leaks from the housing as it didn't seem to be in the best of shape.  We swapped out the paper gasket for a cork casket and minimized the leaking.  I am hoping that it stops all together, or we will need to swap out the housing.
 
New water pump
New remote shift boot setup
Set the valves, put a new cork gasket on the valve cover.
Swapped out the heater valve setup for a blanking plate, as I have no heater.
Installed a weather shield to protect the distributor, plug wires, and coil.
 
IMG_0337.jpg
 
IMG_0338.jpg
 
IMG_0339.jpg
 
Next to do, install the center speedo pod, speedometer (once it comes in), dual water temp/oil pressure gauge, volt meter, and tach.


#58 buddylove

buddylove

    Camshaft & Stage Two Head

  • TMF+ Member
  • PipPipPipPipPipPipPipPip
  • 1,640 posts
  • Location: North America
  • Local Club: SAMOA

Posted 10 November 2013 - 06:07 AM

06/13/2012


Changed the roof color a few days ago and took a few photos today.  We are planning a lot of changes in the Mini over the next year, as I am building it up as a memorial.
 
DSC_0023.jpg
 
DSC_0024.jpg
 
DSC_0025.jpg


#59 buddylove

buddylove

    Camshaft & Stage Two Head

  • TMF+ Member
  • PipPipPipPipPipPipPipPip
  • 1,640 posts
  • Location: North America
  • Local Club: SAMOA

Posted 10 November 2013 - 06:08 AM

07/20/2012


Order from OZ was finally settled:
 
Used parts:
 
– Pair of Window Winders 
– Interior Door latch trim both doors 
– Pair of Interior Door Latches 
– Pair of Exterior Door Latches 
– Rear view Mirror 
– Used Front Indicator Lenses 
– Pair of Clubman front bumper underriders 
– Bonnet Clasp 
 
 
New parts:
 
1/4 window seals x 2 
Inner felt seals x 2
Outer seal x 2
Bailey channel x 2
1/4 glass flat rubber x 2
 
 
Not a whole lot of parts, but the biggest order dollar wise so far.  The window seals almost doubled the cost of the order.  The seals are Australian specific to my car, so I had no other place to buy them from.


#60 buddylove

buddylove

    Camshaft & Stage Two Head

  • TMF+ Member
  • PipPipPipPipPipPipPipPip
  • 1,640 posts
  • Location: North America
  • Local Club: SAMOA

Posted 10 November 2013 - 06:09 AM

10/04/2012


It's been a pretty long time since I have done much with the Mini, other then driving it and checking up on general maintenance items.
 
Today, I installed 2 lower engine steadies.  It just had one up top, and good engine mounts.  The new lower engine steadies, will take some pressure off those as well as off the rod change system.
 
Engine steadies:
 
IMG_5995.jpg
 
One of the spots, that we installed them on.  The only real modification is drilling a hole on the left and right side of the subframe.  
 
IMG_5996.jpg
 
Engine steadies hanging from their new mounts.
 
IMG_5997.jpg
 
Engine steadies installed.
 
IMG_5998.jpg
 
IMG_5999.jpg


1 user(s) are reading this topic

0 members, 1 guests, 0 anonymous users