
You paid 30 quid for that rear bench! I suppose everyone loves a good rip every now and then!


'92 City E - Mk1 Fraudster - Attempt To Shine (16/05/16)
Started by
The Otter
, Mar 08 2012 05:38 PM
297 replies to this topic
#212
: post #212")
The Otter
-
- Members
-

- 620 posts
The artist formally known as j322overthetop
- Location: Midlands
Posted 31 March 2013 - 04:51 PM
I was thinking the other day that now I have lowered shocks to complement my HiLos, why haven't I lowered it yet? So one evening last week I got it as low it will go just out of interest.


Admittedly it's not that low compared to some, but I just wanted to see what it looked like - it drives worse like this anyway and I don't like it when the rear is lower than the front, so I'll raise it up again soon!
That is all
Admittedly it's not that low compared to some, but I just wanted to see what it looked like - it drives worse like this anyway and I don't like it when the rear is lower than the front, so I'll raise it up again soon!
That is all
#213
JollyMole
-
- Members
-
- 153 posts
Mini Mad
- Location: Newcastle
- Local Club: Tynemouth MiniClub
Posted 01 April 2013 - 12:24 PM
Still looking lovely mate. :) think you've convinced me for putting some wind deflectors on, I quite fancy Cooper S door surround chrome too, think it'd look the mutts nuts with wind deflectors on too.
Mine's nearing completion now, got electrics to do and then carpets, front seats and dash and she'll be getting MOT'd. Can't wait.
Mine's nearing completion now, got electrics to do and then carpets, front seats and dash and she'll be getting MOT'd. Can't wait.
#214
The Otter
-
- Members
-
- 620 posts
The artist formally known as j322overthetop
- Location: Midlands
Posted 18 April 2013 - 12:13 AM
Still looking lovely mate. :) think you've convinced me for putting some wind deflectors on, I quite fancy Cooper S door surround chrome too, think it'd look the mutts nuts with wind deflectors on too.
Mine's nearing completion now, got electrics to do and then carpets, front seats and dash and she'll be getting MOT'd. Can't wait.
Cheers buddy, yeah wind deflectors are a handy thing to have, means you can drive with the window down a bit, get some fresh air in the car, and not be buffeted in the face, or drive in the rain and not get wet! As for the door surrounds, I've always liked the idea of them and if I ever switched my rear windows to opening ones (so with the chrome finish) then I'd definitely think about doing the door surrounds to match.
It does sound like you're getting close! Any more progress since you posted this? (Delayed response I know, sorry
 )
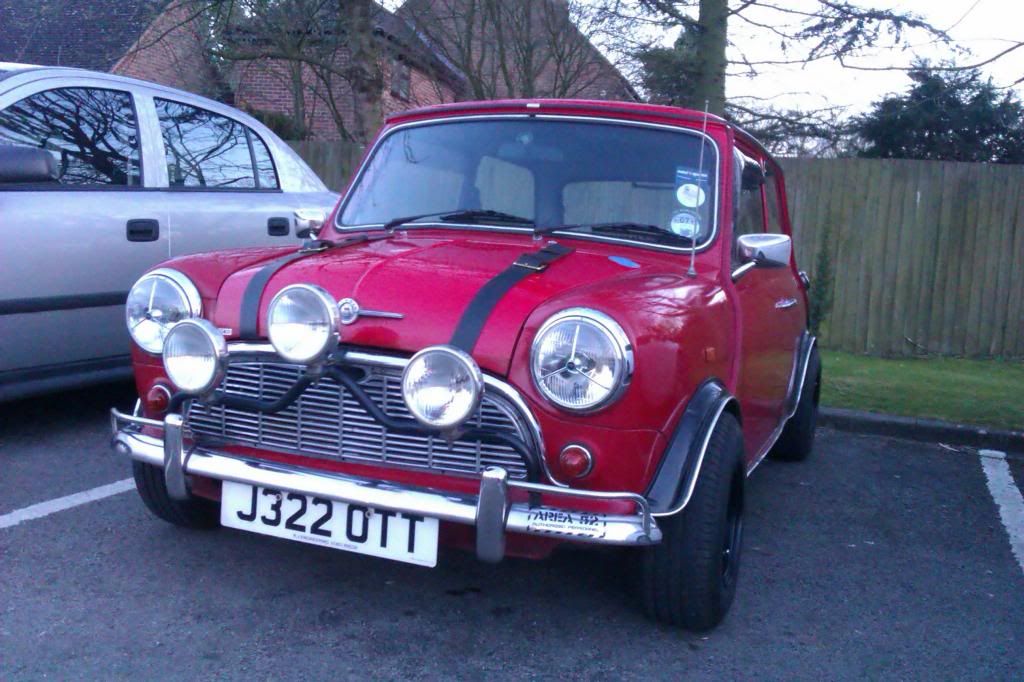
)Right, a couple of little changes to the car - the grille and door cards. I did a swaps deal with a member on here, my Morris Cooper grille for an original pressed Morris grille, some door cards and door pockets. I haven't got any pictures of the door cards, but they're just generic black with a red piping strip going across the middle (Flame Red ones I think - matches the rear bench!), but they're much much nicer than the door cards I had in there before - standard City E cards that had been covered in black vinyl up front and grey vinyl in the rear...
 Still haven't gotten round to getting the pockets on yet.
Anyway, here's a picture of the car today after I gave it a quick wash, which shows the new (old) grille. I also took the fogs off for summer, and took the hub caps off for a bit of a change, along with raising the ride height a bit to try and get some handling/comfort back!

It doesn't look as 'nice' as my old one, but I do think it suits the car better and looks more 'old' if that makes sense to anyone
I have been toying with the idea of painting it satin black, mostly because I really liked the look I had when the grille muff was on for winter, sort of the black centre with the chrome moustache being highlighted. Might post up a photoshop request or something...Now that the weather has decided to be a bit more summery, I also want to get my Wellers back on, but I was a bit bored of the grey I had them in last year. Hence, a respray was in order, this time in satin black.
Firstly peeled off the red and blue stripes, then took them outside for a good clean and then piled them in the garage ready to be prepped. (This shot also shows a bit of the progress I've made with the 1275 with my new engine crane and stand, but I want to start a new thread specifically for that, but whenever I can be bothered to start it is anyones guess
 )
)
Started by rubbing down a few bubbles of rust and bad paint.

Then gave the whole wheel a going over with some wire wool to scuff up the surface, and masked it all off.

Then got busy with the primer and paint.

Should look pretty cool on the car I reckon...

With all the trimmings. A bit blurry, but you get the idea

Hopefully I'll get these on the car in the next few days, might post up another pic or two then, if it looks any good that is!
Thanks for reading.
The Otter
#215
steven
-

- Banned from Buying/Selling
-
- 1,195 posts
One Carb Or Two?
- Location: Uk
Posted 18 April 2013 - 09:57 AM
the grill looks sweet ! nice job on the wellers to
#216
leaky
-

- TMF+ Member
-
- 6,890 posts
Iv never hit a penguin in the face with a casserole
- Location: Costa Del Tadley
- Local Club: Basingstoke Mini Club
Posted 18 April 2013 - 10:05 AM
Wheels look good man! I need to paint up my motorsport wellers and get them back on the clubby.
#217
veigalane
-
- Noobies
-
- 77 posts
Stage One Kit Fitted
- Location: Birmigham
Posted 18 April 2013 - 12:36 PM
want to paint my wellers for me? :)
#218
The Otter
-
- Members
-
- 620 posts
The artist formally known as j322overthetop
- Location: Midlands
Posted 18 April 2013 - 09:18 PM
the grill looks sweet ! nice job on the wellers to
Thanks, hopefully the wheels will work nicely when they're on and I'm glad someone else likes the grille too! I was worried I'd be the only one and that everyone else would abuse me for getting rid of a nice shiny grille for this one
Wheels look good man! I need to paint up my motorsport wellers and get them back on the clubby.
Cheers leaky! You do need to paint them up and get them on, Wellers are obviously the best wheel ever
Got any colours in mind yet?want to paint my wellers for me? :)
Trust me my painting skills aren't that great haha, the photos must be flattering! I'd gladly help you out, but London for me is a bit of a journey just to paint some wheels! It's not that hard to give something a new lick of paint with some rattle cans, there's plenty of DIY guides for doing simple paint jobs out there on the internet - just get stuck in and you might surprise yourself

Also, if anyone is reading this and is interested in seeing the progress on my 1275, I've started a new thread for it right here --> http://www.theminifo...my-1275-engine/ - not much there at the moment, but it'll grow over time and hopefully teach me, and others, a few things about engines and engine building

#219
The Otter
-
- Members
-
- 620 posts
The artist formally known as j322overthetop
- Location: Midlands
Posted 21 April 2013 - 12:06 AM
I fitted my adjustable lower arms today, they'd been sitting in the garage for almost two years, so thought I might as well get them on!

I did have quite a bit of trouble, firstly getting the pivot pins out of the subframe, then getting the arms off the pins, and then on one of the pins, getting the metal insert of the old bush off of the pin, where it had separated from the rubber and rusted itself to the pin

I had to cut through and chisel open the metal part of the old bush, then finally prised it free with some mole grips.


I got my Wellers back on as well. Mmm, yes, I do likey my Wellers...
Can't wait to get the adjustable suspension set up, get a bit of camber on there

I did have quite a bit of trouble, firstly getting the pivot pins out of the subframe, then getting the arms off the pins, and then on one of the pins, getting the metal insert of the old bush off of the pin, where it had separated from the rubber and rusted itself to the pin

I had to cut through and chisel open the metal part of the old bush, then finally prised it free with some mole grips.


I got my Wellers back on as well. Mmm, yes, I do likey my Wellers...

Can't wait to get the adjustable suspension set up, get a bit of camber on there
#220
silve1999
-

- Traders
-
- 1,146 posts
One Carb Or Two?
- Location: Sussex
- Local Club: MiniFreakz, Brighton Mini Club
Posted 21 April 2013 - 08:46 AM
I like it
do you know the code for the paint?? same colour as my city and I need a respray :)
do you know the code for the paint?? same colour as my city and I need a respray :)
#221
The Otter
-
- Members
-
- 620 posts
The artist formally known as j322overthetop
- Location: Midlands
Posted 28 April 2013 - 11:37 AM
I like it
do you know the code for the paint?? same colour as my city and I need a respray :)
COF I believe, Google seems to agree with me 
#222
rob963
-
- Just Joined
-
- 350 posts
Speeding Along Now
- Location: Bristol
Posted 29 April 2013 - 12:01 PM
looking nice with the wellers and arches again, nice job on painting them up 
surprised that you havent done a 'I've got huge camber' pic for the hell of it 
#223
leaky
-
- TMF+ Member
-
- 6,890 posts
Iv never hit a penguin in the face with a casserole
- Location: Costa Del Tadley
- Local Club: Basingstoke Mini Club
Posted 29 April 2013 - 05:21 PM
I expect mine will just to black again but the old owner did it with out any prep so the paint looked naff.
#224
Archived4
-
- Archived
-
- 822 posts
One Carb Or Two?
Posted 30 April 2013 - 09:56 PM
Awesome. Love this!! Inspiration for my project!
#225
The Otter
-
- Members
-
- 620 posts
The artist formally known as j322overthetop
- Location: Midlands
Posted 31 May 2013 - 10:44 PM
Nice to see there's still people interested in my ramblings, cheers Smiler 
An update here about suspensioney goodness.
A few weeks ago, I received a package...


The final piece of my suspension set up, for full adjustableness 

Lovely looking stuff, much better quality than the Minispares brackets I'd previously bought!
However, when I came to fit them I stumbled upon a rather ironic problem - they didn't fit. They weren't even close to fitting! I'd just paid £130 for a pair of CNC machined KAD brackets (with an awesome reputation) and they didn't even fit! Here's a comparison to my standard radius arm brackets.

As you may be able to imagine I was pretty annoyed at this, and after realising they just weren't going to go on, I sent KAD an angry e-mail an left them for a week before coming back to try again. In that time I had a think, and had realised that it had to be my subframe that was wrong, as KAD wouldn't have the reputation they have by selling expensive things that don't fit!
I remembered that I was once told by my local Mini specialist that my rear subframe was most likely a pattern part replacement put on a few years ago, and that it was most likely a really badly made subframe causing my problems. But of course this didn't help my situation of having brackets that don't fit... so of course I had to file open the holes on them, and ended up making such a hideous mutation of the beautiful brackets I started with that I couldn't bring myself to photograph them for you 
So anyway, I got them fitted fine in the end, and got myself booked in to Slark Race Engineering to pay a man with expensive equipment that knows what he's doing to set up my suspension for me! The following photos show the set up process. From what I remember, the rears were set to about 0.5 degrees negative camber and a little bit of toe in, and the fronts were set to 1.5 degrees negative camber, 6 degrees castor, and I got bored by the time he came to set up the front toe (took about 5 hours to set the whole car up) so I have no idea what that's at  I was advised to set the rear ride height about 2mm higher than the front, so I did that before I made the trip to Slarks. Now it handles incredibly, and I thought it gripped well before! It's so much better now! Anyway, pictures...


Oh yeah, I booked myself and rob963 in for the same day, he got his car set up on the rolling road on the other side of the wall

A couple of days later I fitted some black vinyl leatherette rear arch covers, one of the last grey interior things left that I needed to change to black!

Then when I was out driving I fancied pulling over and taking some pictures of the new "stance" 


Ready for the L2B now me thinks See some of you there tomorrow and Sunday!
Thanks for reading!
The Otter


0 user(s) are reading this topic
0 members, 0 guests, 0 anonymous users


