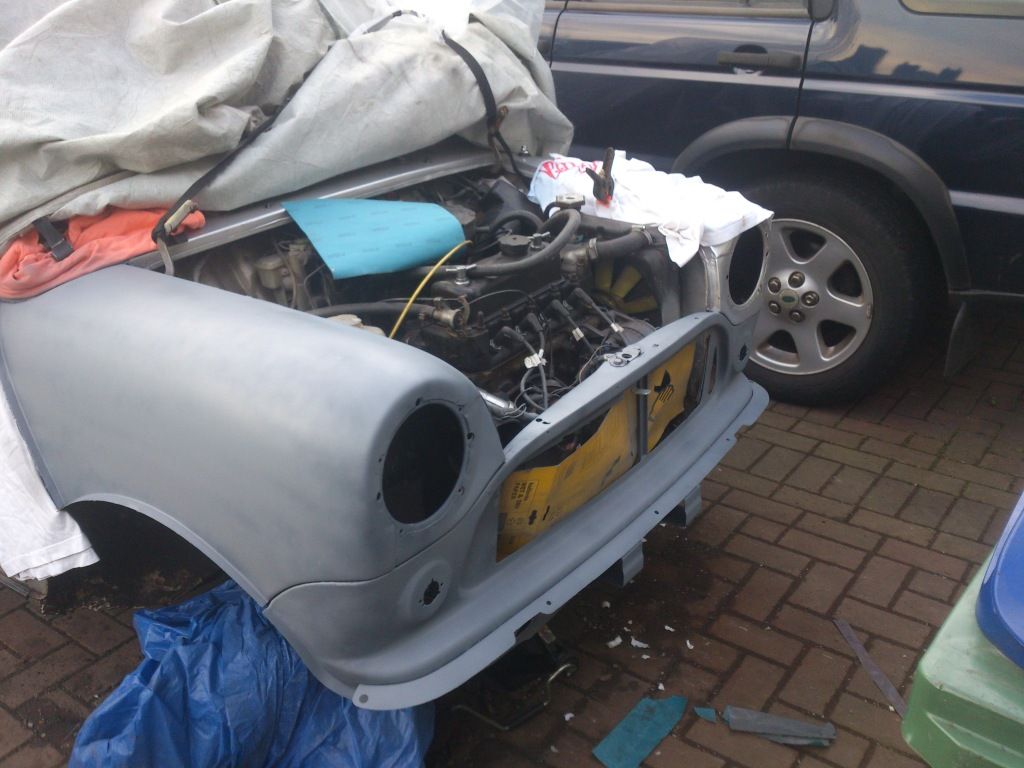
Right come to fitting new front panel and drivers wing
They are pattern parts but there is a big gap up by the scuttle
Like nowhere near right!!

My Poor Mini
Started by
Chance
, Sep 26 2012 02:31 PM
52 replies to this topic
#31

Chance
-
- Members
-

- 1,457 posts
One Carb Or Two?
- Location: West Midlands
Posted 06 October 2012 - 01:26 PM
#32
minidaves
-

- Traders
-
- 4,933 posts
Up Into Fourth
- Location: kent
- Local Club: mine
Posted 06 October 2012 - 02:39 PM
yeah self tapping screws and a bit of pushing and tapping should close the gap up. i always sort the scuttle gap first with the bonnet edge then ajust the rest to fit.
#33
Shifty
-

- Admin
-
- 13,129 posts
Sponsored by Fosters (tm)
- Name: Sean
- Location: Shropshire(sunny)
- Local Club: TMF
Posted 06 October 2012 - 02:45 PM
Yeah, they take some tapping and messing around with, the first time you offer them up they always look like they'll never fit.
Usually..
-The return lip on the wing(where it welds to the inner wing) is too big and causes the wing to sit further out, grind it back till the wing to bonnet gap is right(don't take too much off!!)
-The return lip by the scuttle fouls on the scuttle causing a big gap, gently bend/tap/grind it back until it clears and the gap is nice.
They take an age to get right, I've done a few and allow a days worth of messing around before I even get to weld it on.
Daves right with the self tapping screws, use them to temporarily hold it in place, you'll also need a shedload of mole grips.
Good luck
#34
tiger99
-

- Members
-
- 8,584 posts
Crazy About Mini's
- Location: Hemel Hempstead
Posted 06 October 2012 - 06:49 PM
Many came out of the factory with poor gaps at the scuttle, obviously using genuine panels. It seemed to me that by 1984 the press tooling was worn out, as my 1962 van and 1976 saloon had quite tight gaps, both seam sealed, while the 1984 had very wide gaps, left open. (By the way they don't seem to rust any more, possibly less, if left open, provided all the metal is painted properly, as water drains right through instead of lying about on top of possibly cracked sealant.) It seemed that the radius of the wing edge was too tight, so it touched the scuttle at both ends but nowhere near in the middle. Or, of course, and perhaps more likely, the radius of the scuttle was too large.
#35
Chance
-
- Members
-
- 1,457 posts
One Carb Or Two?
- Location: West Midlands
Posted 06 October 2012 - 07:08 PM
Tiger thats what it's like, touches at both ends which has created a gap in the middle, mines an 85 but dont know if it was original stuff anyway, the old fit was good to be fair.
Thanks for the tips guys :) Ive got to finish getting it all lined up tomorrow after a lot of messing today, I'm enjoying it
Thanks for the tips guys :) Ive got to finish getting it all lined up tomorrow after a lot of messing today, I'm enjoying it
#36
cradley-heathen
-

- Traders
-
- 2,481 posts
Metro-Man
- Location: have a guess?
- Local Club: spearmint rhino
Posted 06 October 2012 - 07:20 PM
i have only just seen this mate, what have you done to my paint! lol
do you want me to pop up and give you a hand to get it lined up? you have got my number, give me a text if you do.
you will at least have new wings now! dont forget i have got loads of paint for this if you want it too.
do you want me to pop up and give you a hand to get it lined up? you have got my number, give me a text if you do.
you will at least have new wings now! dont forget i have got loads of paint for this if you want it too.
#37
Chance
-
- Members
-
- 1,457 posts
One Carb Or Two?
- Location: West Midlands
Posted 06 October 2012 - 07:29 PM
I know mate
I felt so bad
I was gonna text you for a hand but didnt want to bother you again, must be sick of the sight of it now!!
I have managed to change just the front panel and drivers wing, probably wouldnt be suggested but mainly for speed as I need it for work and everything else!!
I felt so bad
I was gonna text you for a hand but didnt want to bother you again, must be sick of the sight of it now!!
I have managed to change just the front panel and drivers wing, probably wouldnt be suggested but mainly for speed as I need it for work and everything else!!
#38
cradley-heathen
-
- Traders
-
- 2,481 posts
Metro-Man
- Location: have a guess?
- Local Club: spearmint rhino
Posted 07 October 2012 - 09:53 AM
dont worry about it dude. if you need a hand or some pointers just text me.
#39
Chance
-
- Members
-
- 1,457 posts
One Carb Or Two?
- Location: West Midlands
Posted 09 October 2012 - 04:53 PM
Well I went ahead and got all the panels on
The seams arent too bad but I understand some of you guys use abit of seam sealer to seal them??
Whats best to buy?? ( best = cheap but good )
Ive got to use the car regardless now for work, ive painted the panels and I might laquer it today but to use the sealer id have to undo my painting I suppose??
#40
alex-95
-

- TMF+ Member
-
- 6,017 posts
I am THE CLAMP MAKER
- Location: l
Posted 09 October 2012 - 04:57 PM
Look's good chance, I'm not too sure on the seam sealer but I think most people use tiger seal? I would have thought that you would need to wire brush the seams.
#41
Chance
-
- Members
-
- 1,457 posts
One Carb Or Two?
- Location: West Midlands
Posted 09 October 2012 - 05:08 PM
Thanks mate
Well ideally I would have done it before paint and painted over it but I just need to use the car now havent got a choice kind of thing
Well ideally I would have done it before paint and painted over it but I just need to use the car now havent got a choice kind of thing
Edited by Chance, 09 October 2012 - 05:13 PM.
#42
tiger99
-
- Members
-
- 8,584 posts
Crazy About Mini's
- Location: Hemel Hempstead
Posted 10 October 2012 - 10:09 AM
Before you use the seam sealer, run as much thinned zinc primer as possible into the seams, or spray with a rattle can from very close range, masking the other paintwork. Repeat a few times. When you are sure that you have as much zinc as possible in there, then you can seal them.
#43
Chance
-
- Members
-
- 1,457 posts
One Carb Or Two?
- Location: West Midlands
Posted 10 October 2012 - 06:08 PM
Before you use the seam sealer, run as much thinned zinc primer as possible into the seams, or spray with a rattle can from very close range, masking the other paintwork. Repeat a few times. When you are sure that you have as much zinc as possible in there, then you can seal them.
Thanks for the tip :) will make sure I get something in there :)
#44
0138dave
-

- Noobies
-
- 190 posts
Mini Mad
- Location: dudley
- Local Club: west mids minis,tmf+
Posted 10 October 2012 - 06:37 PM
Is it all back in 1 peace now then mate?
#45
Scorp
-

- Members
-
- 319 posts
Speeding Along Now
- Location: Preston
Posted 10 October 2012 - 10:30 PM
this is brilliant how in 2 weeks you have a new front on, keep it up!!


0 user(s) are reading this topic
0 members, 0 guests, 0 anonymous users


