Jump to content


Photo
- - - - -

Gearbox Stabiliser (R/h Kit) And Original Front Stabiliser Incompatibility?

engine

  • Please log in to reply
14 replies to this topic

#1 Jamieboy

Jamieboy

    Stage One Kit Fitted

  • Noobies
  • PipPipPip
  • 60 posts

Posted 15 June 2013 - 10:45 PM

I've bought a Mini Spares Gearbox stabiliser (R/H Kit) and was in the process of fitting it today when I discovered that the frontmost of the mounting bolts it needs is currently occupied by the existing front bellhousing to subframe original bracket.


Attached File  minispares.jpg   25.38K   10 downloads


(In reality, the kit mounts facing the other way to the photo, according to the instructions, so the hole in question is in the upper-left of this photo, confusingly)


The bolt position which appears on the left of this picture is the one in question (not my photo!)


Attached File  stabiliser.jpg   50.76K   20 downloads


If the new bracket were to be put behind the existing one, then this factory-fitted stabiliser bar, which goes to the front subframe, would then be placed at an angle and if the new bracket were placed on top then the same wold be true of the new bar.


I suppose the 3rd bolt hole on the new bracket is not needed, but I am wondering if anyone fitted this without chopping it down?


Many thanks,


Jamie


#2 Ethel

Ethel

    ..is NOT a girl!

  • TMF Team
  • PipPipPipPipPipPipPipPipPipPipPip
  • 25,379 posts
  • Local Club: none

Posted 16 June 2013 - 12:45 AM

There looks to be scope for some bending & flattening of the new bracket around the front hole. You could add a washer(s) to pack out the non overlapping bolts on one of the brackets, consider if longer bolts are needed too.

SNV32536.jpg


#3 tiger99

tiger99

    Crazy About Mini's

  • Members
  • PipPipPipPipPipPipPipPipPipPip
  • 8,584 posts
  • Location: Hemel Hempstead

Posted 16 June 2013 - 08:16 AM

What is the point of fitting two stabiliser bars to effectively the same point? It can bring no possible improvement that would not be obtained by fitting harder or poly bushes in the original.


Long ago, BL abandoned the rear facing stabilisers for very good reasons.


#4 Jamieboy

Jamieboy

    Stage One Kit Fitted

  • Noobies
  • PipPipPip
  • 60 posts

Posted 16 June 2013 - 10:10 AM

There looks to be scope for some bending & flattening of the new bracket around the front hole. You could add a washer(s) to pack out the non overlapping bolts on one of the brackets, consider if longer bolts are needed too.
SNV32536.jpg


Thanks for the reply, I didn't consider bending the new bracket. I think that this is the best approach as packing the other mounting points will move the stabiliser nearer the subframe leg.

I'll post my results

J

#5 Jamieboy

Jamieboy

    Stage One Kit Fitted

  • Noobies
  • PipPipPip
  • 60 posts

Posted 16 June 2013 - 10:10 AM

What is the point of fitting two stabiliser bars to effectively the same point? It can bring no possible improvement that would not be obtained by fitting harder or poly bushes in the original.
 
Long ago, BL abandoned the rear facing stabilisers for very good reasons.

How can reducing the count of anchoring points, on what is undeniably a poorly dampened engine (even for standard tune), have any 'very good reasons' concerned with it?

I think you'll find that even when poly bushes are fitted to the original front stabiliser that there is still a fair degree of pitching and torsional movement of the engine under acceleration and gearchange due to the mounting angle and position of that stabilizer and yes my engine mounts and driving style are fine.

Fitting the rear-facing items will undoubtedly aid in dampening this unwanted movement due to the increased number of anchored dampening points.

Edited by Jamieboy, 16 June 2013 - 10:12 AM.


#6 A-Cell

A-Cell

    Camshaft & Stage Two Head

  • Members
  • PipPipPipPipPipPipPipPip
  • 1,610 posts
  • Location: Longbridge

Posted 16 June 2013 - 10:37 AM

You could just cut off the lug in question on the new bracket and go with 2 fixings for it. Better may be to swap it for a LH bracket MSSK001.

#7 Jamieboy

Jamieboy

    Stage One Kit Fitted

  • Noobies
  • PipPipPip
  • 60 posts

Posted 16 June 2013 - 10:46 AM

You could just cut off the lug in question on the new bracket and go with 2 fixings for it. Better may be to swap it for a LH bracket MSSK001.

This my initial thought too - it has 2 mounting points already. I think what I'll do is bend it, see how it lines up and if there is a problem then I will remove the offending section from the new bracket.

I actually have a MSSK001 L/H item for the other side :)

Thanks,

J

Edited by Jamieboy, 16 June 2013 - 10:48 AM.


#8 Ethel

Ethel

    ..is NOT a girl!

  • TMF Team
  • PipPipPipPipPipPipPipPipPipPipPip
  • 25,379 posts
  • Local Club: none

Posted 16 June 2013 - 11:20 AM

More stabilisers on more attachment points spreads the load, the upper mount has a habit of breaking its mountings. I reckon the issue with the rear facing ones is they attach much closer to the driveshaft / diff axis: the source of the reaction forces they are fitted to contain. The shorter leverage will mean the upper bar still does the majority of the work. The front facing version is about as far away as the bulkhead at the subframe end, but doesn't look to line up very well with the applied torque - though god knows how the engine mountings affect that.


I made up a solid arm in sheet steel that bolts onto the radiator / engine mounting bracket and the front subframe member via a couple of tie rod bushes.


#9 Jamieboy

Jamieboy

    Stage One Kit Fitted

  • Noobies
  • PipPipPip
  • 60 posts

Posted 17 June 2013 - 06:50 AM

A quick update on this:


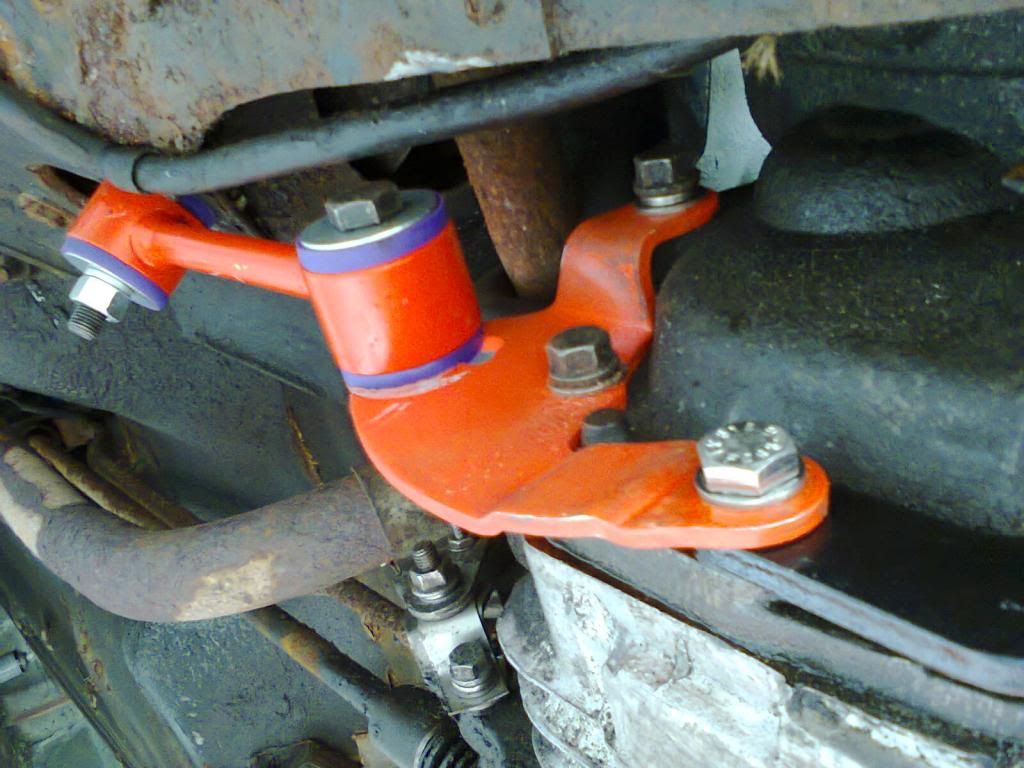
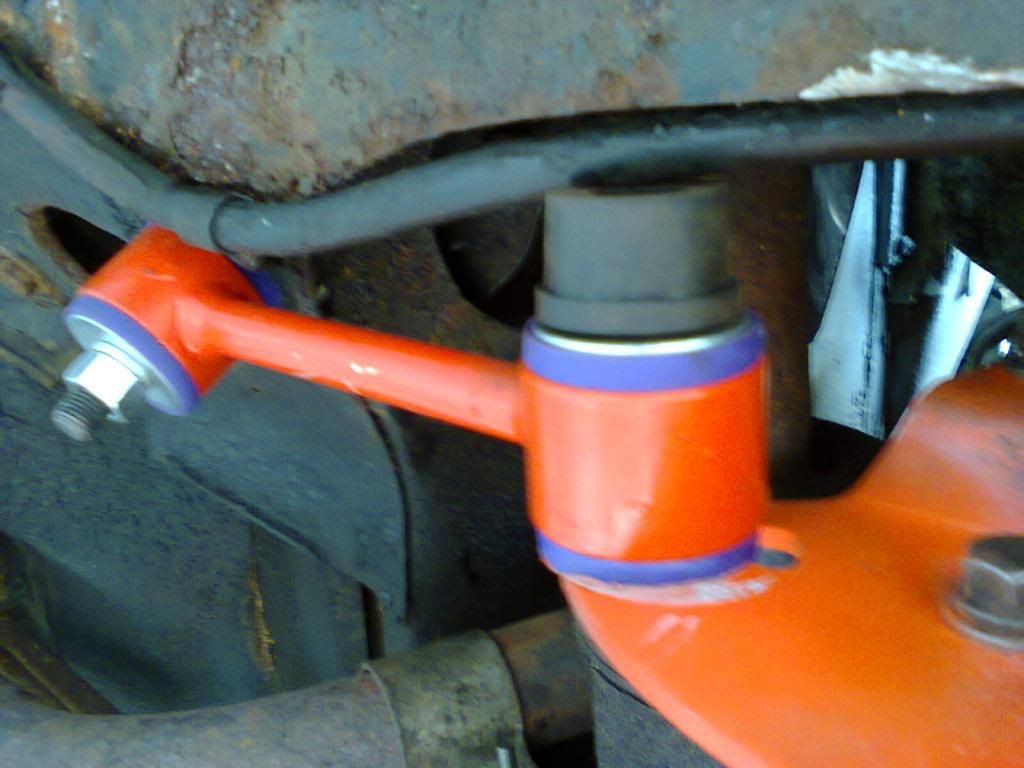
I've bent the new bracket as Ethel suggested; there are existing bends in the bracket which I used to bend the bracket out then back to parallel where it passes over the original item. After doing so, there was a need to enlarge the holes in the new bracket to ~11mm to allow all 3 bolts to line-up. Be warned, the thickness of the new over old bracket means that the 5/16 UNC which passes through both brackets no longer engages the gearbox as it did with only the original, and I managed to strip the thread seeing as I had put a plain and shakeproof washer. I took off both and managed to grab a couple of threads and did not tighten it much at all. The other bolts all tightened up fine. Also to note is that if you remove all 5 bolts at the same time, then it appears that the engine starts to cry a bit of oil from somewhere in this area...


I have ordered a  5/16 x 1¼" UNC to replace the standard and aptly-named DAM7756, which is 1 1/16" long. This will mean that I've got ~4.7mm (in new money) to play with-  ~4mm for the new bracket and 0.7mm which can be taken up with a shakeproof washer.


There is an added complication, in that when the new stabiliser bar was offered up and the site for the hole that is to go in the rear subframe leg was surveyed, it seems that the bar is about 5mm too short to reach a point which would allow a nut to be placed on the opposite side. Looking at the other side, where the L/H MSSK001 kit will go, there is already a hole there where I've read that the L/H stabiliser bolts through.


I think the reason for this is that the kit was designed using dimensions not for a later 1275cc, which has the engine mounted slightly further forward. Why there couldn't be a longer slotted section on the bracket, to cater for all options, is beyond me. I plan to elongate the slot slightly (in-situ using a Dremel and tungsten carbide bit), to see if I can generate the extra reach that way (although the slot ends pretty close to the edge of the bracket), or otherwise I will need to buy an adjustable/correct length stabiliser bar.


At this point I downed tools as my willpower was at rock-bottom.


I will update once the job is complete.


#10 Jamieboy

Jamieboy

    Stage One Kit Fitted

  • Noobies
  • PipPipPip
  • 60 posts

Posted 22 June 2013 - 11:02 PM

I got the stabiliser installation completed today by elongating the slot on the mounting bracket so it left about 5mm of material only:


Photo0017_zps7a0a3871.jpg


In this picture you can also see the 5/16 x 1¼" UNC bolt, described previously, which passes though both steady bar mounting brackets. The hole in the subframe was made using the factory one on the other subframe leg as a guide.


Lastly, I used one of the standard bushes, which was supplied with the kit (I used poly items on the bar instead) to prevent the 12V cable chaffing on the bolt head. It is a strong interference fit over the bolt head so should not become detatched.


Photo0020_zps0f91694b.jpg


Overall, this is a fairly nice kit but is not, repeat not, a straightforward install on later model 1275cc where the engine is slightly further forward in the subframe! If you plan to fit this I recommend sourcing the longer bolt discussed if you also have the standard-on-most front gearbox to subframe bar where the mounts overlap (I have 5 left over and can supply them - PM if required), I also recommend milling material from the steady bar mounting bracket (elongating the mounting holes would have also been beneficial). A good quality, sharp 10mm drill for the subframe drilling and etch primer, paint and lacquer to protect what looks like a zinc passivated finish (which always rust). 


I will contact  Mini spares to ask them to consider selling 2 variations of this kit - this one and one with a longer steady bar to negate all this extra work!


#11 nev_payne

nev_payne

    Up Into Fourth

  • Members
  • PipPipPipPipPipPipPipPipPip
  • 2,249 posts
  • Location: UK

Posted 24 June 2013 - 01:35 PM


I will contact  Mini spares to ask them to consider selling 2 variations of this kit - this one and one with a longer steady bar to negate all this extra work!


They are already aware of this issue and should have adapted the bracket accordingly for later models - when I fitted mine one back in April last year, my self and Vipernoir had terrible trouble try to lever the mounts into the correct positions without modification. 'Spares were contacted about this and acknowledged this was overlooked.

You can see the stabiliser here, top left of the photo:


IMG_5357_zps88c49d89.png


Edited by nev_payne, 24 June 2013 - 01:36 PM.


#12 Ethel

Ethel

    ..is NOT a girl!

  • TMF Team
  • PipPipPipPipPipPipPipPipPipPipPip
  • 25,379 posts
  • Local Club: none

Posted 24 June 2013 - 02:04 PM

Is that a theatre gown???


I didn't think of the later engine position either  >_<


I wonder if a redesign featuring two holes for the steady bar, or even no hole so you can drill your own, would be the way ahead. You could also make it in two parts, with the shared bolt in a bracket that bolts to the outside of the steady bar, it would just need packing washers then. To modify the current bracket, I'm wondering if a cut 'n shut welding job would be better. You could flip that front lug over to reverse the bend and close up some of the gap.


#13 Jamieboy

Jamieboy

    Stage One Kit Fitted

  • Noobies
  • PipPipPip
  • 60 posts

Posted 25 June 2013 - 06:48 AM

I think it can do no harm to inform them of my woes as well, it may prompt them to modify the design if more people let them know about it.

There are various solutions for this issue - have a bracket with a longer reach for all variants being the most manufacture-friendly. It did cross my mind to cut the bar and extend it but I deemed this to be more work than extending the slot.

The more difficult part for me was getting the overlap with the forward mounting bracket done properly, where a longer bolt should be used/supplied to preserve thread engagement.

#14 jaydee

jaydee

    Crazy About Mini's

  • Members
  • PipPipPipPipPipPipPipPipPipPip
  • 8,565 posts

Posted 25 June 2013 - 08:08 AM

I think the main issue is in those brackets being a copy of the original BMC design, so they're fine for a 998 but on the later 1275 engines that sit forward in the subframe you cant line up the holes.


#15 Jamieboy

Jamieboy

    Stage One Kit Fitted

  • Noobies
  • PipPipPip
  • 60 posts

Posted 26 June 2013 - 04:14 PM

I think the main issue is in those brackets being a copy of the original BMC design, so they're fine for a 998 but on the later 1275 engines that sit forward in the subframe you cant line up the holes.


Absolutely, although I didn't consider that they'd be a pattern-copy of the BMC version.


Also tagged with one or more of these keywords: engine

0 user(s) are reading this topic

0 members, 0 guests, 0 anonymous users