Nice project ! and i love how you transport it ;)
- and same old ugly original yellow color as mine 
cheers, Nino
Edited by Nino, 18 March 2014 - 10:25 AM.


Mini Mad

Posted 09 February 2014 - 12:34 AM
Nice project ! and i love how you transport it ;)
- and same old ugly original yellow color as mine
cheers, Nino
Edited by Nino, 18 March 2014 - 10:25 AM.
One Carb Or Two?
Posted 09 February 2014 - 05:40 PM
Nice project
Mini Mad
Posted 17 March 2014 - 11:50 PM
Looking good :)
Nice project ! and i love hove you transport it ;)
- and same old ugly original yellow color as mine
cheers, Nino
Nice project
Cheers guys. Safe to say, I'm having no problems with hesitation on a colour change! Trying to get some time together to do an update, It will happen but I prefer to spend anytime I have, in the garage, rather than speaking about what I should be doing!
Mini Mad
Posted 18 March 2014 - 12:52 AM
Update! 
I got some goodies!

And straight away, set about getting them cut up and coated with weld through primer on the soon to be concealed surfaces.


And then I got on with the O/S/R heel board and O/S inner sill. So under the first layer of outer sill there was... another sill! What a surprise 

So I got it all cut out and started with cutting, fitting and tacking the inner sill. Followed by plug welding it along the door frame, seam welding the butt joint along the floor, cleaning up the welds with the grinder and a lick of paint to top it off.


Add one jacking point. Although I am welding up the hole in the outer sill I am still welding these in for a bit of extra strength ![=]](https://www.theminiforum.co.uk/forums/public/style_emoticons/default/sideways.gif)

A good dosage of "Kurust" and then I was ready to tackle the heel board and quarter panel.

So plenty of wee holes to deal with.


I seem to be missing photos of in between stages  but oh well I'll post what I have. So on went the heel board repair patch after hours of faffing with a tape measure, pieces of paper with several measurements and lifting the subframe over my head several times... Then I added the repair to the O/S/R quarter panel, the closing panel and a wee repair to the rear arch.


I actually replaced the whole closing panel between the heel board and the front of the rear arch as well as part of the seat base beside it but I can't find the photos for it either 
So now that the rear was all complete I could get on with getting the outer sill prepped, fitted, and welded! So I started by removing all of the rubbish magnum factory paint and painting it with weld through as well as welding up the jacking hole.

And on it went!


Some of my welding is coming along slowlyyyy... Getting fed up of laying a really nice weld on bits that need to be flush or will never be seen though!  Or just laying a really nice weld and then laying some pigeon
  next to it! I'm also finding that I don't move the torch around enough while stitch welding, so something else I need to work on while I'm at it.
All finished and painted, or at least that part anyway... Unfortunately I had ground down the welds on the other outer sill, probably not a bad thing, but I felt I had to grind down this side as well otherwise it would have looked strange... Anyways, no where near as lumpy and bumpy as the other side! Kinda want to go back to all the welding I have already done and do it again!

Now for the rear boot floor! So I started cutting all the other parts out and prepping stuff.


I had originally planned on just using the magnum rear boot floor repair panel for the full width but after ruining one panel and realising it was never going to work I ordered another one, along with both rear corners from MMachine, so I'll do it in three parts.
However, the MMachine panels came with the "reinforcing plate", If you like, spot welded to it. Not a problem really but because I had bought genuine valance closing panels which also came with the reinforcing plates, I wasn't so keen on butchering them. So out came the spot weld drill bit and I cut up the MMachine panel.
Left to right: MMachine rear boot corner panel, MMachine reinforcing plate removed, Heritage valance closing panel assembly.

I then used the removed reinforcing plate with all the drilled holes in it as a template to mark where I would drill the heritage reinforcing plate to plug weld later.

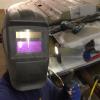
And to finish off I went through my third £15 rubbish Bosch sanding disc holder thingy magig! Fortunately I had my full mask on when it decided to tear itself apart (I may have nibbed a sharp edge...) and launch for my face! Not only would it have been a sore one, I would also have been rendered useless at my work as apparently all I do is reel in the customers with my looks #VSC Full mask all the time from now on!

That's all for now, I'm actually much further ahead than this but I need to get all the photos uploaded first and then find the time to sit down and update this at a sensible time, rather than 1 in the morning  ...
...
To finish off, I found these old wheels, I don't know if they're worth anything or if anyone is looking for these specifically or why two of them have "MOD" on them? But if anyone could enlighten me, it would be much appreciated!


Oh! And if anyone is after one of the metal nut kinda things that hold that bosch thing to the grinder, let me know as I have an ever growing collection!
Mini Mad
Posted 18 March 2014 - 11:54 AM
Woooow. that could have been quite a punch in the face ! thank god for safety ! :)
Lovely job you have done ! :)
- kind regrads Nino
Mini Mad
Posted 23 March 2014 - 08:52 AM
Woooow. that could have been quite a punch in the face ! thank god for safety ! :)
Lovely job you have done ! :)
- kind regrads Nino
Mini Mad
Posted 25 March 2014 - 09:33 AM
I bought these seats and dash for this car but I have decided not to use them in the end as I have other plans so they're up for grabs over on the for sale section! Thought I'd be cheeky and just suggest that they're for sale here as well
http://www.theminifo...very-available/
http://www.theminifo...lack-vinyl-new/


Mini Mad
Posted 25 March 2014 - 10:18 AM
So I carried on with cutting apart the boot floor. So after cutting up and prepping the MMachine boot floor corners, I got them welded in and set about doing the centre piece.

I also cut out a rotten part of the hinge panel to replace, made a panel and welded it in.


Then I trimmed the centre piece and got it welded in!

But I couldnt get the corner to line up

But i got there in the end, sorta... The front of the spare wheel dip if you like was covered in pin holes so I spent an hour trying to weld them up and warping the panel and blowing through it like crazy making a right mess! So I just cut it out and welded a piece in.


I've lost like half of my photos again! Apologies for jumping about the build! From patching the boot floor to completeing the closing panels and valance appears to be missing... but oh well I'll share what I have.


Feel like I'm getting some where now seeing as that's the majority of the floor complete! If I had the time, I'd cut out the whole boot floor and buy one panel and replace it all together but I guess I'll just have to live with a wavy floor! 
So next came the driver's side flitch and hinge panel sorta thing. the hinge panel needed two repairs to start with and the door step also required a panel to be welded in, just at front though. Then the flitch went on with a panel made for a hole at the top, so out came the C.A.D.


So I repaired the hinge panel and then out on a new flitch panel but the photo appears to be missing for that too! So I'll get a full photo today hopefully.
That's all I've got time for just now. Plenty more photos to upload but I'll do that in the next update which will include the roll cage fitment and the door skinning! Or, well, a door frame repair and an attempt at door skinning... But to finish off my new bum savers arrived! Which is why I sold the Cobra's that I bought.

Mini Mad
Posted 25 March 2014 - 07:20 PM
So i decided to have a go at skinning the doors. Tommy popped up and we began by removing the old skin.

But our motivation was short lived as the frame needed quite a bit of work so Tommy let me be to repair the frame work. It wasnt too bad, just need a couple of pieces pieced in along the bottom and a few welds at the bottom of the window frame.


And just as I got going with the repairs, my welder called it a day... So I called up machine mart who then collected it the following day seeing as its still under warranty. In the mean time though, I filled my time with giving the doors a good coating of "Kurust"!

And then I set about making this bad boy with some bits and pieces I had laying around. It's a bit Heath Robinson I know but it does the job brilliantly!

The following week I contacted Machine Mart about my welder where I was told that my welder wouldn't even be looked at for another month! So I had to buy another one to keep me going in the mean time... Fortunately I got a few pennies off because of the inconvenience that they had caused me. So if anyone is looking for a second hand 160TM welder, let me know because I'll have my new one up for grabs in a couple of weeks! Once it arrived, I got it assembled and cracked on!
So basically I lapped the repair piece over the frame and tacked it along the top and then seam welded it underneath along the bend.


And then I got on with repairing the frames.


Prepped the inside of the new skin with weld through primer

Then I tried to skin the doors myself because Tommy wasn't available and I had some spare time. Fair to say, I made a right hash of it! Couldnt get it to line up or anything so one skin ruined and a waste of time! So then I decided that I'll get the paint shop to skin the doors so at least they'll be done properly and be aligned properly. However, I had to buy another skin so I decided just to bite the bullet and buy two genuine skins to try and cut labor time at the paint shop of the guys having to faf around with a rubbish panel.
So on with the next bits!


I know I said the roll cage would be in this update but I haven't got time to write the whole thing up just now so stay tuned! 
Mini Mad
Posted 28 March 2014 - 10:52 PM
Roll cage time! I read the instructions I don't know how many times but I could not, for the life of me, get the whole thing to work together. So I fitted it in a slightly different order and got there in the end.
Started out by laying out the fitting kit and working out what went where. Slight step up from an Ikea DIY fitting kit!

And then after finishing off some welding on the rear inner sill and rear seat, I got it all fitted in to make sure it fitted and then drilled the holes. But before that I made a decision to cut out the rear seat... I had said from the beginning that I wasn't going to do this but I got fed up faffing about with the companion bins in pieces which I spent hours customising to try and fit around the cage but I just kept scratching the cage, so out it came. Quite glad I did now as it means there is more room for some bits and pieces I plan to put in place of the rear seat and it meant I could properly get in to the rear of the inner sill and get them welded up strong! But I can always weld the seat back in if I miss it 


I then removed it and fitted it again with the reinforcement plates to make sure everything lined up. Removed it again and treated all the plates to some weld through primer.

Then I fitted it again so I knew I was tacking the reinforcement plates in the correct places. Removed it agaaaaaaaaain and finally welded the rest of the plates to the car. Some of the welding went really well! And other parts, well, look terrible...  I think I should have had the welder up one more on the power settings


And finished!


In fact I don't think I have the plates welded in in that photo ^ Must have taken it early on.
The only major problem I had was with the fresh air vent for the heater fouling on one of the triangulated subframe bar assemblies. So in the mean time, I just bashed the lip over with a hammer so that it would fit, I'll deal with this later but I am open to any ideas and suggestions!

I also got the inner wings trimmed back ready for the next steps with the front end and started trying to weld up the N/S door frame.


After I finished off those few wee bits, I got the car off the spit on to the wee cart so I could get in and about the boot.

The car came with the larger 7.5 gallon tank, but it was fitted with the 5.5 gallon tank strap and I wasn't totally convinced this was going to hold it in place well enough. So I got the bracket from MMachine and the strap from MiniSpares for the 7.5 gallon tank, got them prepped up, welded on a captive nut and after several measurements of my other mini and trial fitting of the tank I managed to get it in to a position I was happy with, welded it in, job done!


That's all for now, got some exciting things and new bits for the next update!
Learner Driver

Posted 29 March 2014 - 06:49 PM
Looking good so far, keep up the good work. 
Can I ask about how you cut the rear seat down and remove the bins. The reason I ask is because I shall be doing this shortly and have read numerous builds to see exactly how it's done. Unfortunately for some reason they all seem to suddenly appear cut down and finished without any explanation on execution
How is the joint between the seat and the bulkhead finished off ? Have you seam welded right across the car then ground back or just filled the joint with filler and smoothed to close the joint, does the joint even need to be filled ? Hopefully I've explained that properly
Some close up pics would be great and very appreciated if that's possible, thanks 
Mini Mad
Posted 29 March 2014 - 09:20 PM
Looking good so far, keep up the good work.
Can I ask about how you cut the rear seat down and remove the bins. The reason I ask is because I shall be doing this shortly and have read numerous builds to see exactly how it's done. Unfortunately for some reason they all seem to suddenly appear cut down and finished without any explanation on execution
How is the joint between the seat and the bulkhead finished off ? Have you seam welded right across the car then ground back or just filled the joint with filler and smoothed to close the joint, does the joint even need to be filled ? Hopefully I've explained that properly
Some close up pics would be great and very appreciated if that's possible, thanks
Hi mate, sorry for not photographing it step by step, I got so fed up with faffing about with it that I just cut it out without even thinking about taking photos. I will get some more detailed close ups of what I did but it wont be until the end of April... If that's too late for you, pm me and ill explain it as best I can.
Learner Driver
Posted 30 March 2014 - 08:57 AM
Thank you 
In no great rush so whenever is good for you.
One Carb Or Two?
Posted 30 March 2014 - 05:15 PM
Edited by Marco1972, 30 March 2014 - 05:31 PM.
Mini Mad
Posted 30 March 2014 - 09:58 PM
Some nice work going on there
Doing the same boot floor repairs to my lads mini and mine so your pics will be very useful
You wouldn't have the part number and price for those boot floor corners from M Machine ??
Could do with a set of those as they have the strengthening plate attached
Keep up the good work
Mark
Of course!
11.41.00.27 Side Repair Boot Floor LH MK1-5
11.41.00.28 Side Repair Boot Floor RH MK1-5
When I purchased them they were £17.10 each.
I found repairing the floor this way much easier, just wish I had been a bit more patient with the welding so I didn't distort the boot floor so much but it's done now.
Good luck!


0 members, 0 guests, 0 anonymous users


