I just want to clarify that we actually didn't do anything to the VSC mouse. It genuinely did just keel over and die... 


Elliskwleisk - Mk3 Full Nut & Bolt Restoration With Slight Modifications"
Started by
Elliskwleisk
, Jul 22 2013 09:21 AM
155 replies to this topic
#76

Elliskwleisk
-
- Members
-

- 250 posts
Mini Mad
- Location: Scottish Borders
Posted 11 June 2014 - 08:22 PM
#77
Nino
-
- Members
-
- 178 posts
Mini Mad
- Location: Jutland
Posted 11 June 2014 - 10:21 PM
Then lots more goodies arrived!

Hmm Nice ! :)
Does the rear light say Lucas on the glass ?
if so, where did you buy them ? :)
Kind regards Nino :)
#78
Banksy Boy
-

- Noobies
-
- 15 posts
Learner Driver
- Location: Kent
Posted 12 June 2014 - 07:03 AM
Looking good and keep up the good work, light is at the end of the tunnel.
Just to say thanks as well Elliskwleisk with the explanation of the removal of the bins and seat squab. Have now done the job which just needs tidying now, so am very grateful for your pictures and pointers, thanks once again, 
#79
Elliskwleisk
-
- Members
-
- 250 posts
Mini Mad
- Location: Scottish Borders
Posted 12 June 2014 - 08:48 PM
Hmm Nice ! :)
Does the rear light say Lucas on the glass ?
if so, where did you buy them ? :)
Kind regards Nino :)
It doesn't say "Lucas" on the lens but it does say it on the reflector. There is other markings etc on the lens which I tried to take a photo of but it didn't really show up on the photo. However, it is a genuine Lucas part. I'm also not totally convinced that the lens is glass. I think it may be plastic but then it seems too shiny to be plastic? I got them both from minispares, part numbers are: 13H6479 & 13H6480. It doesn't state on their website if they're plastic or glass but I suppose a quick phone call would sort that out. Admittedly I only needed the seal, the lens and the screws but I thought for an extra £20 a side, It was worth renewing the metal body and wiring. ![=]](https://www.theminiforum.co.uk/forums/public/style_emoticons/default/sideways.gif)
Edited by Elliskwleisk, 12 June 2014 - 08:49 PM.
#80
Elliskwleisk
-
- Members
-
- 250 posts
Mini Mad
- Location: Scottish Borders
Posted 12 June 2014 - 08:51 PM
Looking good and keep up the good work, light is at the end of the tunnel.
Just to say thanks as well Elliskwleisk with the explanation of the removal of the bins and seat squab. Have now done the job which just needs tidying now, so am very grateful for your pictures and pointers, thanks once again,
It's nice to see some progress! 
No problem! Happy to help anyone out and it's nice to see people who are interested in doing things the way I do. Makes me feel as if I'm doing something right! 
Have you decided if you're going to fit a cage and if so, which one?
#81
Banksy Boy
-
- Noobies
-
- 15 posts
Learner Driver
- Location: Kent
Posted 13 June 2014 - 10:04 AM
Cage will definitely be going in but the type will ultimately depend on funds.
Am still drawn to the same one you have fitted for the extra protection and the cross over, would also like two horizontal harness bars put in to mount the strapping to so would need to look into that.
#82
Elliskwleisk
-
- Members
-
- 250 posts
Mini Mad
- Location: Scottish Borders
Posted 13 June 2014 - 12:54 PM
Cage will definitely be going in but the type will ultimately depend on funds.
Am still drawn to the same one you have fitted for the extra protection and the cross over, would also like two horizontal harness bars put in to mount the strapping to so would need to look into that.
I'm sure someone will correct me if I am wrong but I think the "Weld in" variant of the cage I have, comes with a horizontal harness bar?
Also, the bolt in cage that I have, does have a harness bar, its just low down. It's the bar that goes between the rear wheel arches.
#83
rodandtom
-
- Members
-
- 998 posts
One Carb Or Two?
- Location: Dover
Posted 13 June 2014 - 03:05 PM
Okay, so I'm finally starting to bolt some things on... I've had enough of cleaning waxoyl, sound proofing and carpeting. I still have practically the whole interior to do, but it can wait because I need to see some visual progress in order to boost my motivation!
So I began by re mortgaging my soul to buy this beastly tap and die set so I could clean paint and crap out of threads for ease of assembly.
Then I got on with fitting the rear subframe and brake pipes. Daphne gave me a hand to lift it on as I decided to fit it while the car was still on the spit. Quite glad I did now because it was a total pain! But, it's done now. I painted the trunnion's black last minute but they don't look the best as I got impatient waiting for them to dry and just fitted them with soft paint.
I also decided to fit uprated bushes while I was at it because any money spent improving handling is money well spent!
So I purchased some of the minispares C-STR638 bushes. Fitted easily with a light coating of polyurethane friendly grease. But, they are purple... Don't know why they are pictured black when they are actually purple
but I'm sure I'll live.
Anyways, so then I ripped open the pre made brake pipe set, cheating, I know, but much more convenient! Or so I thought... I also cleaned up the 3 way union with some gunk, a wire brush, and then cleaned up the threads with a tap.
If you're a fruit like me, then you'll be able to appreciate how beautifully made these brake pipes are. If you're not a fruit, then this build thread probably isn't for you.
And here is an example of what I mean. The flare on the right, is the what I think is a universal flare (if there is such a thing) that came on all the ends of the kit. Whereas the flare on the left is one that I did and is known as an operation 1.
Then I came across the next problem. The "convenient" pre made brake pipe set, was actually more hassle than it was worth!
So you can see here that both of these pipes are far too long.
So I trimmed them down, put the correct flare on the end, and got it all looking sexy.
Then lots more goodies arrived!
I also decided to splash out on a selection of fastners because I was fed up of not having the right stuff. Couple hundred squids later and I've got a nice selection of metric, UNF, UNC, high tensile and stainless A2 and A4 grade!
Next, I decided to bite a bit more of the waxoyl cleaning, sound proofing and carpeting malarkey and tackled the C Pillars.
Then, to mix things up a bit, my absolute plonker of a brother decided to break the 200 year old front door knob. Guess who was expected to pick it up off the floor and fix it...
So a quick mod later for a wee grub screw and we were back in action!
So the next job was all the bits that go along the floor like the front to rear brake pipe etc. I wanted to get all of these done before I took it off the spit, for obvious reasons.
So this was my first attempt.
But I wasn't happy with this so I took it off and started again. I cut off the bit that I had bent because I was concerned that it may have damaged the inside diameter if I was to keep on bending it. Then I spent several hours trying to weave it in correctly. Why I didn't just lift the subframe and be finished in half an hour, I don't know.
So the second attempt! Required some on the car flaring. It isn't perfect, but looks better...
I'm not sure if this is totally the correct routing, but It's how the old one was that I removed.
Next job was the battery lead, this went on a breeeeeze - with stainless fasteners and " P Clips" of course
Followed by the stainless braided fuel line.
Two clips, for extra security.
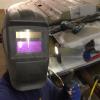
Then I managed to persuade my grandparents to donate their garden waste bin to me - that the council no longer collect - to use as a curing booth! So first I gave it a good clean and then I plopped a heater in the bottom, followed by some wire to hang stuff off. I'll need to get a photo of it all kitted out.
After touching up all the chipped paint, I removed the car from the spit. It was
heavy with all the stuff on it, and set about fitting the steering rack. I had bought a new one because the old one was no where near serviceable condition. But, I was disappointed because the rubber boots were held on with cable ties. Now I appreciate that these boots see no where near the stresses that the likes of the CV boots do, but I had the kit and clips, so I thought I may as well.
I've just noticed that in the photo where it is fitted, it still looks like cable ties.
Next step was to prepare the front subframe. So I keyed it, painted it, badly... and then started kitting it out.
First step was to get the minitastic coil spring conversion kit ready. They only come in black unfortunately but I wanted to paint them red because I think they look fab in the black subframe. So I painted the front two first to see how they'd come out.
Happy with this result, I got my new upper arms and gave them a couple of coats of black also because the factory paint was pretty crap. I then fitted new bearing kits too them and took a wee picture of the set up on the bench.
While I was at it, I decided to take apart the new knuckles because I wanted to check how well greased they were. Fortunately I did because they come with practically nothing. Or at least I think so... It may be a right
And this is as far as I got.
Obviously still loads to be done and bolts to be tightened but I think it looks great! I also managed to get a small nut on the back of the lower buffer screw. I know these are just supposed to be a self tapper but a nut and bolt is always better!
In the mean time, #VSC has been busy taking on the difficult jobs this past week. Had the whole team on this big job.
On another note, it was a sad day at #VSC yesterday. We had acquired the most curious and friendly pet mouse. The VSC mouse.
But after a whole 10 minutes in our company, or should I say, Mark's company, It had had enough and kicked the bucket.
So hopefully I'll get on with the rest of the suspension this weekend. That's if my minisport order that I placed almost 3 weeks ago arrives...


Hi
Lovin this and sorry about the mouse! Where did you get the braided fuel hose and how much was it please?
Ta
Rod
#84
Elliskwleisk
-
- Members
-
- 250 posts
Mini Mad
- Location: Scottish Borders
Posted 13 June 2014 - 09:33 PM
Hi
Lovin this and sorry about the mouse! Where did you get the braided fuel hose and how much was it please?
Ta
Rod
I'm glad that you get as much enjoyment out of reading it as I do typing it!
The fuel hose was purchased from CBS and this specific bore was sold at £9.60 a metre.
Here's the link: http://www.carbuilde...d-fuel-hose-6mm
#85
skmulvany
-

- Noobies
-
- 19 posts
Learner Driver
- Location: Dublin
Posted 14 June 2014 - 12:11 AM
Hi,
I just finnished reading this thread, really great project you have there.
Could you tell me where you bought the soundproofing.
Thanks
#86
Elliskwleisk
-
- Members
-
- 250 posts
Mini Mad
- Location: Scottish Borders
Posted 16 June 2014 - 09:46 AM
Hi,
I just finnished reading this thread, really great project you have there.
Could you tell me where you bought the soundproofing.
Thanks
Cheers!
The sound proofing, sound deadening, dampening or whatever you want to call it is called "Silent Coat". I think they do several different types of thickness etc but this stuff is 2mm thick so doesn't take up too much space and It has a military grade composition (apparently ). It's very flexible and forgiving and therefore easy to apply to curves etc and it cuts really easily with scissors!
I bought two packs off of ebay. Here's the link: http://www.ebay.co.u...984.m1439.l2649
#87
skmulvany
-
- Noobies
-
- 19 posts
Learner Driver
- Location: Dublin
Posted 17 June 2014 - 12:32 AM
Thanks very much! Wasn't even that expensive which is a win win!!
#88
Elliskwleisk
-
- Members
-
- 250 posts
Mini Mad
- Location: Scottish Borders
Posted 02 July 2014 - 06:59 PM
So a small update! Nothing too exciting though.
I bought more goodies! But I really need to get some of this stuff stuck on the car otherwise I'm going to have to sleep on the sofa...


I also decided to take a wee nibble at doing more of the sound proofing.

Then I got a couple of cans of this from CBS to paint the drums. It's the same stuff I used for the springs.

And here they are in my highly sophisticated and expensive "curing booth"

Pretty pleased with the finished result. Seems like a durable finish but I guess time will tell.

Then I began to get the front subframe prepared for fitting. So I bought some new metal spacers to go in between the body and the frame because I couldn't find my original ones. But, Sod's law - I found the old ones the day after... So, firstly a picture to show the difference. Not sure why they're made differently now, does anyone else know? Then I slapped some copper grease on the side between the frame and the packer because for some reason I thought that this may squeak. then a bit of waxoyl on the other side between the spacer and the shell to prevent any rust due to any chips or scratches. Does anyone know what the torque is for the four subframe tower bolts? I've seen torque's for the single bolt towered frames but not the pre 76 ones. 


Next was to take a load of new parts and give them a key and a couple of coats of hammerite smooth black because the factory finish is just pants.

Then I got the front damper mounts waxoyl'd on the back and slapped on with some high tensile copper greased bolts.

Lookin purdaaaaaaaay already!

That's it for now really... I have a bunch of other stuff to upload but I want to get some more photos of all the bits finished so I can put together a couple of good updates.
On another note, we've been having a problem at #VSC - We've lost Mark... We don't know If he was just struggling with his desire to own a mini, weighed against Volvo practicality and had to take some time out or what...  Fortunately, we appear to have taken someone else on in the mean time to help with the work load, he does have a dodgy hair cut though.
  He claims that he is "Mark", but I think he's just trying to kid us on because it's definitely not Mark! Mark's wife is a hairdresser and there is just no way she'd let him go out like that! I mean look at that hair cut, that is clearly an ex-convict recently released from prison! So we wont be trusting anything he says. So if anyone see's him, let us know!

Unfortunately this is the only photo I could get, I almost got caught trying to take one of the shaved Adidas logo on the side of his head. 
Cheerio!
Edited by Elliskwleisk, 02 July 2014 - 09:03 PM.
#89
Elliskwleisk
-
- Members
-
- 250 posts
Mini Mad
- Location: Scottish Borders
Posted 10 July 2014 - 09:14 PM
So a wee update.
I had a long sleepless night of trying to decide on my dashboard configuration which lead to some early morning eBay searching - never a good idea...
In the end, I made a 2am purchase of this, which by the time lunch rolled around, I knew I wasn't going to use. So a waste of money, and a big cumbersome lump that will be shoved in a cupboard. I do like it, I just don't think it will fit with my current "style", if you like. Maybe I'll use it for another project sometime, who knows! But It did come with the gauges which may come in handy one day, if they work... 

Anyways, then I began with the rear suspension. So, once I had finalised the fitment of the rear subby and got everything torqued, I started with a hole like this. Don't worry about the roll cage bolt, I know it's in the wrong way! It's just temporary though.

Took allllllllllllllllllll of this

Got it all built up, including a cheeky wee Smiffy's bits, turned aluminium dust cap. Really nice quality, prefect fit and quite thick so it didn't go all distorted after a tap with a soft mallet.

And made it look like this! 


Aaaaaand, here's the other side all complete!


The only issue I had was with one of the minispares rear tracking and camber brackets. One of the bolt holes was slightly off, but a quick file and it was all sorted.

I was also a complete fud as I went and bought this Mac Tools bearing packer and two tubs of the Castrol LM grease. The packers brilliant! Quick, simple and clean. However, It doesn't work with mini wheel bearings, typical.


Literally, JUST enough room to get around the brake pipes with the torque wrench for the pivot shaft nut.

On another note, I got my fuel tank and heater parts all sand blasted. I wanted them painted by the same place but because It was going to be £20 more than originally quoted and he couldn't get in contact with me, he didn't bother doing them. And now its the two week trade holiday in Edinburgh so I just picked them up and I'm just going to have to paint them myself. For the sake of £20. I hate painting.

I also just decided to finish off the parcel shelf and fit the rear screen.
So I carpeted it all.

Then popped a wee parcel shelf mat in place.

Fitted the rear seal, got the old rear window, gave it a good ol' clean, then fitted it along with the chrome strip. I actually managed to do this one my own surprisingly without any broken glass!


I don't think tint is fair on the roll cage... 
And to finish off, I bought this high level brake light which I thought would be a cool little addition and it is neat and contained. But I forgot the mini had a curved rear screen so obviously it wont stick. So if anyone needs this for something then give me a shout.

#90
Elliskwleisk
-
- Members
-
- 250 posts
Mini Mad
- Location: Scottish Borders
Posted 19 July 2014 - 11:40 PM
So, small update on the front end. I previously built up the basic parts of the front subframe on the bench and then I got it fitted to the car.
So I got the after market top damper mounts fitted which apparently improve dampening due to the differing angle? I also fitted the matching upper arm pin. Got some cheeky GAZ 36 point adjustable dampers and began with this.

Then I got all this.

Stripped the disc drive assemblies and greased up the parts including the brake pads. Got some new lower arm pins and galvanised them.

And ended up with this.


Stainless steel tie bars are the business.

Proof of the business in these red beauties!

And now the story of the wheels. I wanted something a littttttttttle bit different. I know it's been done before and a few people have them but I didn't fancy slapping on a set of minilites like everyone else. So! I bought four new steelies and sent them away to get banded!
I took inspiration from this baby which I saw at B&Q one day.

Nothing toooooooo crazy, just 10X6.

The place that I had them banded also does powdercoating so I had them powdercoated black also. Here they are next to Keith's landrover wheels.

However, when I received them, I wasn't impressed at all with the powdercoat. £100 down the drain! So while I was having the car painted, I had the wheels painted in the same pearlescent black as the roof. Got my pal Graeme to throw on a set of AO32R's, then I added a set of stainless steel hubby caps, set of bolt in red anodised valves and whaaaaaaaala!

Even come with a picture of a cool fella in the hub cap. 
Anyhoo, I admit they're a bit marmite and some people will think the filled in "yokohama" and the wheel's are a bit  , but I don't care, I loveeeee them!
I haven't put the track rod ends on yet because the correct ones hadn't arrived at this point but I couldn't resist getting it on to it's wheels. So on went the rears.


Cheeky bit of poke. I may add some additional spacers to fill out to the arches I've bought - when they arrive.

And the fronts.


I bought spacers for the front but they fit terrible! So I may look for an alternative but I'll check first if I even need them when my arches come. Only other issue is that the front caliper's are VERY close to the wheel.


It's hard to see in the photo but there is about a 4mm gap between the wheel and the caliper. I can't see this being a problem because they are obviously fixed in place and should never come in to contact.
Fortunately, while faffing around concerned about the gap, I noticed that I had been a complete fud and forgotten the copper washer between the stainless steel flexi and the caliper! So I popped that back off and stuck it in. Brakes should not be worked on late at night....

So here's the setup finalised.

Anyhoo, next step was to get some grease in all these new bearings and ball joints! But after owning and discarding four crap and shouldn't be allowed to be sold, laser grease guns, I purchased this compressor powered one from MM! Absolute beast! After I spent an hour learning how to bleed it...

So I greased everything up and then I got these wee red bleed nipple caps. I kept them standard for the bleed nipples, but I trimmed off the wee tail for the grease nipples because it pushed the cap off itself due to the depth of the nipple being shallower than a brake bleed nipple.

Then the time came to get the car off the pallet. Big step forward!
So I used what I had and got it dodgily jacked up and on to axle stands. I used this little bottle jack because obviously it lifts totally vertically, whereas a trolley jack pull towards the rear as you increase the lift and obviously I didn't want it falling off the stands.


Fortunately I had been a smarty pants when I put it on the pallet as I put long pieces of wood wrapped in a plastic sheet along the floor in between the flutes. This allowed minimal marking to the underside of the car and also meant that I only had to jack it up about an inch, slide the wood out and then run the pallet out. Fortunately so because the axle stands max'd out and gave me just enough room to ease the pieces of wood out!

Then I had, literally, just enough room to wiggle the pallet out between the car and the worktop. Close one!

And back on all four's!

I don't understand why my phone persists in making the car look orange and pink in photographs...
Edited by Elliskwleisk, 19 July 2014 - 11:45 PM.


1 user(s) are reading this topic
0 members, 1 guests, 0 anonymous users


