That engine bay looks extremely clean and that is a very neat idea with that rear brake light. I'm guessing it is quite easy to wire in as you would just have to splice the cables from the other rear brake lights?


Leyland Clubman Resto
Started by
colinf1
, Jun 01 2014 09:15 AM
308 replies to this topic
#241

Vinay-RS
-

- Members
-

- 2,115 posts
Put's foolish ideas in peoples heads
- Location: Cape Town
Posted 03 January 2015 - 09:49 AM
#242
colinf1
-
- Members
-
- 1,064 posts
One Carb Or Two?
- Location: Dundalk
Posted 03 January 2015 - 10:01 AM
yeah, I'm just going to run the cable directly out from the leg, then tuck it under the carpet I have on the parcel shelf, run it across to the passenger side C post where the loom comes down from the roof. Should be easy to splice into it there.
#243
Jared Mk3
-

- Members
-
- 1,974 posts
Has a small thing but it does make a difference
- Location: Kokstad, South Africa
- Local Club: MOCKZN
Posted 03 January 2015 - 12:59 PM
The smaller jobs are often the worst. Looking good :)
#244
colinf1
-
- Members
-
- 1,064 posts
One Carb Or Two?
- Location: Dundalk
Posted 05 January 2015 - 09:53 AM
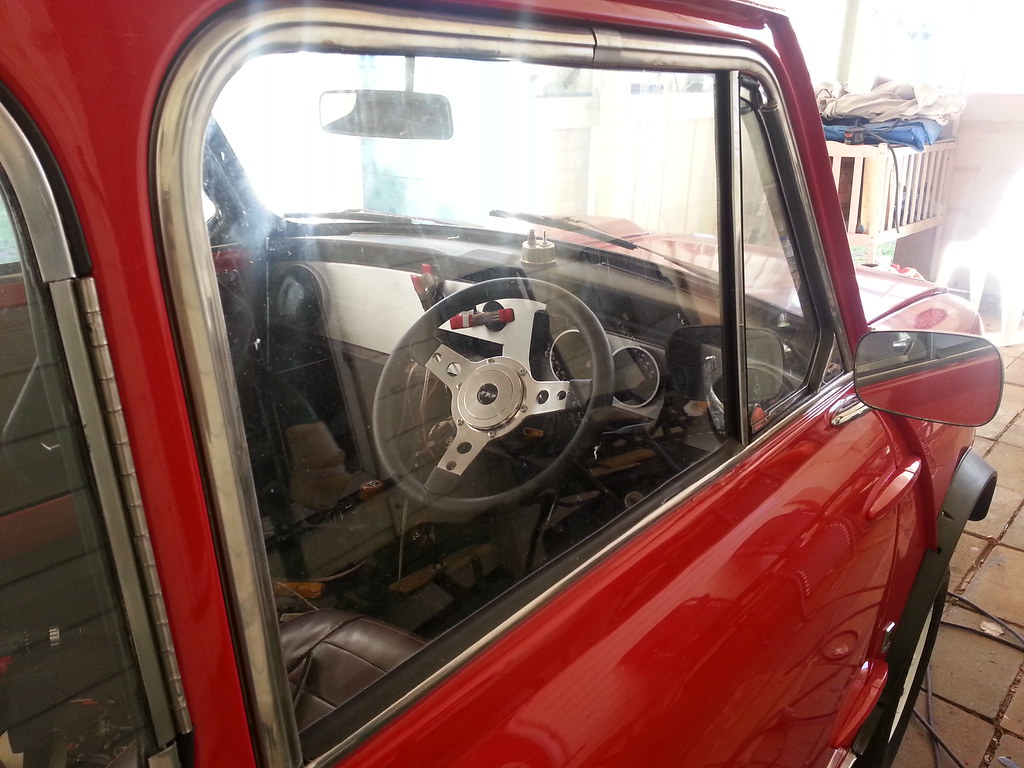
Got a few more items checked off the to do list. Got the door mirror on, had to remake the bracket as the other one was made out of cheese. Also got the interior light and door switches on and wired, 3rd brake light also installed securely and wired up.
Put the steering wheel on, tightened up on the spline, then adjusted with the drop bracket, then re-tightened the U bolts and placed the carpet over it. Indicator stalk shroud put on and all wiring tidied up under the dash.
The screen vent ducting was also put in and a bit of flexi tubing to link it to the heater outputs. Broke a piece of the cable for the heater tap on/off, so will need to sort out some more, then finish off that section.
#245
colinf1
-
- Members
-
- 1,064 posts
One Carb Or Two?
- Location: Dundalk
Posted 07 January 2015 - 07:56 AM
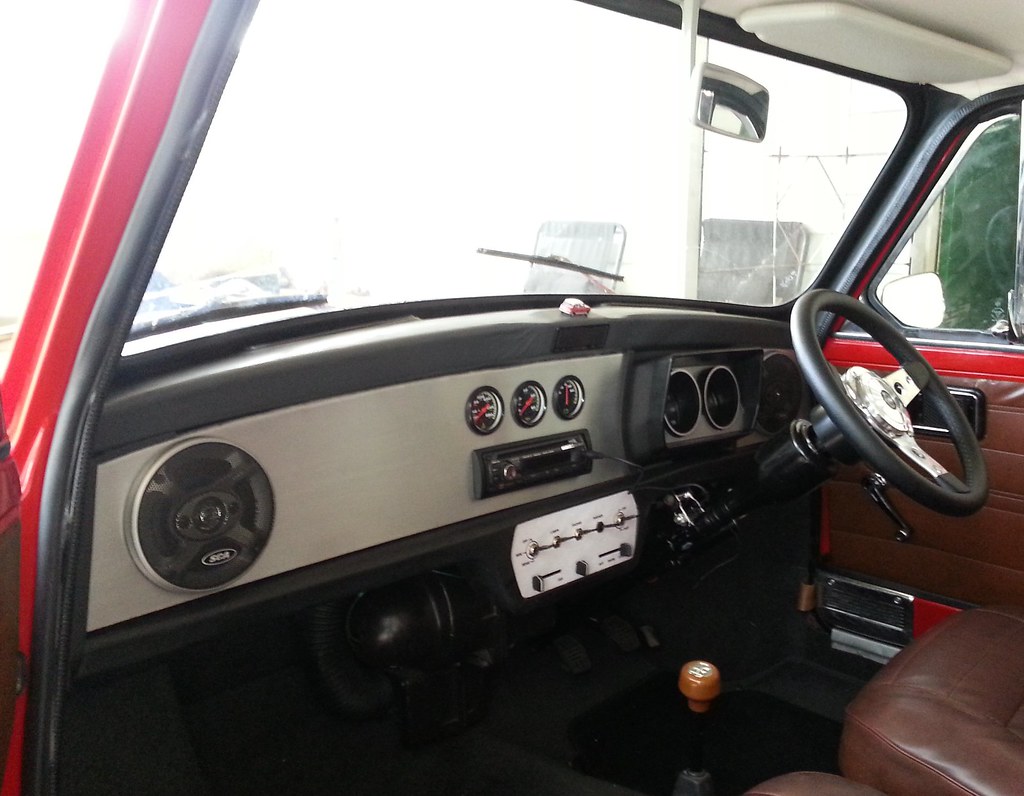
Big job crossed off the list today. Finally managed to figure out how to make a dash and get it fitting nicely.
9mm MDF covered in 0.4mm Aluminium sheet. A hole saw certainly helps rather than the other option of 100 small holes around the perimeter! Just a pity I didnt have a jigsaw for the 100mm speaker holes.
Started with the drivers side piece, got it in and looking tidy, then checked the post and my new circuit board had arrived for the dials. Continued on with the larger side of the dashboard, figuring out where to put the gauges and radio, cutting out the MDF and then cutting the aluminium sheet to go over it.
Once it was all looking like fitting ok, put a brushed effect on the sheet as it would have been too reflective as it was, then degreased it and gave it a few clear coats. At least that way if I do touch it, it wont leave nasty finger prints!
Got the new circuit board on, checked all functions and its all looking good, thanks to Tony at auto electrics on wheels for that!
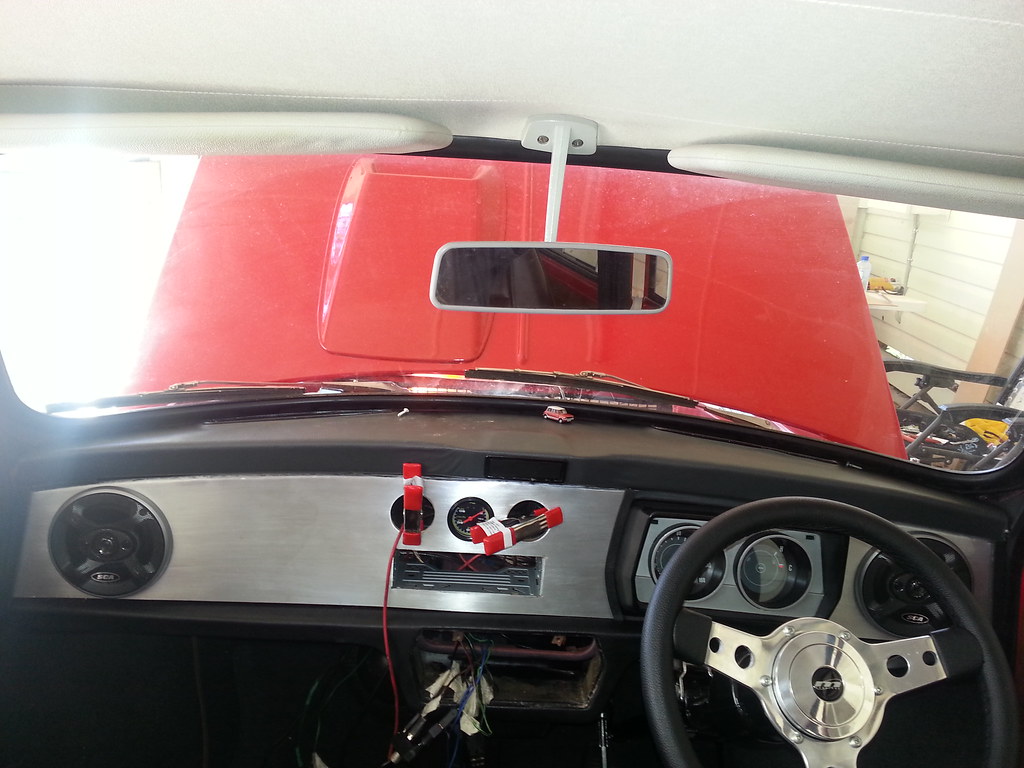
Clamps holding it in place that side until the contact adhesive sets. Its screwed in place on the other side, speaker is keeping it in place. Just need a narrow strip of foam along the top and bottom edges just to finish it off.
All wires in place ready for the radio harness to go in tomorrow, then wire up and fit the gauges. I will have to disconnect the coolant temp probe, then feed it thru dash back to where it needs to go.
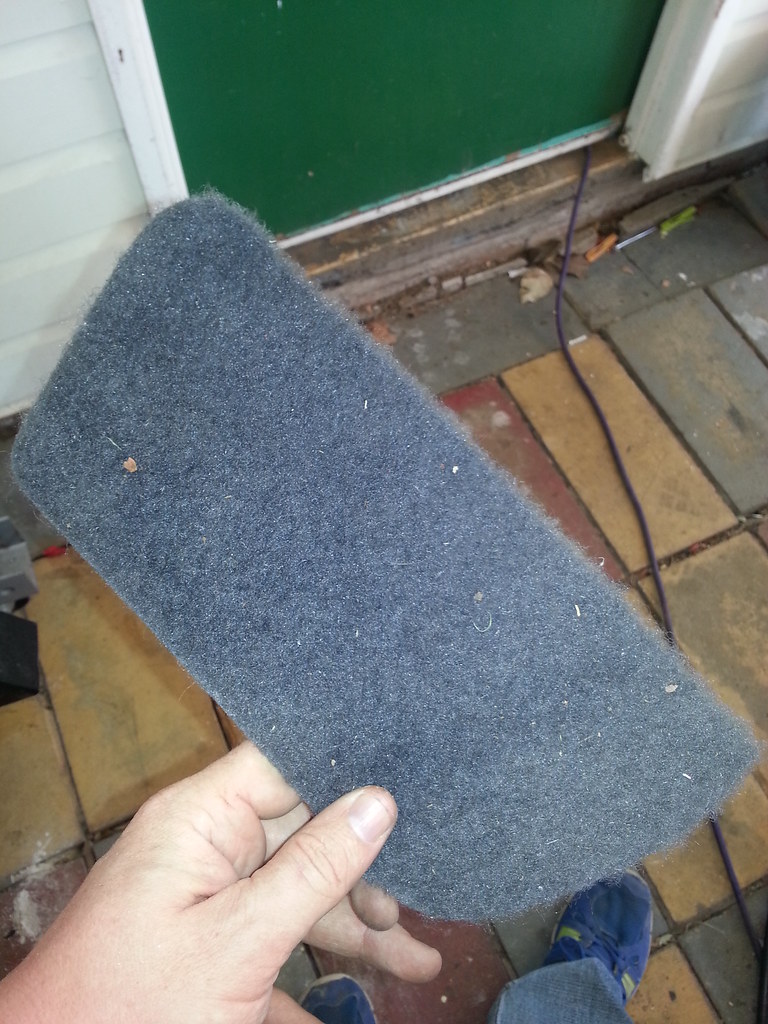
What are these pieces of carpet for??
#246
Vinay-RS
-
- Members
-
- 2,115 posts
Put's foolish ideas in peoples heads
- Location: Cape Town
Posted 07 January 2015 - 08:53 AM
Looking very nice dude. That piece of carpet looks like it is the size of the centre console space (just a thought). Also how do you get the brushed effect on the aluminium sheet?
#247
colinf1
-
- Members
-
- 1,064 posts
One Carb Or Two?
- Location: Dundalk
Posted 07 January 2015 - 08:57 AM
Just rubbed it with a piece of sand paper, 120 grit, just kept going in the same direction til it all looked even.
#248
Vinay-RS
-
- Members
-
- 2,115 posts
Put's foolish ideas in peoples heads
- Location: Cape Town
Posted 07 January 2015 - 08:59 AM
Ah, well it looks very neat even though it isn't complicated. Plus goes well with the instrument cluster colour.
#249
Jared Mk3
-
- Members
-
- 1,974 posts
Has a small thing but it does make a difference
- Location: Kokstad, South Africa
- Local Club: MOCKZN
Posted 07 January 2015 - 09:44 AM
Great job on that dash :)
#250
Ben_O
-

- Paint Doctor
-
- 9,794 posts
Mill Road Garage
- Location: Isle of Wight
Posted 08 January 2015 - 05:17 AM
Looking good!
That piece of carpet i am guessing should wrap over the ends of the crossmember. there should be 2
Ben
#251
colinf1
-
- Members
-
- 1,064 posts
One Carb Or Two?
- Location: Dundalk
Posted 08 January 2015 - 09:05 AM
Bad start to the day, went about removing the temp gauge from the block, ended up pulling the capillary pipe off the bulb. Was not happy at all! Struggled to remove the bulb from the block but eventually got it out. Had to go pick up another gauge and feed it tru the dash and back round to the block.
Plumbed up the oil pressure gauge and put the amp meter in too. Wired it up as per the instructions, connected the battery and seen smoke from the bonnet. Thankfully I got the leads off the battery in time before any serious damage was done. Done a bit of research online and plenty of negative views on running that kind of power back into the car, so decided against wiring it up. Its sitting in place with the light wired until I can get a volt gauge to replace it.
Wired up the stereo, had to re wire the drivers speaker as the cable was a bit short, then managed to get all speakers wired correctly on the 1st attempt. Wired up for power and bit of a test to make sure everything was working, then slid it into place.
Then spent an hour hoovering out the carpet and parcel shelf. All nice and clean now, with some mats put down too.
Most of the wires are nice and tidy now, just need to fit the heater controls and get the switch panel on.
Still haven't got my rear cylinders, there the only think holding me up now.
#252
colinf1
-
- Members
-
- 1,064 posts
One Carb Or Two?
- Location: Dundalk
Posted 08 January 2015 - 09:07 AM
Looking good!
That piece of carpet i am guessing should wrap over the ends of the crossmember. there should be 2
Ben
Could be, but not needed now as I have covered it with a full piece of carpet.
#253
colinf1
-
- Members
-
- 1,064 posts
One Carb Or Two?
- Location: Dundalk
Posted 09 January 2015 - 04:20 AM
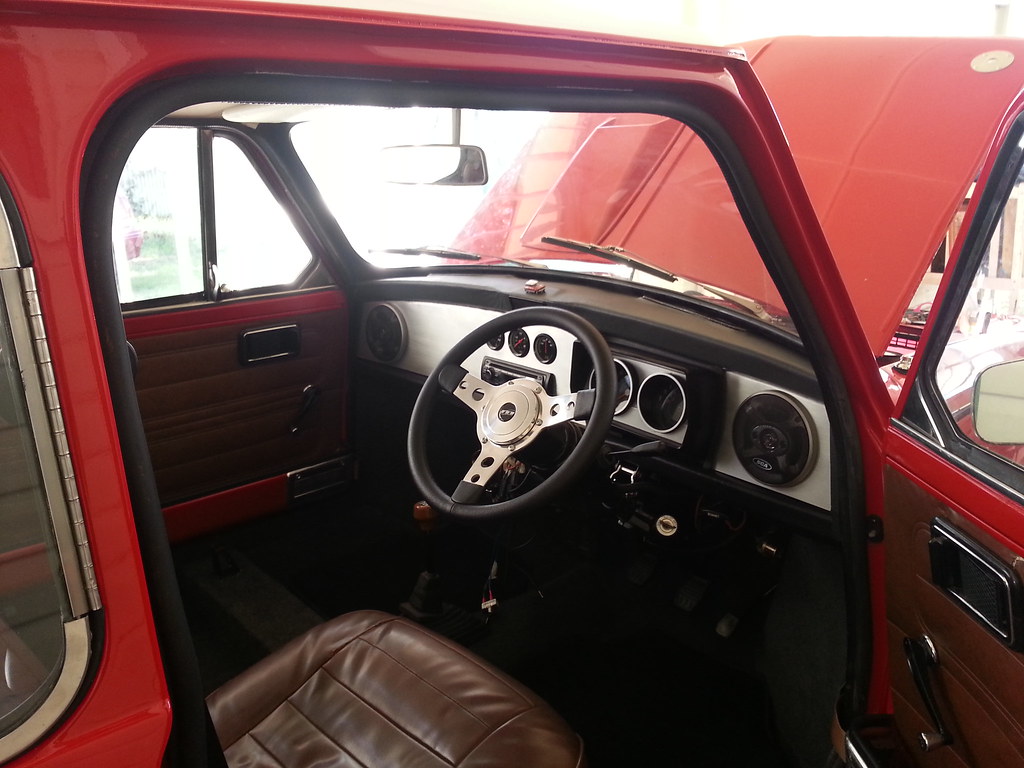
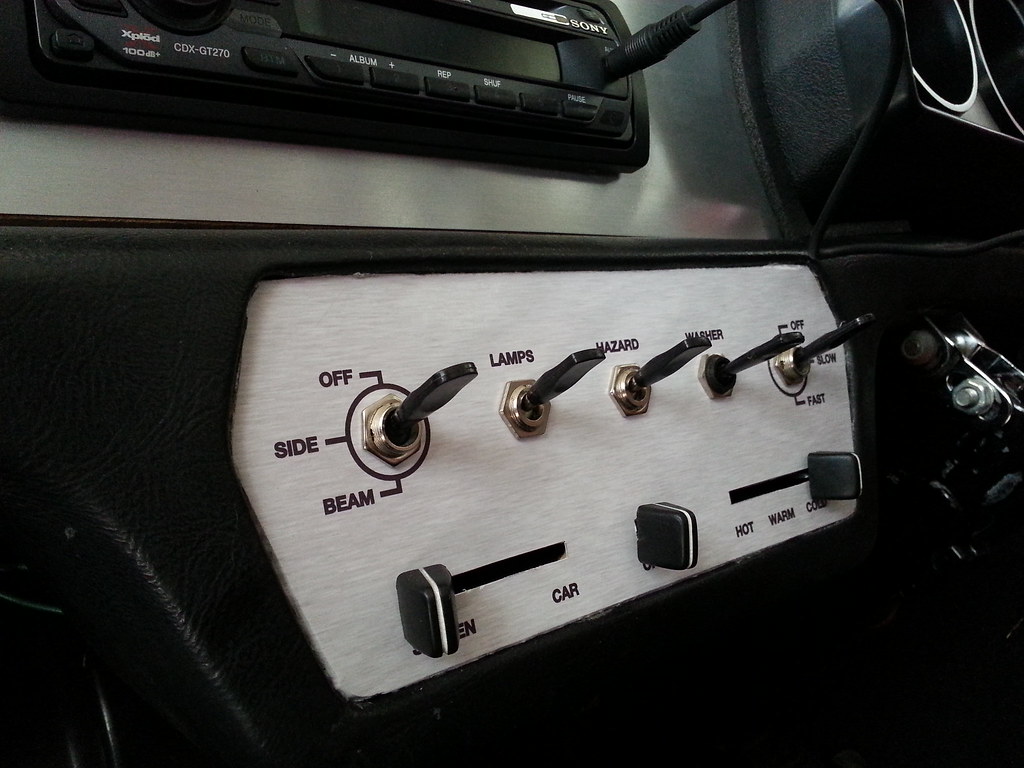
Heater control arms extended so they stick out past the new switch panel. All switches in place and tightened up, switch panel face installed to cover the MDF. Photoshop of the panel I was intending to get laser cut and etched. Printed on glossy photo paper then gave it a few coats of clear lacquer, then some spray adhesive to hold it in place.
Connected handbrake cables to the lever and screwed the brass nuts on a bit, then put in the passenger side seat.

#254
colinf1
-
- Members
-
- 1,064 posts
One Carb Or Two?
- Location: Dundalk
Posted 09 January 2015 - 07:07 AM
A few more shots
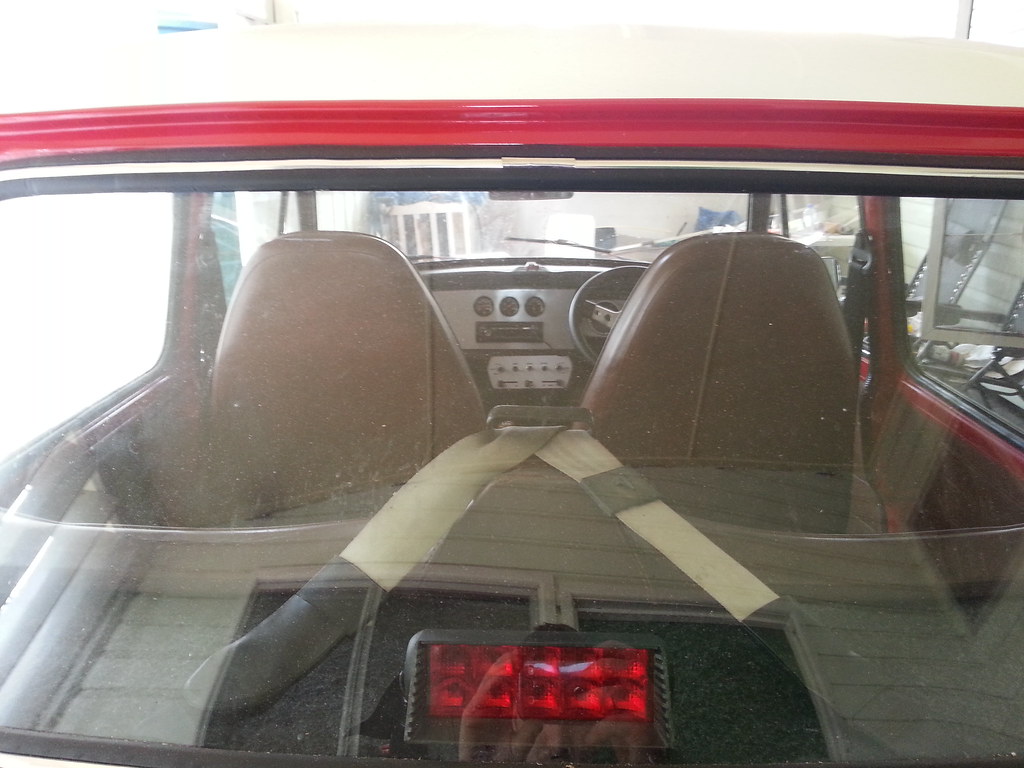
Just need some thin foam to tidy around the edges
Got the choke cable in, fitted it under the dash to the left of the bonnet release, JUST long enough to reach. Fitted the air filter housing.
Thats all I can do until I get my rear cylinders, then it will be the moment of truth!
Just over 7 months since I started this project, its come together quite quickly, mainly due to the loss of job situation, I wonder how far along it would have been if I was still working, probably still in primer!
Edited by colinf1, 09 January 2015 - 07:09 AM.
#255
Vinay-RS
-
- Members
-
- 2,115 posts
Put's foolish ideas in peoples heads
- Location: Cape Town
Posted 09 January 2015 - 07:14 AM
Sorry about the job situation  on the plus side the mini looks great! From the first picture of the switch panel, I actually thought it was a printed brush aluminium panel.


2 user(s) are reading this topic
0 members, 2 guests, 0 anonymous users


