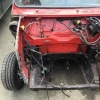


if I was replacing literally just the valance then I would drill the spot welds through just one skin from underneath. That way the floor and back panel flanges remain intact and untouched.Wow, glad I asked. Thanks for the advise. I'll do that over the weekend and post results.What you are actually doing there is splitting the bootfloor from the rear panel by the looks of it.
There are 3 skins there, Valance - boot floor - back panel
No worries though, you can just continue on but drill all the way through the spot welds until your drill pops out the other side, that way you will split all 3 panels
Cheers
Ben
Would you have removed it differently?
Thanks
Ben
However I would be very surprised if the floor and back panel don't need attention or replacement anyway so carry on as you are until you know. At least drilling from above, you can plug weld through your drilled holes onto the valance flange when you weld it on.
As above, ask as many questions as you need to. There is no such thing as a stupid question.
Cheers
Ben
Edited by Ben_O, 10 January 2020 - 05:47 PM.


 I promise to do better in February and make more progress this month!