Jump to content


Photo
- - - - -

Restoring/replacing Horn Button Surround

electrical

  • Please log in to reply
6 replies to this topic

#1 soulslinga

soulslinga

    Stage One Kit Fitted

  • Noobies
  • PipPipPip
  • 63 posts
  • Location: New Jersey

Posted 02 April 2022 - 02:31 PM

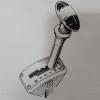
hello - the area on my steering wheel surrounding the horn button is cracked. replacement parts are around $130, so i got one on ebay - but it appears to be a later model tho.. ? Not sure if its going to work.


i'm trying to fix this without replacing my original austin emblem, and getting a whole new horn button. i'm interested in keeping the car as original as possible, especialy with the little touches like that emblem:)


question - will this new-to-me horn surround work with my MK1 1965 ? or is this just the wrong part ? (pictured)


Also, once i got the horn button off the steering wheel, i realized the emblem is riveted. is there any way to remove this emblem without damaging it, and then how would i re-attach? think i've gone in over my head on this simple thing. 


should i just be using the broken original, and glueing it back together, like the previous owner did ? maybe i could glue/spackle/paint it to look good again, restore it. i'm a noob by the way. 

thanks for any help! 

Attached Files


Edited by soulslinga, 02 April 2022 - 02:33 PM.


#2 richmondclassicsnorthwales

richmondclassicsnorthwales

    One Carb Or Two?

  • Traders
  • PipPipPipPipPipPipPip
  • 942 posts
  • Location: Co Mayo

Posted 02 April 2022 - 03:39 PM

Welcome to the forum


To be honest, I would repair the one you have.


Use a good strong glue for the piece to be attached. Then use some good filler on / in the cracks, make them slightly proud.


Then use 2 or 3 different grades of Emery or Sand paper, stating with a sharper paper, then finishing with a nice soft paper.


Use a primer once finished, and this will show any light imperfections, so start by adding filler again, then sanding as above.


Repeat until you have a horn push that is presentable, 


Then use a gloss or matt finish paint - black - to finish for your desired finish.


Use a good hard paint which will last. Use 2 , 3 or 4 coats to give a good deep finish.


#3 big john

big john

    Passed Test

  • Noobies
  • PipPip
  • 30 posts
  • Location: Jacksonville, Florida

Posted 02 April 2022 - 11:08 PM

If I'm understanding you correctly you want to place the Austin badge on the new horn button. It's easy to remove by pushing the button from behind. The chrome ring is what actually holds the button in and it is a friction fit in the housing. Pressing from the back side will force the ring out and the button just falls free. Use a new pencil and put the eraser (rubber) against the back of the button and push. Your new assembly does appear to be missing one of the rivets, but that could be replaced with a small nut and bolt from Ace. If it were mine, once I had the ring out I might try to remove the rivet from the broken one and reuse it in the new. It appears to be copper or brass so it is probably pretty soft. Good luck!


#4 soulslinga

soulslinga

    Stage One Kit Fitted

  • Noobies
  • PipPipPip
  • 63 posts
  • Location: New Jersey

Posted 03 April 2022 - 04:39 PM

this is great advice. thanks for taking the time! 


Welcome to the forum


To be honest, I would repair the one you have.


Use a good strong glue for the piece to be attached. Then use some good filler on / in the cracks, make them slightly proud.


Then use 2 or 3 different grades of Emery or Sand paper, stating with a sharper paper, then finishing with a nice soft paper.


Use a primer once finished, and this will show any light imperfections, so start by adding filler again, then sanding as above.


Repeat until you have a horn push that is presentable, 


Then use a gloss or matt finish paint - black - to finish for your desired finish.


Use a good hard paint which will last. Use 2 , 3 or 4 coats to give a good deep finish.


#5 soulslinga

soulslinga

    Stage One Kit Fitted

  • Noobies
  • PipPipPip
  • 63 posts
  • Location: New Jersey

Posted 03 April 2022 - 04:40 PM

thank you this is so helpful!!


If I'm understanding you correctly you want to place the Austin badge on the new horn button. It's easy to remove by pushing the button from behind. The chrome ring is what actually holds the button in and it is a friction fit in the housing. Pressing from the back side will force the ring out and the button just falls free. Use a new pencil and put the eraser (rubber) against the back of the button and push. Your new assembly does appear to be missing one of the rivets, but that could be replaced with a small nut and bolt from Ace. If it were mine, once I had the ring out I might try to remove the rivet from the broken one and reuse it in the new. It appears to be copper or brass so it is probably pretty soft. Good luck!


#6 soulslinga

soulslinga

    Stage One Kit Fitted

  • Noobies
  • PipPipPip
  • 63 posts
  • Location: New Jersey

Posted 10 May 2022 - 07:52 PM

hello - i followed your advice as best i couldl. thank you for this. you'll notice the glued, repaired, and painted horn in the below video:) 


also wanted to ask - as you can see from the video, the horn button surround doesnt sit in the wheel properly. it kinda falls out. this was always a problem, and nothing appears to be missing or broken. any further tips about what is going wrong in this video ? thank you! 

https://www.dropbox....G_4716.MOV?dl=0


Welcome to the forum


To be honest, I would repair the one you have.


Use a good strong glue for the piece to be attached. Then use some good filler on / in the cracks, make them slightly proud.


Then use 2 or 3 different grades of Emery or Sand paper, stating with a sharper paper, then finishing with a nice soft paper.


Use a primer once finished, and this will show any light imperfections, so start by adding filler again, then sanding as above.


Repeat until you have a horn push that is presentable, 


Then use a gloss or matt finish paint - black - to finish for your desired finish.


Use a good hard paint which will last. Use 2 , 3 or 4 coats to give a good deep finish.


#7 richmondclassicsnorthwales

richmondclassicsnorthwales

    One Carb Or Two?

  • Traders
  • PipPipPipPipPipPipPip
  • 942 posts
  • Location: Co Mayo

Posted 13 May 2022 - 12:26 PM

Horn push looks good.


I hope someone with a MK1 could help you here regards the horn push locating correctly. It has been a long time

since I had my MK1 (1989) and can not remember how it sat / seated correctly


Regards  Neil.


Also tagged with one or more of these keywords: electrical

0 user(s) are reading this topic

0 members, 0 guests, 0 anonymous users