Dutch HayaMini project
#16
Posted 07 May 2007 - 04:13 PM
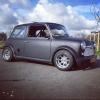
Wheelarches look good on the car!
You'll have to keep it up to make your deadline though!
#17
Posted 16 May 2007 - 05:03 PM
My HayaMini Project website is coming together. Some pages are online and the Photo Album is active too.
My website can be reached by clicking www.hayamini.nl
#18
Posted 16 May 2007 - 05:10 PM
There are no links on it for any pics or gallery, A good start though
Cheers
#19
Posted 16 May 2007 - 07:02 PM
Oh my, forgot to mention. It is completely built with all web standard, but browsers like Firefox cannot display the correct page yetI can only see the intro page??
There are no links on it for any pics or gallery, A good start though
Cheers
I am already looking at this problem and figuring a way out to get it fixed.
Ok, changed to code of the pages so it should work properly now.
Edited by Poly_Patje, 16 May 2007 - 08:53 PM.
#20
Posted 20 May 2007 - 11:04 AM
Which panels did you use for the arches? is that fiat?
Greetings Gianni
#21
Posted 20 May 2007 - 11:16 AM
Hi Gianni,Hi Poly_Patje
Which panels did you use for the arches? is that fiat?
Greetings Gianni
These are Volkwagen Golf type 1 outer arches. They are made for max 16" wheels (width) and are oval. Some extra work is needed to make it round again but that is much easier then making metal arches from scratch.
Greetings, Patrick
#22
Posted 20 May 2007 - 12:12 PM
Keep it up!!
I wana see it driving!
#23
Posted 21 May 2007 - 10:45 PM
The past few days I started thinking the boot lid. Now I came up with the idea to get rid off the heated air inside the motor compartment.
The original boot lid will be used as a positive mold to create the negative mold. When this mold is completed I can make my own carbon fiber boot lid.
I have updated my photo album on my website.
#24
Posted 22 May 2007 - 03:03 PM
your websites working fine now (im using Firefox) and you have some great pics up too.
good luck with the build ill be checking back here now and again
#25
Posted 07 June 2007 - 05:32 PM
It had some dents so I came up with the idea to reinforce the front floor panels with 2mm thick plates. So I started at 04-06-07 and welded 4 plates to the floor. It is much stronger now. There are still 6 pieces left to weld. You can see the images at my website.
#26
Posted 25 June 2007 - 01:00 PM
Here are some pictures.
More pictures can be viewed at www.hayamini.nl
#27
Posted 21 July 2007 - 06:04 PM
Today I ordered a brand new set of calipers and discs. I ordered a set of Wilwood 6-piston calipers and these will be used on a set of 310mm 2-piece disc system (seperate rotor and disc instead of a one-piece disc so I am able to determine the offset/placement of the discs and calipers).
I also started making a set of bracebars that goes in the front from 20mm round tube (4mm sidewalls). The upcoming week I hope to begin working on the steel flipfront. I already have all panels laying around and bought a set of heavy duty hinges go make it removable.
Almost every week new pictures are added to the online photoalbum on www.hayamini.nl
#28
Posted 01 August 2007 - 10:06 PM
Last week I clamped the front panels together. It was a real pain in the #ss but it all came together as it should. This will become a flipfront and all panels will be welded together, even the hood so it will be one piece.
Tonight I closed up the fuelcap opening at the rear left side and used the good old-fashioned lead load techniqie to make it smooth. I do like this old proven technique very much.
Here are some pics of the current progress:
#29 Guest_cooper_rsp_*
Posted 27 August 2007 - 07:36 PM
Can you do mine next please When i see jobs like yours it gives me inspiration to start my own.
#30
Posted 12 October 2007 - 10:09 PM
Last few months I spent many hours on the project and bought got the brakes. Now I have a set of red Wilwood 6-pot calipers (which are normally used as a brake upgrade for the Subaru WRX) with 310mm vented/grooved/drilled discs. This should bring the Mini from fast to zero as quick as possible.
The front is getting somewhere and is able to flip open. The rear valance is reinformed with a bar and some plates. The rear rollcage is connected to the b-style with triangle plates. Uhm, I also bought a powersteering column to build in. The only thing left for this steering column is fabricating te controller (PCB) and program it so it will adjust the amount of steeringassist upto 15mph and then disable it totally.
But I received terrible news. I must leave the current space by the end of this month (October) so I have to get several things sorted out and arranged so I can move the complete project to a new location.
Below I have attached some pictures to make it a bit more visual.
0 user(s) are reading this topic
0 members, 0 guests, 0 anonymous users