Really nice mate, it's all pulling together!

Guennie's Turbo Conversion
Started by
Guennie
, Jun 23 2008 09:37 PM
87 replies to this topic
#61

analogue_radio
-

- TMF+ Member
-

- 4,897 posts
Up Into Fourth
- Location: Melton Mowbray, UK.
Posted 30 March 2009 - 10:37 AM
#62
matty135790
-

- Noobies
-
- 125 posts
Mini Mad
- Local Club: Bury mini club
Posted 30 March 2009 - 12:25 PM
looking good si,
went through all the pre mot checks on mine yesterday. going to book the test for a week today! so hopefully have mine back on the road soon!
See you soon im sure.
went through all the pre mot checks on mine yesterday. going to book the test for a week today! so hopefully have mine back on the road soon!
See you soon im sure.
#63
Guennie
-
- Members
-
- 186 posts
Mini Mad
- Location: Newmarket
- Local Club: Bury Mini Club
Posted 11 April 2009 - 12:20 AM
Hey,
With the 4 day weekend i thought it would be the perfect oppertunity to get a lot of work done on the mini, so heres a little update of what i did today.
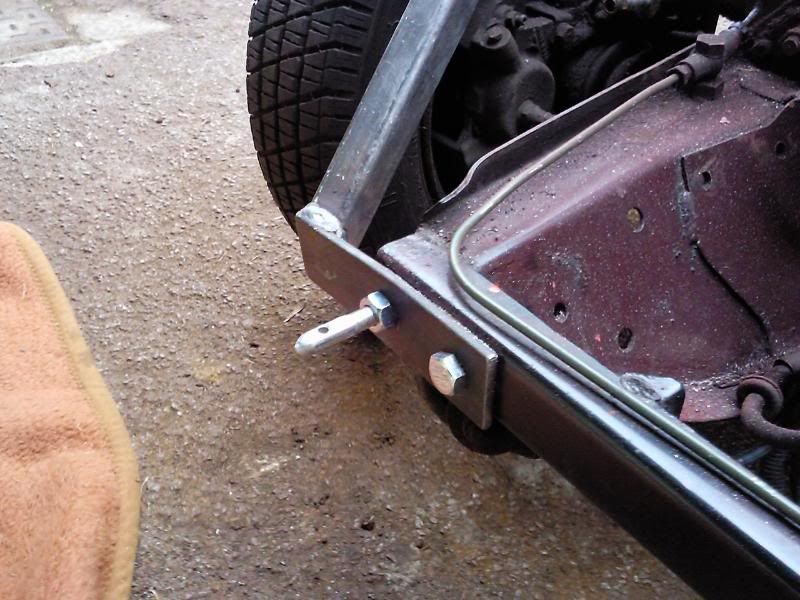
Now the front bulkhead has been made ready for the turbo i can continue fitting the front end. Dad and i had started this last weekend and had been fitting, filing, re-fitting, re-filing for quite a while when we decided that fitting the hinges would make an already difficult job even harder! So we decided against using the hinges and i ordered some bonnet pins instead. I'd heard of someone else on the forum using them and they'd made a very neat job of it. Basically the front end will now be completely removable rather than just tilt forward.
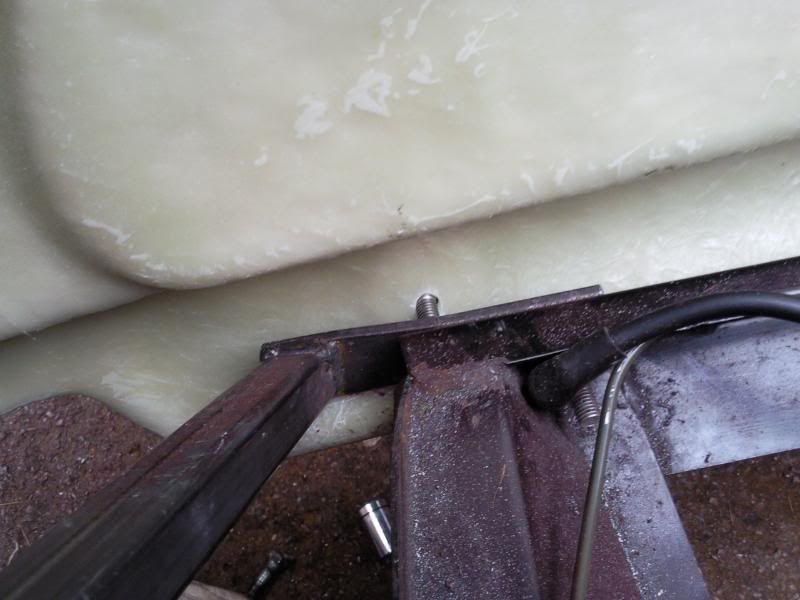
Anyway, first thing we did was to line up the front end as best as we could and cut and file to get a good fit around the scuttle. once we were happy, we lined it all up, removed one of the front brace bar to subframe bolts and put a pen in the hole to mark the front end where the hole needed putting. We could then drill the holes in the correct place on the front end and also replace the bolt with one of the bonnet pins.
Bonnet pin in the brace bar mount
Both pins in place
As you can see from the next image, when the front end is all lined up the bonnet pins for the fron end were almost exactly in the midle of the recess in the front end!
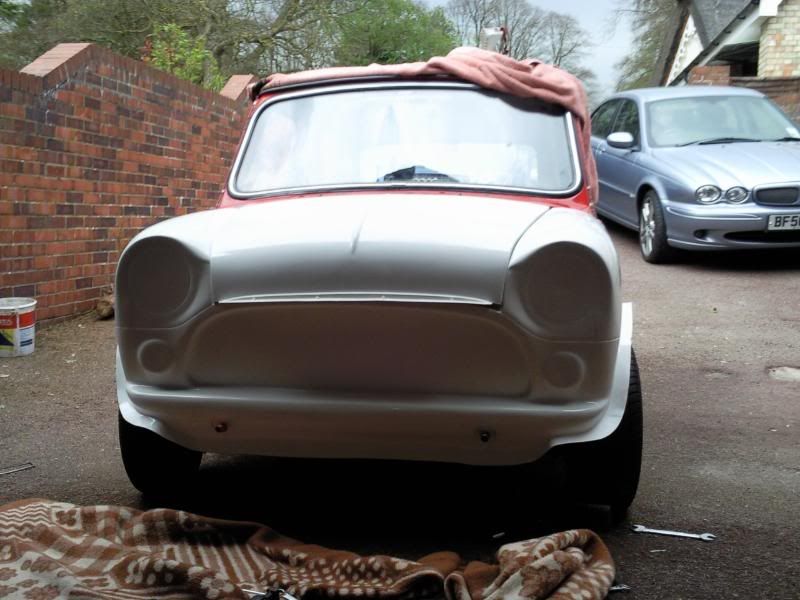
After we'd got it roughly lined up i put the bonnet on just to see what it will look like when its done and was really quite pleased with the fit (even if nothing is secured!!!)
front end on
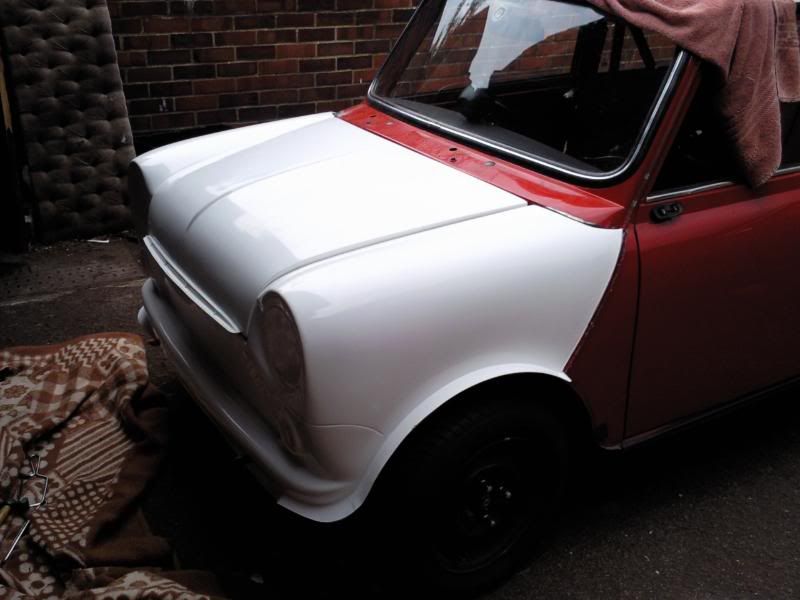
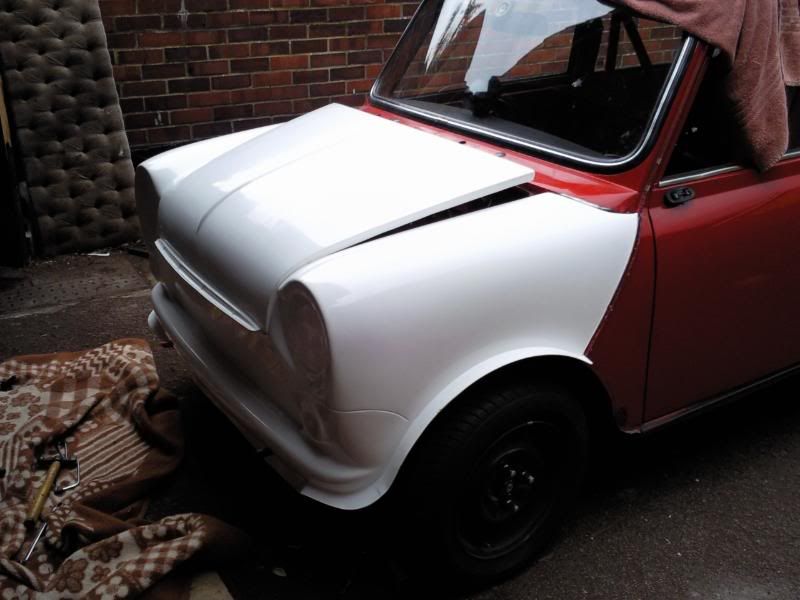
Raised bonnet look
Obviously i need to do a bit more fettling but i think im over halfway with it now. Tomorrow i'm going to finish off the front end mountings with a nice washer to make them strong and neat and hopefully i'll take some better pictures too!
Also i got a lot more of my engine bits through this week so i can get on with the engine build, woohoo
Guennie
With the 4 day weekend i thought it would be the perfect oppertunity to get a lot of work done on the mini, so heres a little update of what i did today.
Now the front bulkhead has been made ready for the turbo i can continue fitting the front end. Dad and i had started this last weekend and had been fitting, filing, re-fitting, re-filing for quite a while when we decided that fitting the hinges would make an already difficult job even harder! So we decided against using the hinges and i ordered some bonnet pins instead. I'd heard of someone else on the forum using them and they'd made a very neat job of it. Basically the front end will now be completely removable rather than just tilt forward.
Anyway, first thing we did was to line up the front end as best as we could and cut and file to get a good fit around the scuttle. once we were happy, we lined it all up, removed one of the front brace bar to subframe bolts and put a pen in the hole to mark the front end where the hole needed putting. We could then drill the holes in the correct place on the front end and also replace the bolt with one of the bonnet pins.
Bonnet pin in the brace bar mount
Both pins in place
As you can see from the next image, when the front end is all lined up the bonnet pins for the fron end were almost exactly in the midle of the recess in the front end!
After we'd got it roughly lined up i put the bonnet on just to see what it will look like when its done and was really quite pleased with the fit (even if nothing is secured!!!)
front end on
Raised bonnet look
Obviously i need to do a bit more fettling but i think im over halfway with it now. Tomorrow i'm going to finish off the front end mountings with a nice washer to make them strong and neat and hopefully i'll take some better pictures too!
Also i got a lot more of my engine bits through this week so i can get on with the engine build, woohoo
Guennie
#64
Guennie
-
- Members
-
- 186 posts
Mini Mad
- Location: Newmarket
- Local Club: Bury Mini Club
Posted 11 April 2009 - 09:54 PM
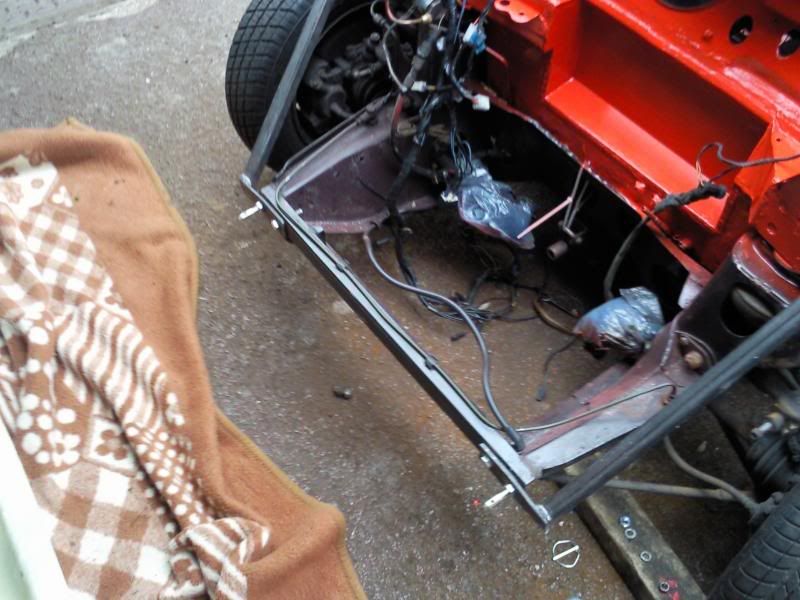
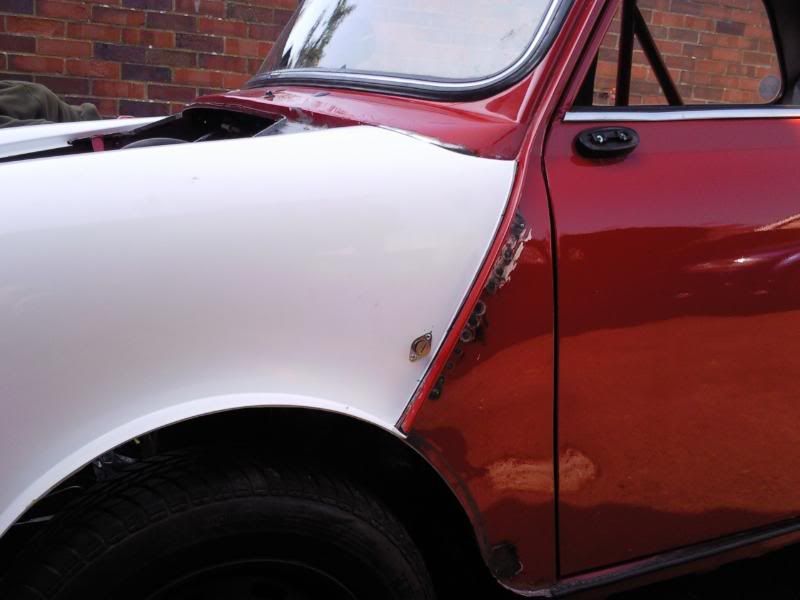
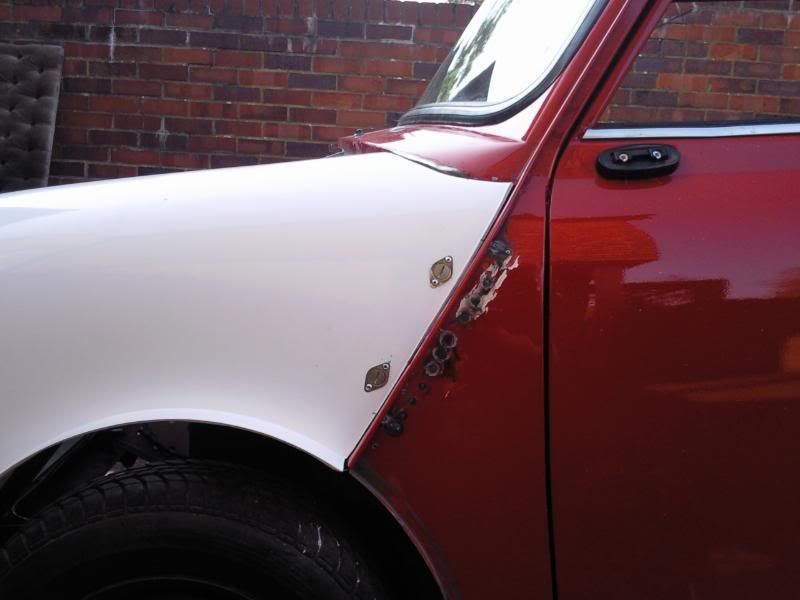
Did a bit more on the mini again today. Got the front end mounted. just need to put the deaz fasteners on the a-panel. The only reason i've not done this yet is that my welder is next to useless (as are my skills!) so the plates on the a-panel have only been rivited on for positioning purposes. Ed has been kind enough to agree to do some more welding for me, so the final fittings will be on soon!
Here is the fit on the off side. (once completly fitted the corner will be replaced for obvious reasons)
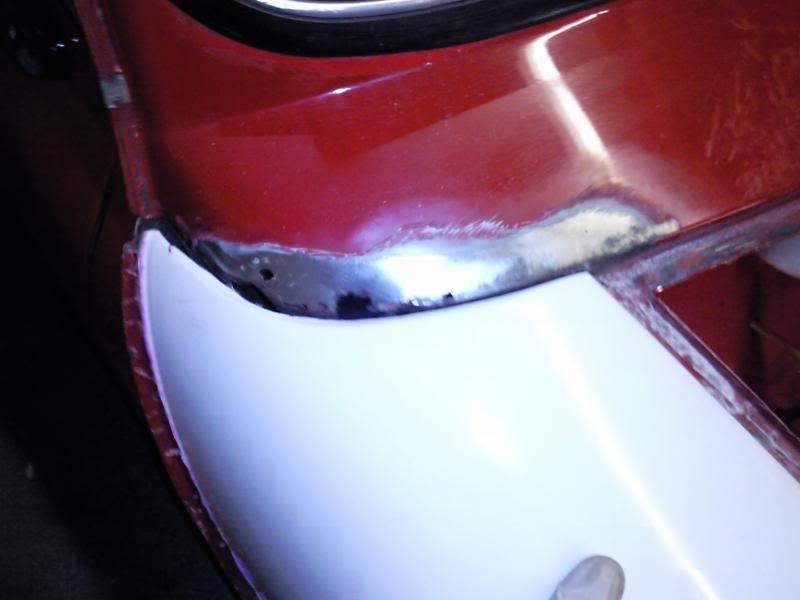
The pins and clips on the front.

To prevent the fibreglass from wearing and cracking we've made up a metal plate so that the fibreglass is sandwiched in between two pieces of metal. Hopefully this will make the front end last as long as possible as there is no fibreglass resting on the bonnet pin, only metal. You can just see the plate on the inside in this pic.
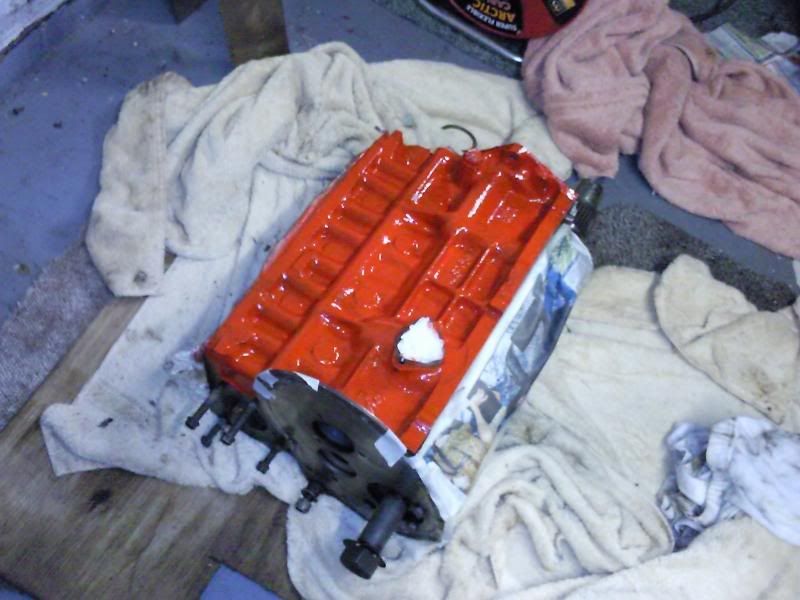
After getting as far as i could with the front end for now, i decided to clean up and put the first couple of coats of paint on the block.
Work continues tomorrow!
Here is the fit on the off side. (once completly fitted the corner will be replaced for obvious reasons)
The pins and clips on the front.
To prevent the fibreglass from wearing and cracking we've made up a metal plate so that the fibreglass is sandwiched in between two pieces of metal. Hopefully this will make the front end last as long as possible as there is no fibreglass resting on the bonnet pin, only metal. You can just see the plate on the inside in this pic.
After getting as far as i could with the front end for now, i decided to clean up and put the first couple of coats of paint on the block.
Work continues tomorrow!
#65
Guennie
-
- Members
-
- 186 posts
Mini Mad
- Location: Newmarket
- Local Club: Bury Mini Club
Posted 19 April 2009 - 10:55 PM
Hey,
Work on the mini has continued, and my bank balance is about to take a big hit! Thank god it's my birthday at the start of may! (not that i'll see much of the money i get!!!)
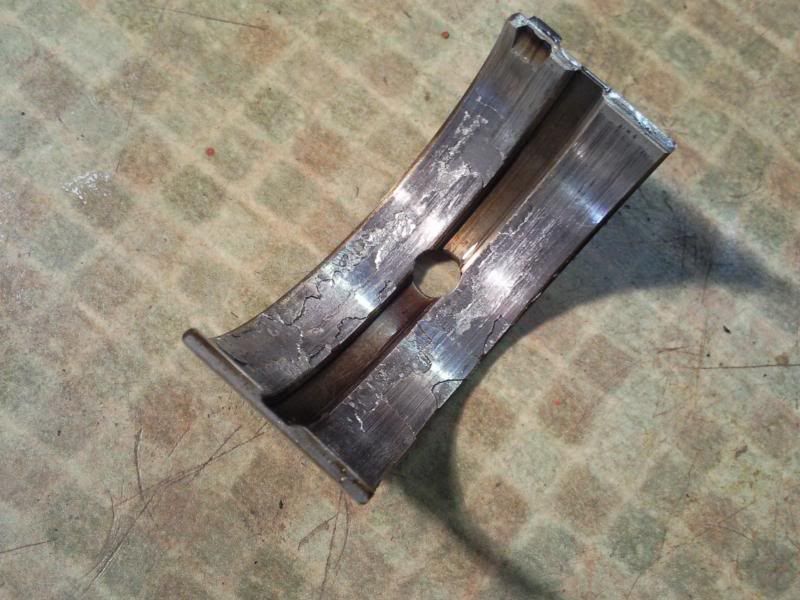
After painting half the block i realised i should really strip it all the way down if i'm going to be running it as a reasonably high output unit. It's a really good job i did too. Dad and i spent a morning stripping it down and checking out bearings and pistons for wear etc and i think it's fair to say that the crank shells were very dead!!!
Also one of the cylinders looked a bit worn so we took it to the local engine builders. The guy there were fantastic and very knoledgeble. They said that the cylinder was ok and that it just needed honing. Whilst it's there they are going to replace the crank bearing and cam ones too (they were as bas as the one in the picture too!). Also one of the guys there mentioned that they might have some unused turbo pistons. It turns out they did so instead of changing the piston rings on mine i'm getting a brand new set of pistons for a very good price!!!
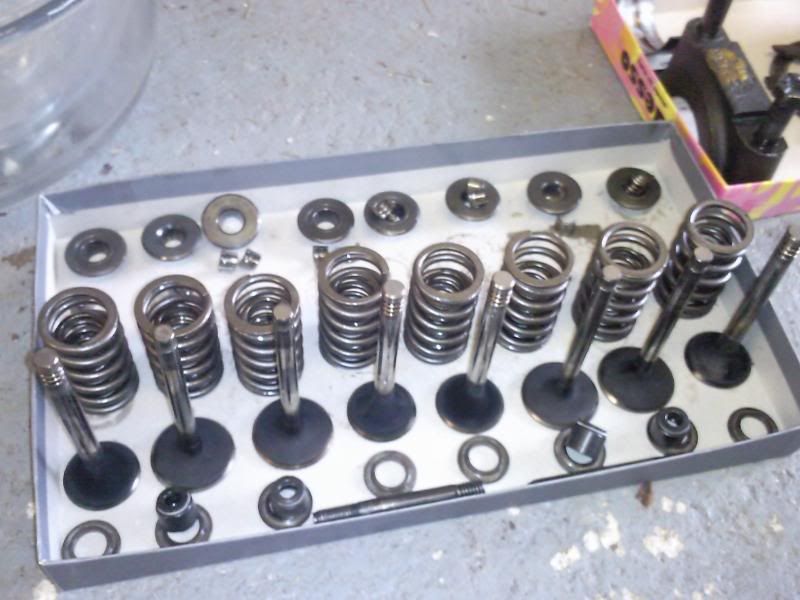
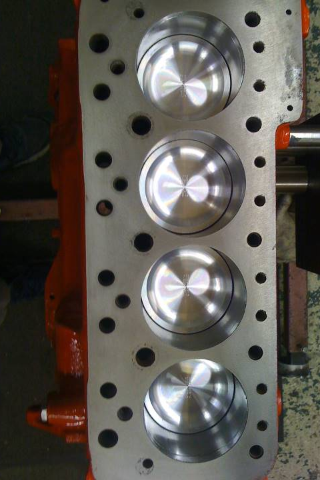
For the moment i'm using a standard head until i can afford to have it modified. The only thing i'm doing to it is fitting some new double valve springs and cleaning it up a bit.
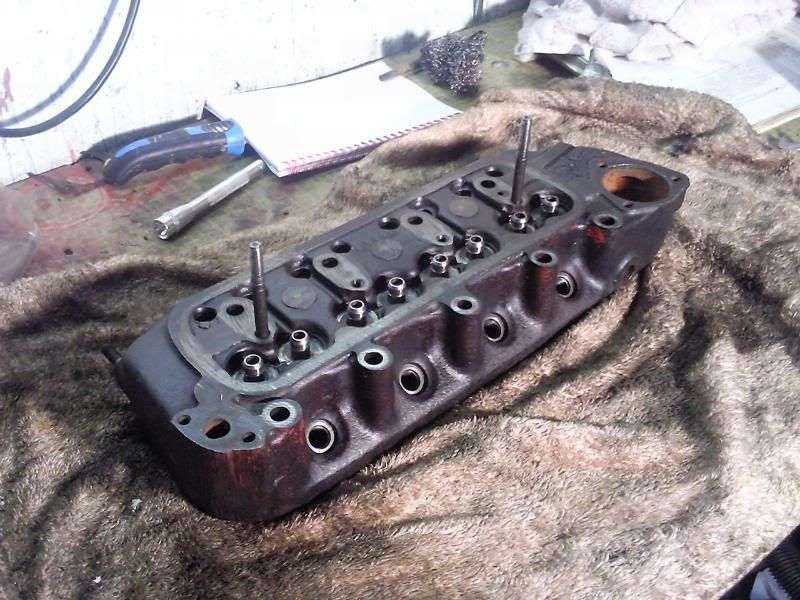
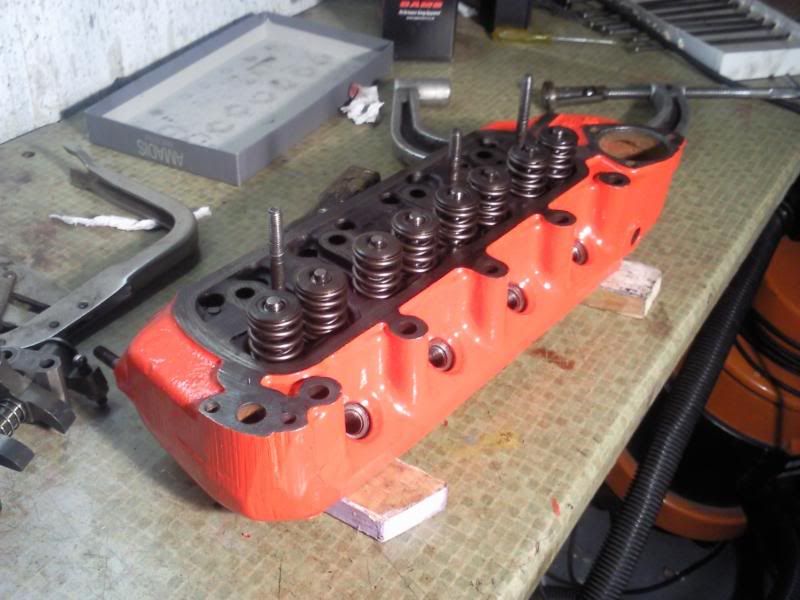
Dad and i cleaned all the valves up and checked for ware. Fortunatily it is all in very good condition.
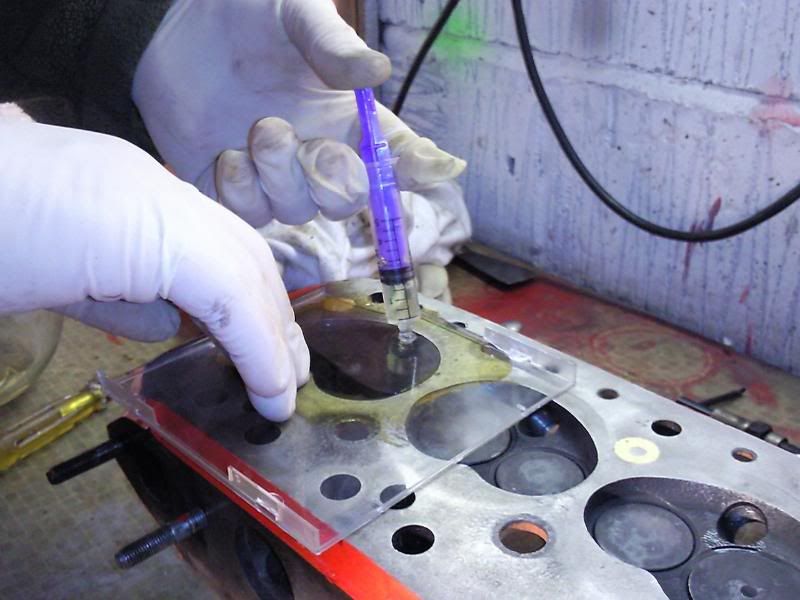
Once we'd reassembled the head we caculated the compression ratio using a syringe (sp) from boots! We worked out a CR of 9.4:1 which is standard metro turbo. I'd like to get it down to 8.5:1
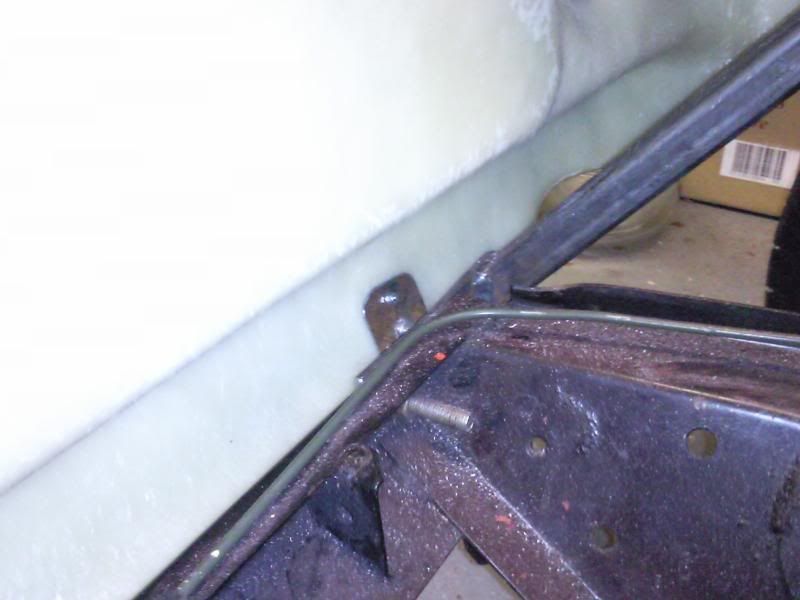
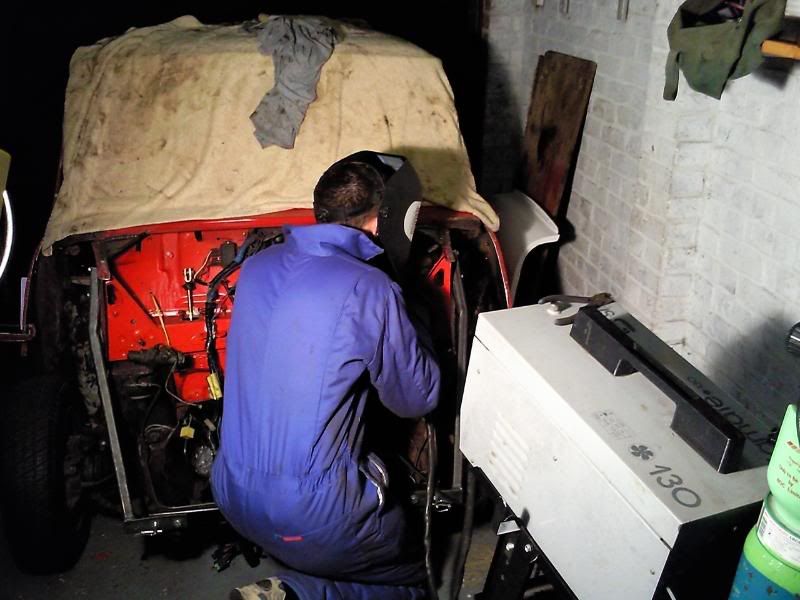
Right now back to bodywork! Ed came over again and did some more welding for me. I can't thank him enough! He's done a brilliant job as usual. He welded the triangular plates i made for my bonnet mounts and also the taps that the front end attaches to.
Ed hard at work
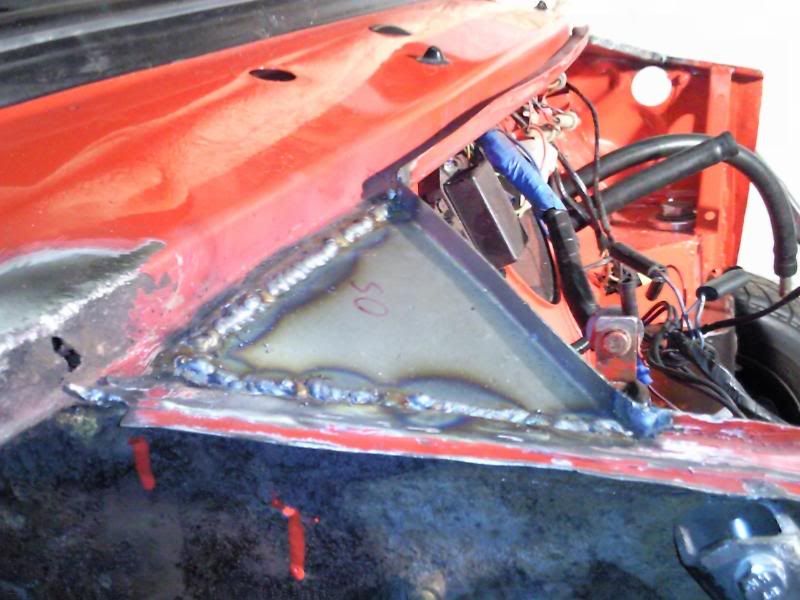
A panel tab
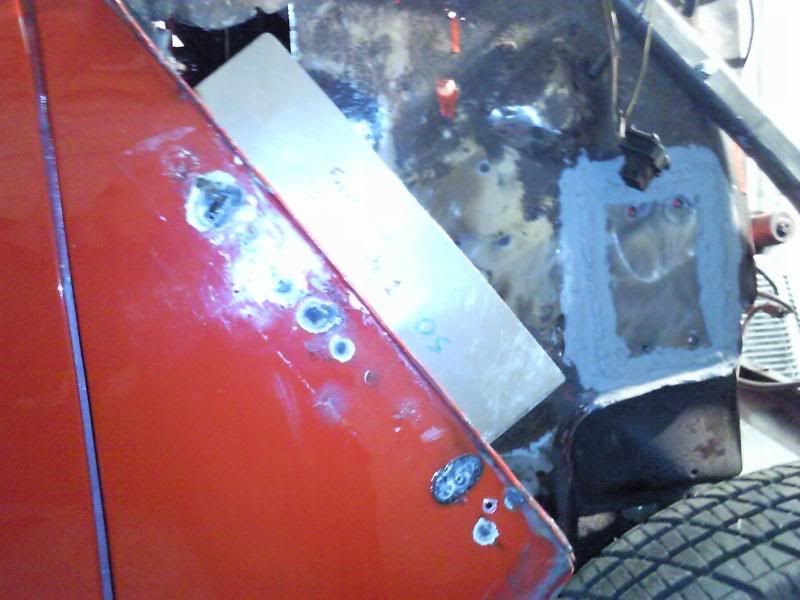
Bonnet pin mount
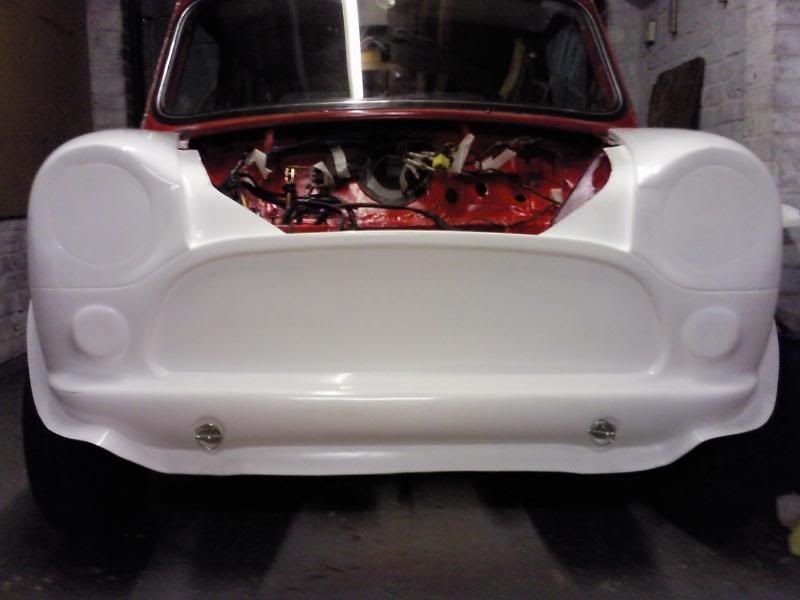
Today was spent fixing the front end on and drilling the holes in the right place for the deuz clips. I'm fairly happy with the allignment i've got of the front end but will be happier when i get some rubber finishing strip to prevent paint scratching and mask any gap differences.

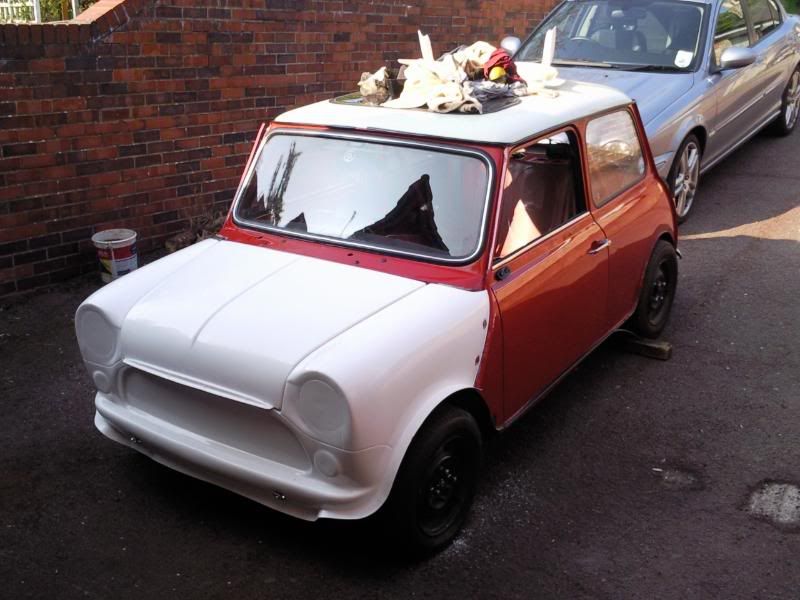
So this is where i am now! What do you think?
Work on the mini has continued, and my bank balance is about to take a big hit! Thank god it's my birthday at the start of may! (not that i'll see much of the money i get!!!)
After painting half the block i realised i should really strip it all the way down if i'm going to be running it as a reasonably high output unit. It's a really good job i did too. Dad and i spent a morning stripping it down and checking out bearings and pistons for wear etc and i think it's fair to say that the crank shells were very dead!!!
Also one of the cylinders looked a bit worn so we took it to the local engine builders. The guy there were fantastic and very knoledgeble. They said that the cylinder was ok and that it just needed honing. Whilst it's there they are going to replace the crank bearing and cam ones too (they were as bas as the one in the picture too!). Also one of the guys there mentioned that they might have some unused turbo pistons. It turns out they did so instead of changing the piston rings on mine i'm getting a brand new set of pistons for a very good price!!!
For the moment i'm using a standard head until i can afford to have it modified. The only thing i'm doing to it is fitting some new double valve springs and cleaning it up a bit.
Dad and i cleaned all the valves up and checked for ware. Fortunatily it is all in very good condition.
Once we'd reassembled the head we caculated the compression ratio using a syringe (sp) from boots! We worked out a CR of 9.4:1 which is standard metro turbo. I'd like to get it down to 8.5:1
Right now back to bodywork! Ed came over again and did some more welding for me. I can't thank him enough! He's done a brilliant job as usual. He welded the triangular plates i made for my bonnet mounts and also the taps that the front end attaches to.
Ed hard at work
A panel tab
Bonnet pin mount
Today was spent fixing the front end on and drilling the holes in the right place for the deuz clips. I'm fairly happy with the allignment i've got of the front end but will be happier when i get some rubber finishing strip to prevent paint scratching and mask any gap differences.
So this is where i am now! What do you think?
#66
Jordie
-
- TMF+ Member
-
- 13,567 posts
Traders Area Specialist Mod, North and Scotland Area Manager
- Name: Jordan
- Location: North East
Posted 20 April 2009 - 11:19 AM
Cant see pictures at work, but im glad your getting sorted with the engine. I wish id have kept that one and stripped it and built it myself, as the one I went down to portsmouth needed rebuilding anyway in the end....
See BenRoss at turbominis forum. He can machine out the chambers on the cylinder head to a size you want. Work out what extra CC you need to lower your compression, then drop him an email and see what he can do for you.
He did me a cyl head with new double valve springs, valves cleaned/lapped, chambers opened up, porting of the exh ports for turbo. bit of porting on inlet, new studs and nuts, painted and skimmed faces. Lovely job for a good price.
Jordie
#67
Marky Tizz
-
- Members
-
- 2,434 posts
Up Into Fourth
- Location: Carshalton
- Local Club: LSMOC
Posted 20 April 2009 - 10:19 PM
looks really nice mate, I need to find someone to weld tabs on the a panels and bonnet pin struts for me too.... *ponders deeply*
#68
mini_mad69
-
- Traders
-
- 5,417 posts
Let future you worry about it
- Local Club: urrrr no
Posted 10 November 2010 - 12:29 AM
Was this finished?
#69
Guennie
-
- Members
-
- 186 posts
Mini Mad
- Location: Newmarket
- Local Club: Bury Mini Club
Posted 25 May 2011 - 09:23 PM
Hey!
It's been a while since i've been on here! Since i last came on i've finished uni a got myself a real job! lol.
In answer to your question mini_mad69, it has been on the road (i think i've got a couple of videos on here somewhere), but after a few hundred miles it stopped boosting properly and was making a funny sound, so it currently off the road and being done properly (now i have an income!).
Anyway, engine stripped again turns out the head gasket had gone, so it and the compression plate have been scrapped, and i will have the head worked to bring down the CR rather than use the compression plate (which was a bit of a bodge to be honest!).
The major discovery from my engine builder, was that the pistons i had bought on rods had not been put together properly. These pistons had come straight out of a factory engine that had never been run, so both the company i bought them from and myself assumed that a big company would have assembled them correctly. As it turned out, the rods were not fitted centrally on the gudgeon pin and as a result the pin protruded beyond the edge of the piston and scored the cylinder. I thought i was completely stuffed however i called the company i got them from, and that had done some engine work for me, and they remembered the pistons (despite it being 2 years ago!). After looking over the engine and pistons the company (though they didnt assemble the pistons initialy, so it wasn't their fault) decided to do the following for me.
- Rebore to +20 to 1293cc to remove the score mark - foc
- Reimburse the money i paid for the pistons
- Fit the new pistons i buy to the rods - foc
I think this is very fair so kudos to Cambridge Rebores.
So basically although the mini is off the road at the moment it will be on again in the next few months and should be pretty spot on, with a professionally build 1293cc turbo lump.
I'll get some more pictures up of progress if you guys are interested. Hopefully it will look pretty fresh when it's back on the road, especially after i clean up and repaint certain components with some very bright yellow hammerite!!!
Cheers,
Guennie
#70
crazycoleman118
-

- Members
-
- 836 posts
One Carb Or Two?
Posted 18 June 2011 - 11:31 AM
Just read through the whole thread, some great work here, what sort of boost are you hoping to run? sorry if you said before i must have missed that part...
#71
Guennie
-
- Members
-
- 186 posts
Mini Mad
- Location: Newmarket
- Local Club: Bury Mini Club
Posted 19 June 2011 - 09:23 PM
Hey. I was going to run it at 10psi when it was a 1275, and have decided to keep it at 10psi now it's been rebored to 1293cc. That should provide plenty of power, and put that silly grin on my face that i get everytime i hit boost!!!
I've got a small update and a couple of pictures for you.
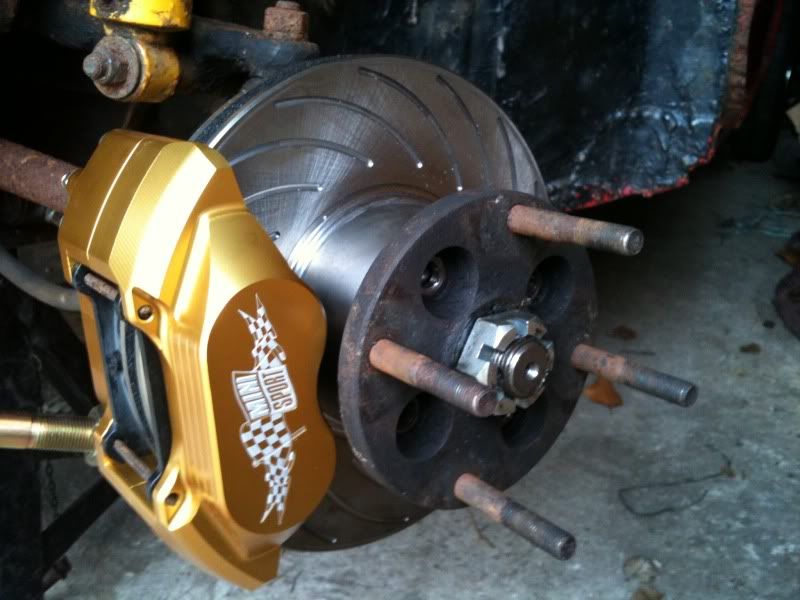
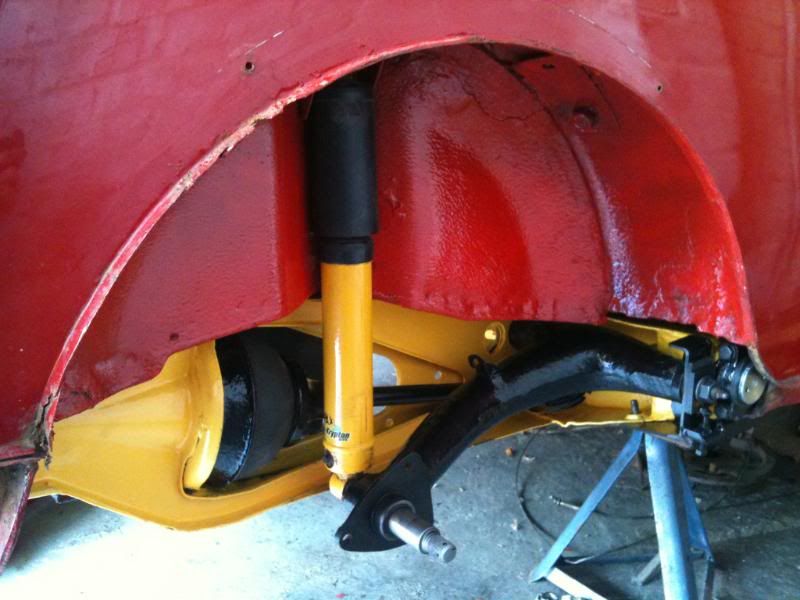
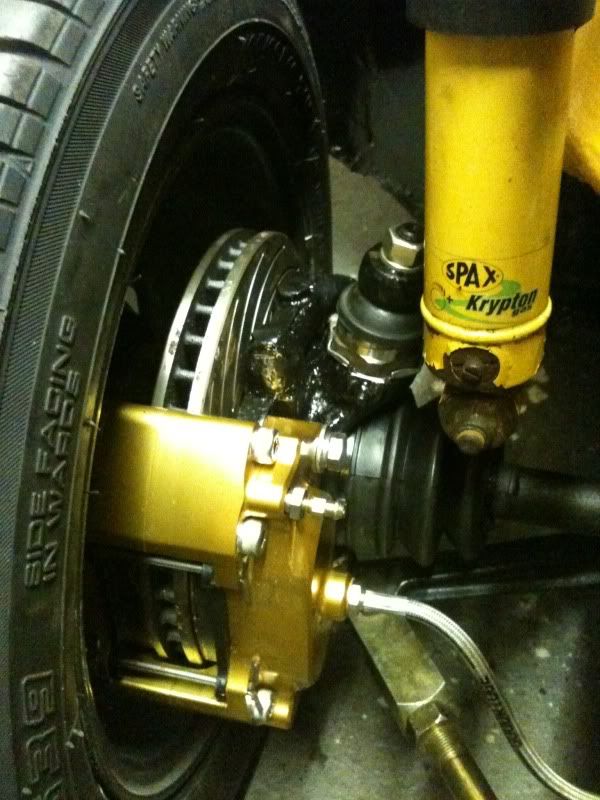
I decided that with the extra power i should probably make sure the brakes and suspension were all up the the job, so i've bought myself some nice shiny 4pots from Minisport. It was the 8.4 vented and groved conversion kit and looks pretty cool. Hopefully they work as good as they look!
I've also fitted completely adjustable and beefed up front suspension components and adjustible rear camber/toe brackets.
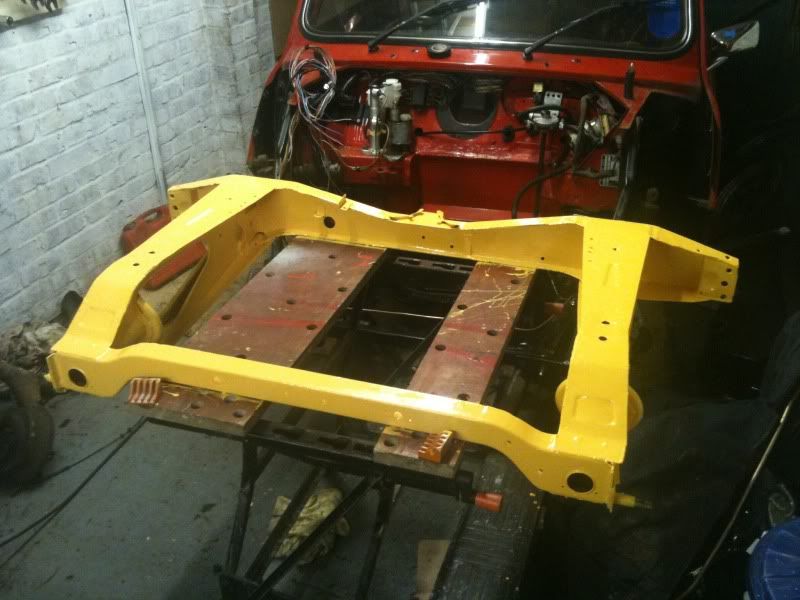
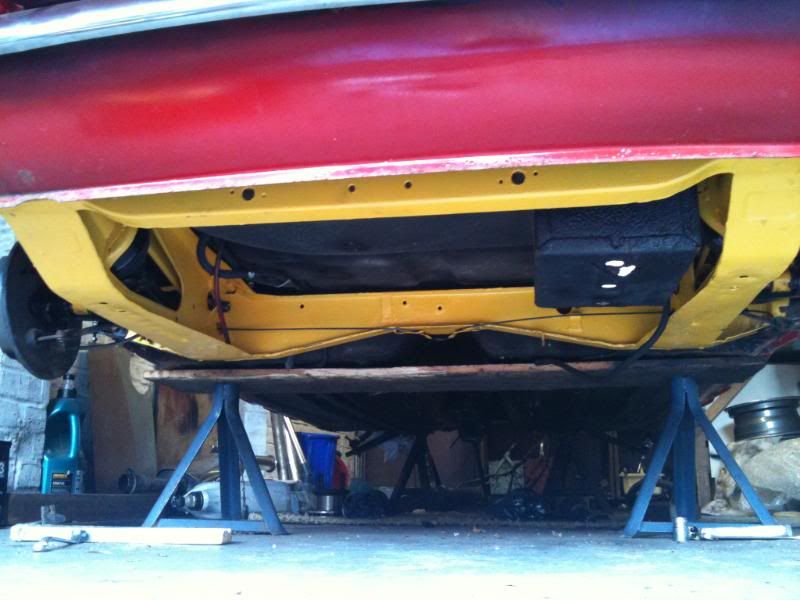
Whilst i had the rear subframe off i decided to give it a coat of paint. I decided that as my dampers and calipers are yellow, i would carry on this theme with the rear subframe, so now i have a nice shiny yellow subframe
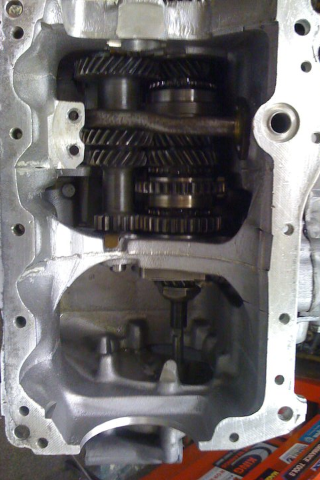
During the week i had a call from Chris at Allitt Motorsport who is rebuilding my engine to say that the gearbox casing was cracked and that unfortunatily it wasn't servicable. So this weenkend i spent a bit of time splitting my old 998cc engine to steel the gearbox casing from that. Once i had box seperated it took it over to Chris who said it looked a very clean box and is going to check all the gears and bearings, replace what's necessary, and then rebuild the box from two he now has. He now has everything he needs and said he'll have it ready pretty soon. I can't wait!! His experience building racing engines is amazing, i'm sure he knows what every nut and bolt in the engine should be torqued to off the top of his head. His website is www.allittmotorsport.co.uk. Well worth a call if your after and engine build.
Hopefully i'll have some pictures of a shiny new engine soon.
Cheers,
Guennie
I've got a small update and a couple of pictures for you.
I decided that with the extra power i should probably make sure the brakes and suspension were all up the the job, so i've bought myself some nice shiny 4pots from Minisport. It was the 8.4 vented and groved conversion kit and looks pretty cool. Hopefully they work as good as they look!
I've also fitted completely adjustable and beefed up front suspension components and adjustible rear camber/toe brackets.
Whilst i had the rear subframe off i decided to give it a coat of paint. I decided that as my dampers and calipers are yellow, i would carry on this theme with the rear subframe, so now i have a nice shiny yellow subframe
During the week i had a call from Chris at Allitt Motorsport who is rebuilding my engine to say that the gearbox casing was cracked and that unfortunatily it wasn't servicable. So this weenkend i spent a bit of time splitting my old 998cc engine to steel the gearbox casing from that. Once i had box seperated it took it over to Chris who said it looked a very clean box and is going to check all the gears and bearings, replace what's necessary, and then rebuild the box from two he now has. He now has everything he needs and said he'll have it ready pretty soon. I can't wait!! His experience building racing engines is amazing, i'm sure he knows what every nut and bolt in the engine should be torqued to off the top of his head. His website is www.allittmotorsport.co.uk. Well worth a call if your after and engine build.
Hopefully i'll have some pictures of a shiny new engine soon.
Cheers,
Guennie
#72
Guennie
-
- Members
-
- 186 posts
Mini Mad
- Location: Newmarket
- Local Club: Bury Mini Club
Posted 03 July 2011 - 09:12 PM
Just a quick update.
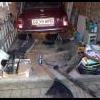
Today me and my mate Steve assembled the rear subframe and radius arms that were painted up last weekend. Its all starting to become more complete again!
Here's a picture of the subframe just after mounting. I love the way the yellow goes with the red. I'm going to spray my cage the same colour when i get it out again.
Once the frame was back on the radius arms were put back on with the adjustible camber and toe brackets.
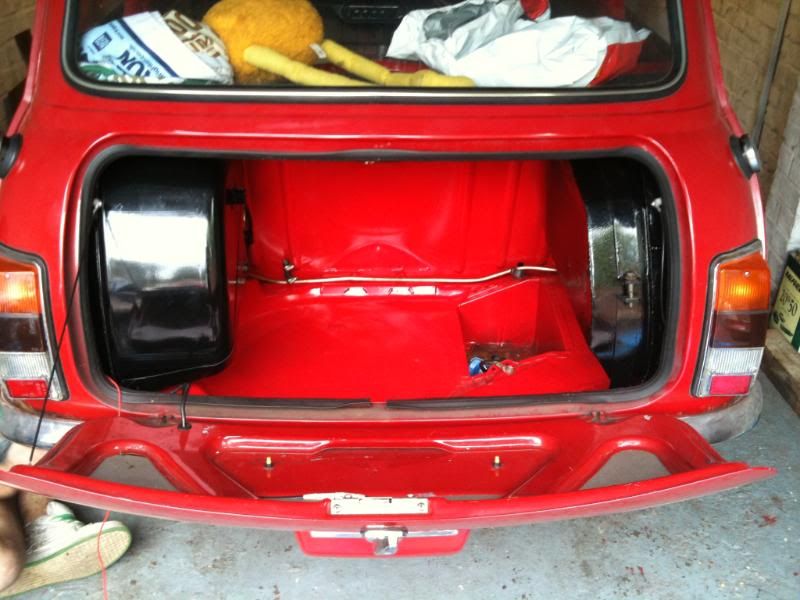
Once the dampers had been put back on i could refit the twin tanks.
At the end of the days work it looked nearly complete again
I just need to get a couple of wheel bearings and the drums and wheels can go back on.
I also saw a couple of pictures on my engine that Chris from Allitt Motorsport posted on his facebook page. I can't wait to go and collect it when it's done. It's going to be perfect!!! (http://www.facebook....188120907890812)
Things are starting to move on a bit quicker now. I'll try to post updates when i can.
Cheers,
Simon
Today me and my mate Steve assembled the rear subframe and radius arms that were painted up last weekend. Its all starting to become more complete again!
Here's a picture of the subframe just after mounting. I love the way the yellow goes with the red. I'm going to spray my cage the same colour when i get it out again.
Once the frame was back on the radius arms were put back on with the adjustible camber and toe brackets.
Once the dampers had been put back on i could refit the twin tanks.
At the end of the days work it looked nearly complete again
I just need to get a couple of wheel bearings and the drums and wheels can go back on.
I also saw a couple of pictures on my engine that Chris from Allitt Motorsport posted on his facebook page. I can't wait to go and collect it when it's done. It's going to be perfect!!! (http://www.facebook....188120907890812)
Things are starting to move on a bit quicker now. I'll try to post updates when i can.
Cheers,
Simon
#73
Jayme 1275
-

- Members
-
- 488 posts
Speeding Along Now
Posted 07 July 2011 - 02:49 PM
looks good mate would love a set of them brakes for mine maybe next year
#74
Guennie
-
- Members
-
- 186 posts
Mini Mad
- Location: Newmarket
- Local Club: Bury Mini Club
Posted 12 October 2011 - 08:36 PM
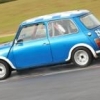
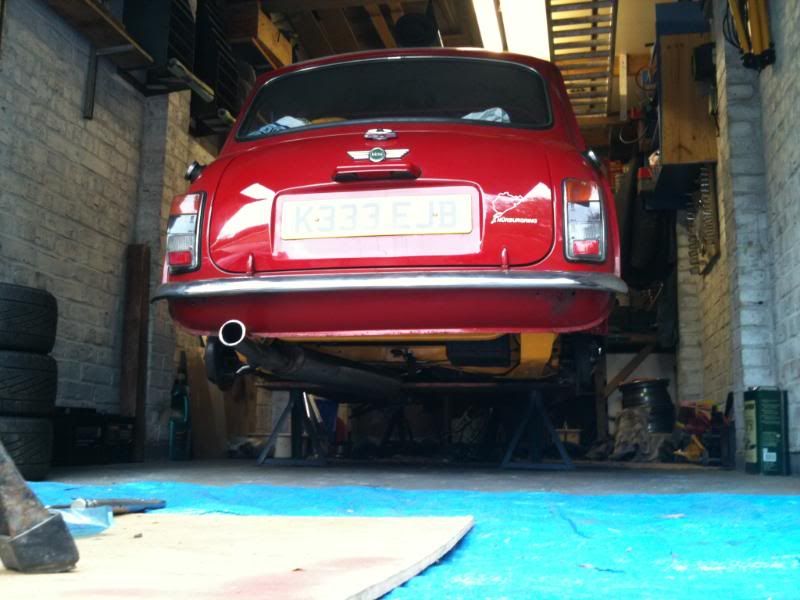
Another Update. I'm sure people are more interested in the photos, but i'll give a brief summary of progress! So:
Here are the pics!
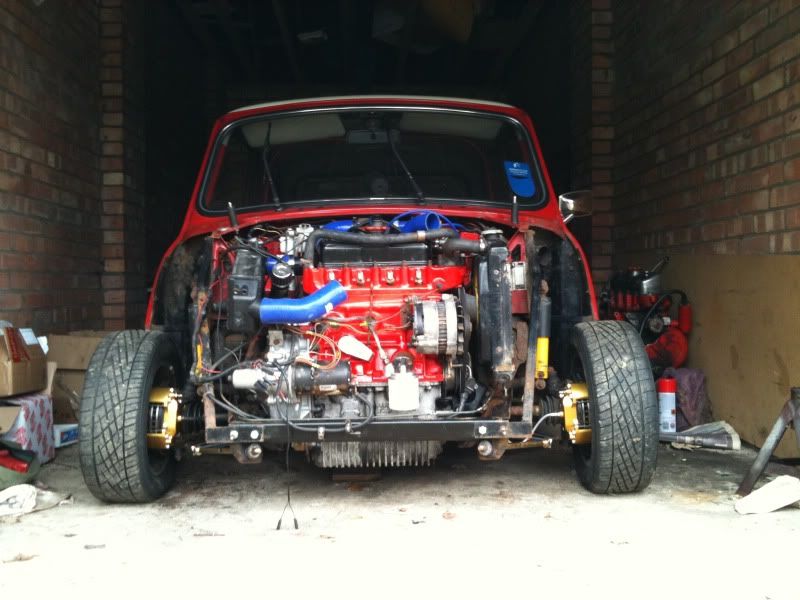
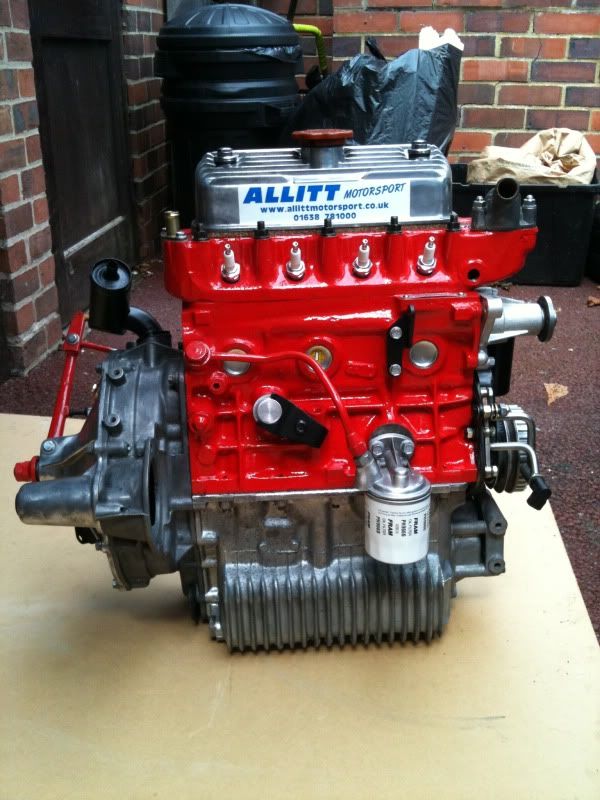
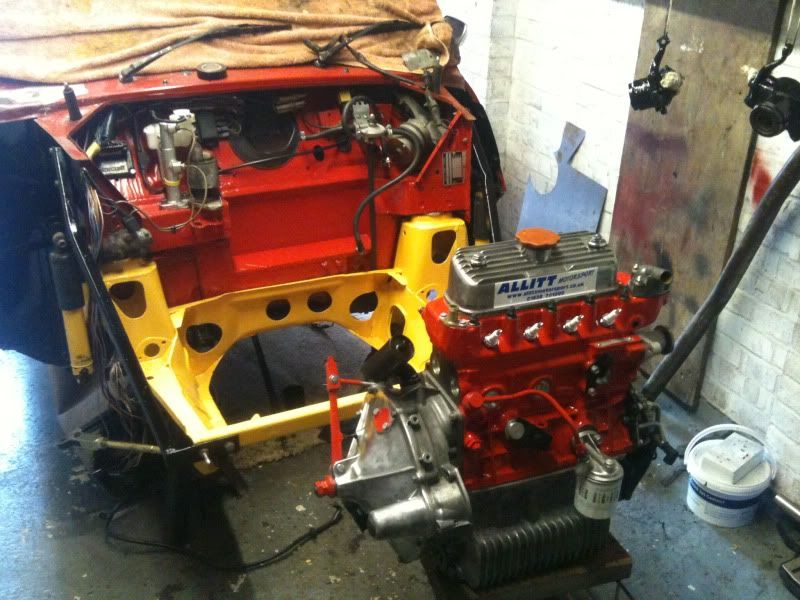
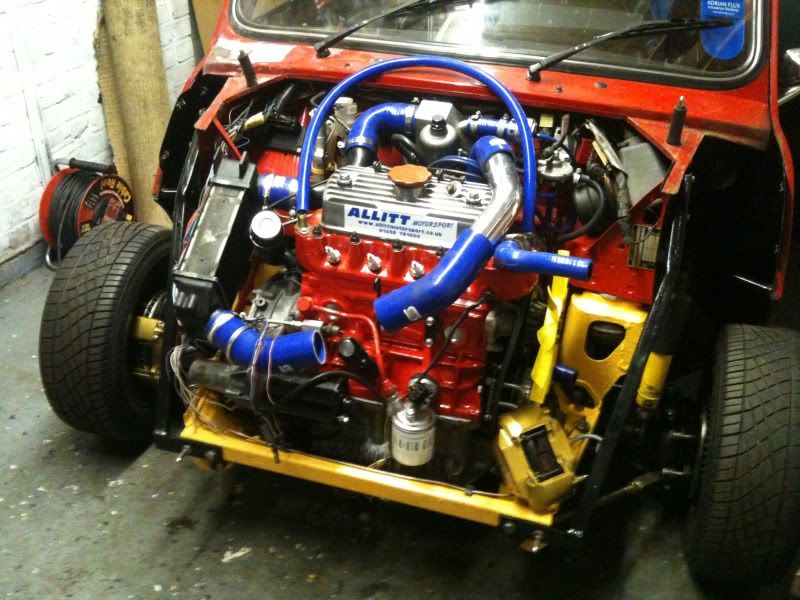
Shiny 1293 turbo!!
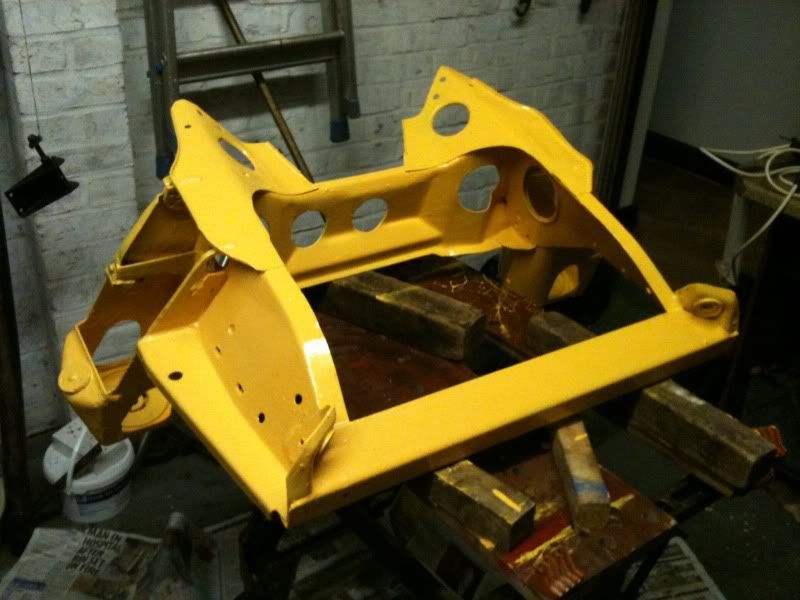
Yellow Subframe
Ready to lift in
Front suspension and brakes
Mocking up
Rear arch

Nice and low )
)
- Engine is now back from the engine builders and in the car, all plumbed in ready to be started for the first time next weekend.
- Front subframe removed cleaned up and painted bright yellow to match the rear one!
- Front suspension removed, inspected, bearings replaced, cleaned and painted and reassembled.
- Minisport vented and grooved 4 pots but on.
- Intercooler and pipe layout finalised.
- New rear arches test fitted before being vinyl wrapped (carbon fibre effect)
- Fly off handbrake and quickshift fitted.
Here are the pics!
Shiny 1293 turbo!!
Yellow Subframe
Ready to lift in
Front suspension and brakes
Mocking up
Rear arch
Nice and low
)
#75
Turbo Nick
-

- Members
-
- 2,913 posts
Up Into Fourth
- Local Club: Turbominis.co.uk
Posted 12 October 2011 - 09:27 PM
just a quick word of advice before you get too far along with the intercooler install, if you're leaving it there then make sure you duct it well and maybe stick a fan on it sucking air through. I used to have mine in a similar place years ago and it did't help a great deal.


2 user(s) are reading this topic
0 members, 2 guests, 0 anonymous users


