
Edited by Stu., 05 January 2015 - 07:06 PM.
91 replies to this topic
#61

Stu.
-

- Members
-

- 912 posts
One Carb Or Two?
- Location: My workshop.
Posted 05 January 2015 - 07:01 PM
How difficult do you find lead loading? Is it a skill you've acquired previously or are you new to it? Seems like a good skill to learn as part of my own resto if it's fairly easy to do. I guess heat build up and panel distortion are the main drawback?
#62
inkyjamesdee
-
- Noobies
-
- 83 posts
Stage One Kit Fitted
- Location: Cambs
Posted 05 January 2015 - 07:31 PM
Got some more done today. But work was cut short by my gas bottle running out.
Got the drivers side panel gap adjusted using a gas welding rod (CCMS) The chap at my local welding centre charged me £1 for 3 rods.

Need to take the door off to finish cleaning up the a panel.
Also adjusted the gap of the window frame had two spare frames from some scrap doors.


Got the drivers side panel gap adjusted using a gas welding rod (CCMS) The chap at my local welding centre charged me £1 for 3 rods.


Need to take the door off to finish cleaning up the a panel.
Also adjusted the gap of the window frame had two spare frames from some scrap doors.


Edited by inkyjamesdee, 05 January 2015 - 11:04 PM.
#63
inkyjamesdee
-
- Noobies
-
- 83 posts
Stage One Kit Fitted
- Location: Cambs
Posted 05 January 2015 - 07:34 PM
How difficult do you find lead loading? Is it a skill you've acquired previously or are you new to it? Seems like a good skill to learn as part of my own resto if it's fairly easy to do. I guess heat build up and panel distortion are the main drawback?
I'm a newby to lead filling just got a kit from frost restorations. It's pretty easy on small level areas but a bit difficult on larger areas. Heat distortion isn't much of an issue as the lead has a low melting temp.
Edited by inkyjamesdee, 05 January 2015 - 11:03 PM.
#64
inkyjamesdee
-
- Noobies
-
- 83 posts
Stage One Kit Fitted
- Location: Cambs
Posted 11 January 2015 - 12:40 AM
Had some lovely photos of the back door gap which is all evened up now but my memory card decided to die. Will hopefully be back in the shed tomorrow but have loads to do Monday (my day off) so won't get out there .
I missed my welding mask ages ago by riveting a head torch to it makes seeing what I am doing much better and I thought I would share and give myself a very shameless bump at the same time...

I missed my welding mask ages ago by riveting a head torch to it makes seeing what I am doing much better and I thought I would share and give myself a very shameless bump at the same time...

#65
F1L8EY
-

- Members
-
- 600 posts
Super Mini Mad
- Location: Cornwall
Posted 11 January 2015 - 01:04 AM
great idea of riveting a head torch to the ask... stealing that idea ;)
#66
inkyjamesdee
-
- Noobies
-
- 83 posts
Stage One Kit Fitted
- Location: Cambs
Posted 01 March 2015 - 11:22 PM
A well over due update I have been doing quite a bit to the mini lately but not as much as I would like. But I have gotten all of the boot and underside of the car welded, seam sealed, etch primer and a coat of stone chip applied. Had some issue with the stone and chip reacting but I'm sure that due to not giving the etch more time to dry. I usually use Gravtex and haven't had any issues with it but couldn't get any on a Sunday so went with Tetrosyl and mixed black and white (only had a can of each) to make grey. The tetrosyl burned my eyes so I think it has more thinners in it which would explain the reaction. But I will defeat these areas when it has had another week to dry then move on to either the interior of the engine bay next.


More soon hopefully. Thanks for looking.


More soon hopefully. Thanks for looking.
#67
inkyjamesdee
-
- Noobies
-
- 83 posts
Stage One Kit Fitted
- Location: Cambs
Posted 29 June 2015 - 09:33 PM
After another break from the mini I have gotten back to it over the past few weeks and made some good progress


I did get a run in the printer but I have it on good authority that no runs means the paint isn't on thick enough lol
Whoops nothing a bit of wet and dry won't resolve tho. There has also been a change in choice of colour. I took Abbie with me to my local paint suppliers and set her loose with a handful of colourchips I will leave you guessing but it not red!!!


I did get a run in the printer but I have it on good authority that no runs means the paint isn't on thick enough lol

Whoops nothing a bit of wet and dry won't resolve tho. There has also been a change in choice of colour. I took Abbie with me to my local paint suppliers and set her loose with a handful of colourchips I will leave you guessing but it not red!!!
Edited by inkyjamesdee, 29 June 2015 - 09:35 PM.
#68
Ben_O
-

- Paint Doctor
-
- 9,794 posts
Mill Road Garage
- Location: Isle of Wight
Posted 30 June 2015 - 08:31 AM
Looks great all in primer!
Well done with it all.
I won't make a guess with the paint colour because i always guess wrong 
#69
Daviewonder
-
- Members
-
- 1,020 posts
Needs an extra inch!!
- Location: England
Posted 31 May 2016 - 07:28 PM
Any updates on this? Did it get finished? It looked like it was going really well.
#70
WPD
-
- Noobies
-
- 85 posts
Stage One Kit Fitted
- Location: Hampshire
Posted 01 June 2016 - 02:59 AM
Tried my hand at some lead filling this weekend. Pretty happy with the results.
I made a small repair on the door step with I was going to use normal body filler I think this is a much better repair.
I Then applied the flux paint tinned the panel and then melted the lead into the space.
I didn't have a rasp to remove the excess lead so I pulled the handle off of a metal file and used that. And then sanded smooth using sandpaper.
There is a little bit of material to remove on the drainage point but otherwise I am very happy with the result.


Looks great, did you use an oxy-acetylene torch or a regular blow torch with a large tip?
I'll eventually give leading a go one day either when I get a classic or get fed up of waiting and dent a panel from the scrappy 
Any issues or difficulties you had starting out? and will you be using lead for the rest of the restoration rather than filler?
Thanks
#71
inkyjamesdee
-
- Noobies
-
- 83 posts
Stage One Kit Fitted
- Location: Cambs
Posted 25 September 2016 - 12:15 PM
Any updates on this? Did it get finished? It looked like it was going really well.
Yeah its still going, I completely lost motivation for a few months and have been back on it with renewed gusto in recent weeks 
Tried my hand at some lead filling this weekend. Pretty happy with the results.
I made a small repair on the door step with I was going to use normal body filler I think this is a much better repair.
I Then applied the flux paint tinned the panel and then melted the lead into the space.
I didn't have a rasp to remove the excess lead so I pulled the handle off of a metal file and used that. And then sanded smooth using sandpaper.
There is a little bit of material to remove on the drainage point but otherwise I am very happy with the result.Looks great, did you use an oxy-acetylene torch or a regular blow torch with a large tip?
I'll eventually give leading a go one day either when I get a classic or get fed up of waiting and dent a panel from the scrappy
Any issues or difficulties you had starting out? and will you be using lead for the rest of the restoration rather than filler?
Thanks
Yeah just a regular blow torch for the lead filler. Its got a low melting temp. Its double bonus as you don't need an expensive oxy torch and wont heat distort the panels.
#72
inkyjamesdee
-
- Noobies
-
- 83 posts
Stage One Kit Fitted
- Location: Cambs
Posted 25 September 2016 - 12:43 PM
I should change the name of this thread to a present for the wife...eventually (or I might keep it for myself) Been married a year now and unfortunately the mini had no involvement in the big day. But on the plus side I have done loads since the last update.
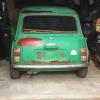
Firstly the mini got some paint.

I did the roof myself, something im pretty proud of as I have very limited spraying experience.
After a failed attempt at painting the body I had to draft in my Dad to help me.

Here she is in a fresh coat of Rover Speedwell Blue.
Since the respray I have taken it down for the jig and its now sitting on brand new sub-frames that came with the old yellow mini I brought from eBay. Which has had new rear brakes, bearing etc. As well as a fresh coat of paint as they weren't looking brand new after 3 years of over spray, dust and getting dragged around the garage.


Next Job was adding some sound proofing.


And then a nice new headliner from optimise automotive, Which I had trimmed in soft textured material more akin to a modern car but looks and feels lovely top quality job from them.

I decided to completely trim the A and B Panels too as I thought it looked really nice when I eyed them up in position and its something a bit unusual without necessarily looking unoriginal.


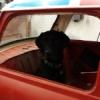
Dad and the dog in the background
Next was more insulation/sound deadening in preparation for the carpet.


Then on with trimming the carpet. Which I made from Veltrim the camper van carpet stuff. It nice and flexible and is pretty soft to touch (Car is for the missus remember  )
)
First I covered the parcel shelf

Then the cross member and door bottoms and started on the back.

Then moved on to the front


Oh and that picture reminds me that I refitted the loom.
Any way that's it for now. Hopefully I will keep the updates rolling now.
Edited by inkyjamesdee, 25 September 2016 - 12:57 PM.
#73
Jared Mk3
-

- Members
-
- 1,974 posts
Has a small thing but it does make a difference
- Location: Kokstad, South Africa
- Local Club: MOCKZN
Posted 25 September 2016 - 01:52 PM
Awesome colour ![=]](https://www.theminiforum.co.uk/forums/public/style_emoticons/default/sideways.gif)
#74
inkyjamesdee
-
- Noobies
-
- 83 posts
Stage One Kit Fitted
- Location: Cambs
Posted 29 September 2016 - 11:23 PM
Did a bit more this week, looked at refitting the heater. Looked pretty rusty and tired so I stripped it down. The fan worked really well but the matrix had a hole, which explains the rust.

The inside was cleaned of rust and got an extra thick coat of hammerite to prevent future rusting

Added new foam to the controller flappy part.


Added extra foam to the matrix so the air has to go through it rather than around it. Also put the fan in the right way round for anyone who noticed that.

Then used this body sealing stuff to seal it up nicely.

Few coats of Halford satin. Nothing to crazy as it's,mostly hidden but tidys the whole thing up.

Got to find the other window de-mister vent now and I have a nice new top and bottom dash rail from an SPI that I brought this week and are both in mint condition to fit then. More soon thanks for looking.
#75
inkyjamesdee
-
- Noobies
-
- 83 posts
Stage One Kit Fitted
- Location: Cambs
Posted 18 October 2016 - 08:31 PM
Just a little update. Got a few parts arriving soon but until then been keeping my self busy.
I made my self a new battery cable up out of 300amp cable (which has the terminals on now but no photos) and plonked a battery in the tray and made my self a little clamp up to hold in in place with some bits I had going spare.

Also have the dash rails in place and the switch panel. Need some new non faded switches and will be fitting a flat dash front when I get round to ordering one.

Did a quick mod on the heater to make for easier hose routing. So now the pipes will run on same side as there corresponding holes in the bulk head.


After that I was at a bit of a loss as to what to do so I had a play with the polisher.


Still needs more work on the polishing but defiantly looks a lot better than it did.
More soon hopefully get the lights fitted next.


Also tagged with one or more of these keywords: roundnose
Projects →
Mini Saloons →
1976 Mini 1000 Le "stripey"Started by cafeclassic , 03 Sep 2025 |
|

|
||
Projects →
Mini Saloons →
Mini Cooper Project - Finally StartsStarted by piphatch , 08 Jan 2025 |
|

|
||
Projects →
Mini Saloons →
1965 Austin Mini Restoration - Canadian Mk1Started by DoubleEh , 14 Nov 2022 |
|

|
||
Projects →
Mini Saloons →
Project Joe - 1991 Mini Mayfair 998Started by Eggers , 02 Jun 2022 |
|

|
||
Projects →
Mini Saloons →
Mpi Dashboad ProblemStarted by mikeprez , 22 Dec 2021 |
|

|
0 user(s) are reading this topic
0 members, 0 guests, 0 anonymous users


