[quote name="THE ANORAK" post="3378110" timestamp="1460909715"]
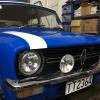
removed the standard mini city stickers. the electric blue was clashing with the cranberry red !!! the start of a process to de-90's the car.
Looks great! Any handy tips for getting off the remaining glue left behind by the stickers? Took my Mayfair stripes off and they've left marks.
EDIT: OOOPS my quote didn't work :/


What Did You Do To Your Mini Today
Started by
Ipod
, Apr 10 2010 07:06 PM
9954 replies to this topic
#5746

dobbin1999
-

- Noobies
-

- 82 posts
Stage One Kit Fitted
- Location: Kent
Posted 25 April 2016 - 04:57 PM
#5747
dobbin1999
-
- Noobies
-
- 82 posts
Stage One Kit Fitted
- Location: Kent
Posted 25 April 2016 - 04:58 PM
White spirit will remove the old glue without damaging the paint.
#5748
SuperDeLuxeNick
-

- Members
-
- 625 posts
Super Mini Mad
- Location: Dorset/Somerset
- Local Club: West Country Minis
Posted 25 April 2016 - 05:12 PM
Fitted new wheels.
Replaced beading on arches.
Next job is to finally set the ride heights all even and sort stance. Currently sitting way to high on one side!
#5749
davej
-

- Members
-
- 985 posts
Kelly Jones
- Location: North Wales
Posted 25 April 2016 - 06:34 PM
Took it for an MOT and it passed!! 
#5750
Chris.Williams
-
- Members
-
- 679 posts
Super Mini Mad
- Location: Matamata
Posted 26 April 2016 - 07:10 PM
Carpeted my boot/rear of the seat and mounted my amp
image.jpeg
Then made a boot board, which I will carpet tomorrow all going well
I'll be the first to ask, got any drawings for the boot board? Looks good
 image.jpeg 44.85K
13 downloads
image.jpeg 44.85K
13 downloads
#5751
Batmini
-

- Members
-
- 378 posts
Speeding Along Now
- Location: Stourport
Posted 26 April 2016 - 08:03 PM
Thanks buddy, think i'll have a go at one of these
#5753
Keith Piper
-

- Noobies
-
- 3 posts
Starting My Mini Up
- Location: East Sussex
Posted 26 April 2016 - 08:39 PM
Cut the floor out
#5754
minifreek1
-

- Members
-
- 1,260 posts
One Carb Or Two?
- Location: Wigan
- Local Club: S.U.N.M.O.C
Posted 27 April 2016 - 07:03 AM
Cut and retrimmed the centre console to add oil pressure and battery, but to also incoporate a cubby hole too (for somewhere to put my phone)...
I found some stickyback walnut effect vinyl Iv had for years and was just waiting for something to use it on...
#5755
MacGyver
-

- TMF+ Member
-
- 1,028 posts
One Carb Or Two?
- Location: Fribourg
Posted 27 April 2016 - 07:56 AM
Hammered my left headlight aperture and wing back in to shape and reshaped my arches.
Then my mum came along and said: You really made a pigs ear of that then...
That took the 'satisfaction of a job well done' smile right off my face. 😞
Will have to take it out on the boot floor... 😀
Then my mum came along and said: You really made a pigs ear of that then...
That took the 'satisfaction of a job well done' smile right off my face. 😞
Will have to take it out on the boot floor... 😀
#5756
Chris.Williams
-
- Members
-
- 679 posts
Super Mini Mad
- Location: Matamata
Posted 27 April 2016 - 11:19 AM
Started wiring my dash board ready for installation
image.jpeg 62.28K
11 downloads
image.jpeg 37.62K
9 downloads
Bit hard to see but there are 4" speakers in the air vent holes.
image.jpeg 62.28K
11 downloads
image.jpeg 37.62K
9 downloadsBit hard to see but there are 4" speakers in the air vent holes.
#5757
Chris.Williams
-
- Members
-
- 679 posts
Super Mini Mad
- Location: Matamata
Posted 27 April 2016 - 11:22 AM
Thanks buddy, think i'll have a go at one of these
Let me know how you get on.
#5758
James_eaton_thewholething
-

- Members
-
- 1,063 posts
One Carb Or Two?
- Location: Manchester
Posted 27 April 2016 - 03:41 PM
Cut, filed and hammered the exhaust hole to get it to fit up higher.
.

.


#5759
ukcooper
-
- Members
-
- 1,625 posts
Camshaft & Stage Two Head
- Location: Stoke on Trent
Posted 01 May 2016 - 01:28 PM


#5760
redboy
-
- Members
-
- 333 posts
Speeding Along Now
Posted 01 May 2016 - 10:49 PM
I don't suppose u know what diameter pipe I would need to do that with. I'm guessing I would need to be a pretty flush fit as to not leak. Also when doing this do u need to drain the system before trying to remove the thermostat or do u just pop the top hose off a catch the little bit of over spill. Sorry for the all the QsSorry late reply. Yes works a treat. Need to take the thermostat out first and make sure your heater knob is pulled out fully. This back flushes the system and just keep going until it runs clear.wait how does that work? you stick it into the water pump, hose it down and it comes out the radiator? if that works for flushing all the coolant then that's mighty cool.
Coolant flush after fitting new water pump.
After that I blew back a little on the rad pipe which forces some water back out the thermostat housing just enough to put a litre of blue coolant in.
Thermostat and pipe back on. Job done.

The pipe was 22mm. The jubliee clip clamps the pipe. Don't worry about a bit of leakage.
No need to drain the system. A bit of water will come out when you take the thermostat housing off but not much.


3 user(s) are reading this topic
0 members, 0 guests, 0 anonymous users
-
Bing (3)


