Hi Graham, great to see your work. What is Matt thinking of? That engine looks lovely. Young people are so dull compared to us older folks! I dread fitting the front and you are showing me why! My driver's side door is like yours. Think it might have been made for a Land Rover the way it fits. You would be best replacing the piston rings if not too expensive. They lose their spring with age and tend not to seal so well. Certainly that's what happens on old motorbike engines.
What a brave man you are on my page!! I would love to see you show Jan your post! Its amazing what courage we have outside of the wife's notice!
All the best, hope you are having a great festive season.
Hugh


Mini Virgin Rebuild Of 83 Mayfair.
Started by
grahama
, May 22 2010 05:09 PM
1006 replies to this topic
#316

hughJ
-

- Members
-

- 727 posts
Soldiering Along
- Location: Highlands, Scotland
Posted 27 December 2011 - 08:34 PM
#317
minimuk
-

- Members
-
- 1,947 posts
Camshaft & Stage Two Head
- Location: Midlands
Posted 28 December 2011 - 08:41 PM
Graham, now the Turkey is cold I can see you are having fun with the front end, door fits nicely after your tweeking , and that engine colour, is Fab!! I would leave it like that especially the other bits are the same, then again, it will show dirt very quickly.......
#318
SomethingNew71
-

- Traders
-
- 462 posts
Speeding Along Now
- Location: Charlotte, NC, USA
- Local Club: Carolinas Classic Minis United
Posted 31 December 2011 - 02:38 AM
Project is looking really great. I just started following. I subscribed. Keep up the great work!
#319
grahama
-
- Members
-
- 2,442 posts
Up Into Fourth
- Location: Warrington
- Local Club: None in my area !!
Posted 02 January 2012 - 06:10 PM
Hi all,
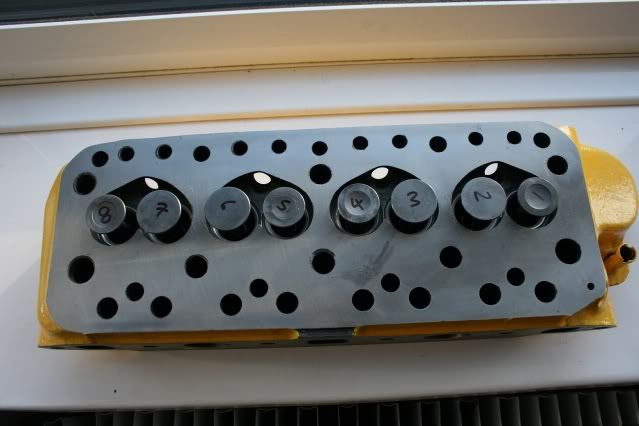
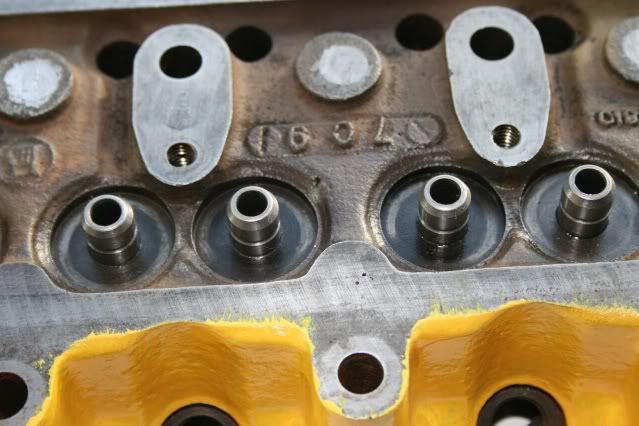
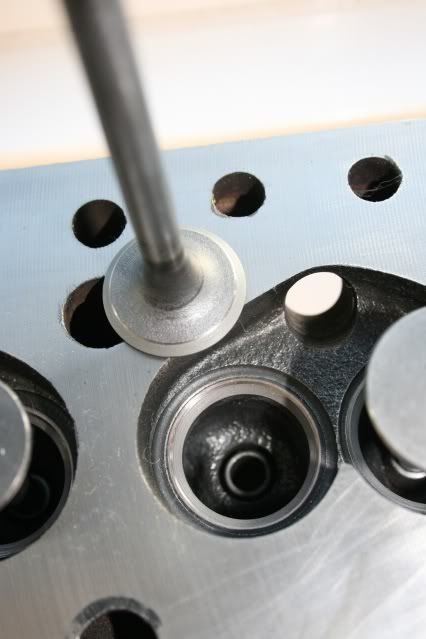
small update as usual at the moment !! Engine on hold till everything opens and I get a tool to deglaze the cylinders and some rings for the one I bust. However I did get the head fitted with new valve guides and the machine shop recut the seats and lapped the valves in for me, however the cost was £85, so a little more than I was expecting, cost of the guides, but done nicely.
Would liked to have done these myself but I don't have the guide fitting equipment and cutting the seats back in meant it was way too much for me and the grinder !!
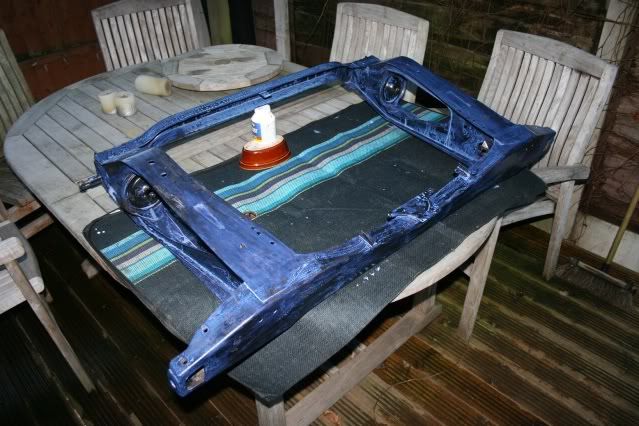
Next was the long standing date with my rear subframe. Got the rust off it a while ago and got it out to be greeted by more surface rust, that will teach me to leave it too long in the shed !! Anywat wire wheeled and brushed it back to a nice condition and set about fixing it up.
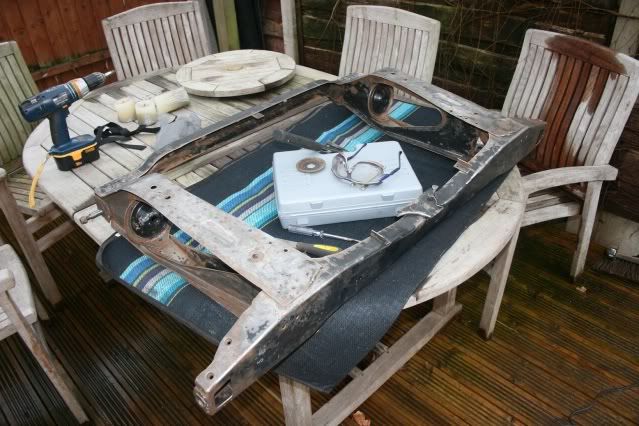
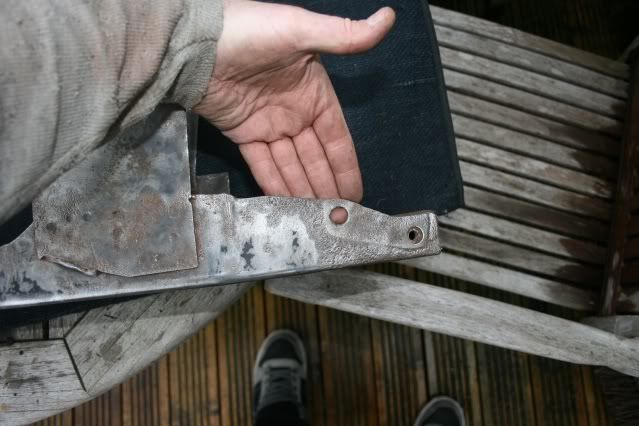
Had to drill out a nut on removal and there was only a little rot so cut it out. Made a piece and welded it in and positioned a camber bracket to align the new nut.
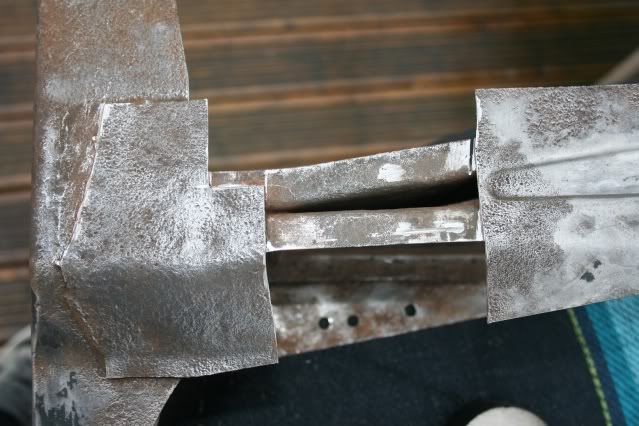
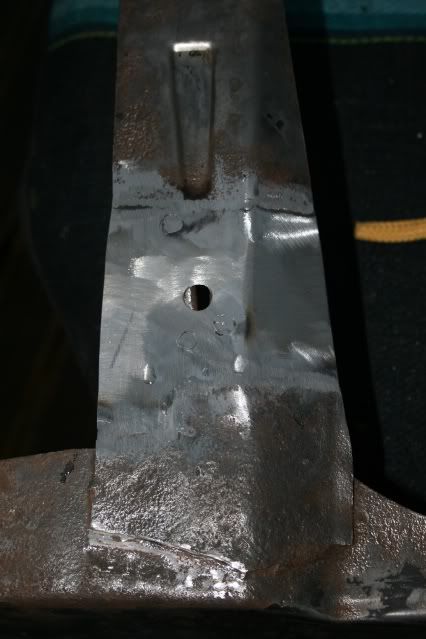
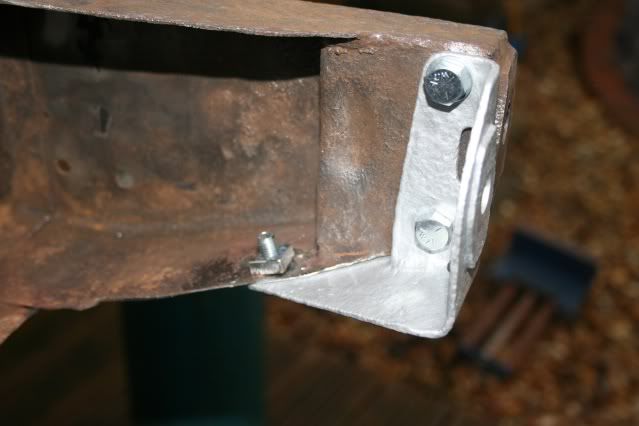
All welded up and ground back it got a severe kurusting !!
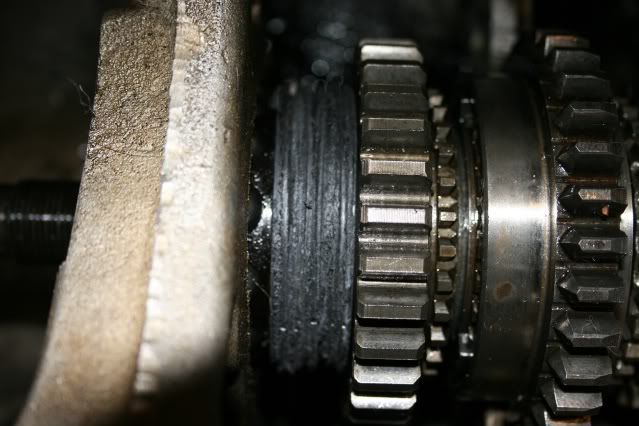
Had to look at the gearbox as Carlos is getting back in the lead so out it came from under the stairs. Initially I was told it was crunching into 2nd gear and saw some grooves on the gears. My heart sank as I thought they were crunching markes but turned out to be marks put on to identify the gears. So here goes, my first look into gearboxes !!
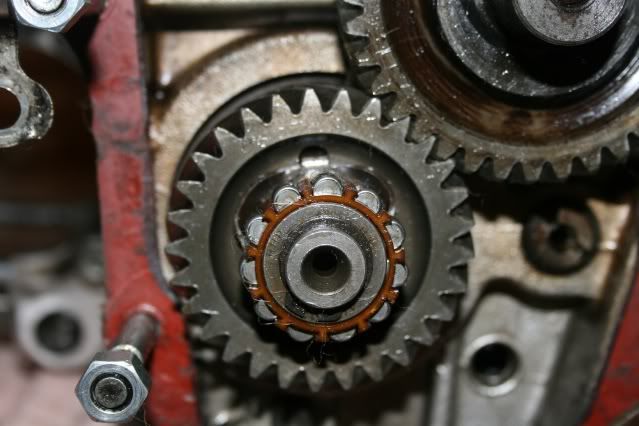
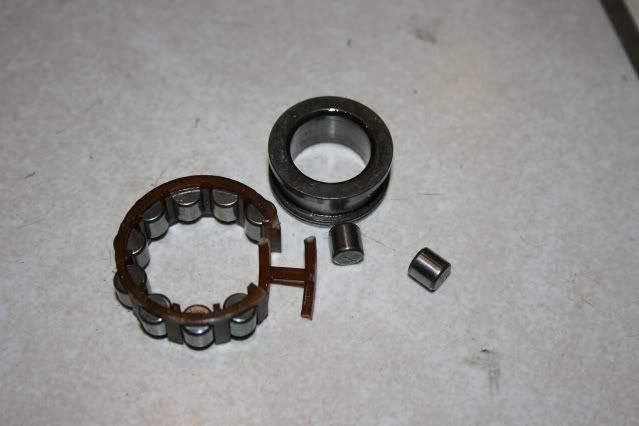
Start point was to remove the roller bearing, bloody hell no bearing puller what a crappy hour that was. Yes you guessed it, bust it right near the end !
None of the fancy stuff to get the input end tight nut off either so it was up to Matt to help..
Just enough weight on there with the block and Matt, came off quite easily too I thought after reading about people's scaffold bars and long pole antics, socket bar and a ring spanner for leverage and off it came.
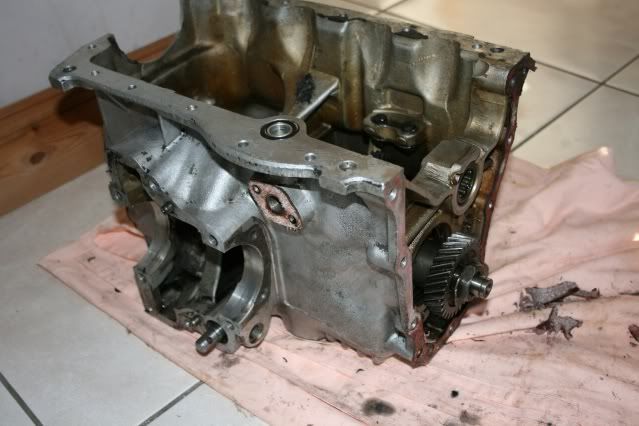
Stripped the box of all the bolts to make cleaning it up later easier and had a look at the gears.
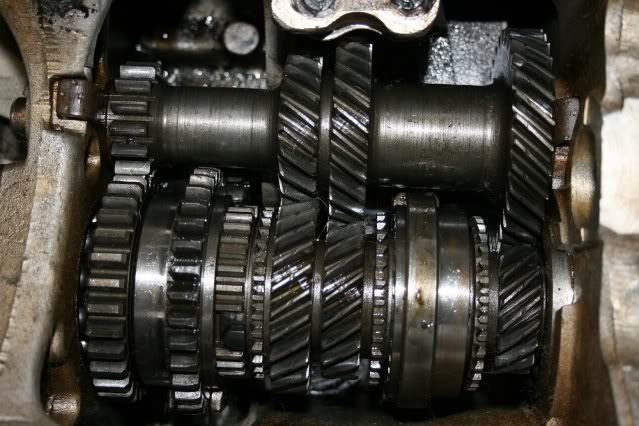
See what I mean about the grooves!! Guessworks has looked at them and says they are fine so that will do me. Will change the balk rings when I redo and hopefully that will be all. Just waiting for a big socket to undo the other tight nut on the diff end.
That's all for now, small but interesting, for me anyway !!
Graham
small update as usual at the moment !! Engine on hold till everything opens and I get a tool to deglaze the cylinders and some rings for the one I bust. However I did get the head fitted with new valve guides and the machine shop recut the seats and lapped the valves in for me, however the cost was £85, so a little more than I was expecting, cost of the guides, but done nicely.
Would liked to have done these myself but I don't have the guide fitting equipment and cutting the seats back in meant it was way too much for me and the grinder !!
Next was the long standing date with my rear subframe. Got the rust off it a while ago and got it out to be greeted by more surface rust, that will teach me to leave it too long in the shed !! Anywat wire wheeled and brushed it back to a nice condition and set about fixing it up.
Had to drill out a nut on removal and there was only a little rot so cut it out. Made a piece and welded it in and positioned a camber bracket to align the new nut.
All welded up and ground back it got a severe kurusting !!
Had to look at the gearbox as Carlos is getting back in the lead so out it came from under the stairs. Initially I was told it was crunching into 2nd gear and saw some grooves on the gears. My heart sank as I thought they were crunching markes but turned out to be marks put on to identify the gears. So here goes, my first look into gearboxes !!
Start point was to remove the roller bearing, bloody hell no bearing puller what a crappy hour that was. Yes you guessed it, bust it right near the end !
None of the fancy stuff to get the input end tight nut off either so it was up to Matt to help..
Just enough weight on there with the block and Matt, came off quite easily too I thought after reading about people's scaffold bars and long pole antics, socket bar and a ring spanner for leverage and off it came.
Stripped the box of all the bolts to make cleaning it up later easier and had a look at the gears.
See what I mean about the grooves!! Guessworks has looked at them and says they are fine so that will do me. Will change the balk rings when I redo and hopefully that will be all. Just waiting for a big socket to undo the other tight nut on the diff end.
That's all for now, small but interesting, for me anyway !!
Graham
Edited by grahama, 02 January 2012 - 06:12 PM.
#320
minimuk
-
- Members
-
- 1,947 posts
Camshaft & Stage Two Head
- Location: Midlands
Posted 02 January 2012 - 06:27 PM
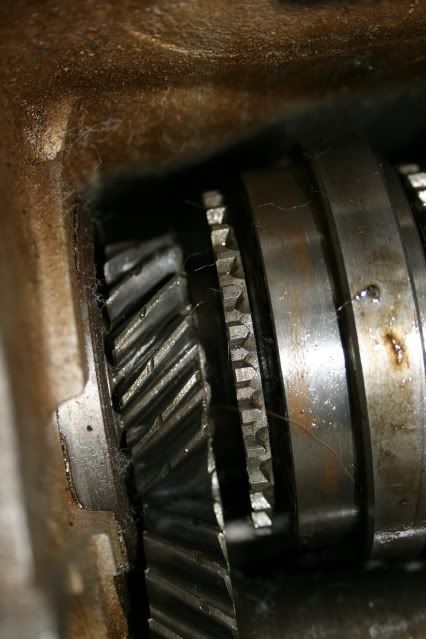
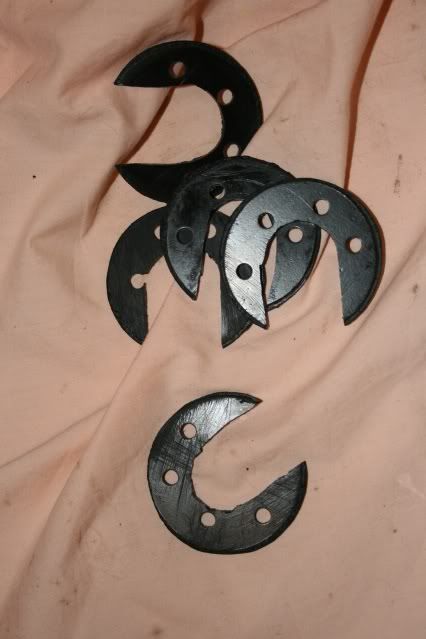
looks good from here, you might have to replace the double roller bearing when you get to that point, and check both synchroniser's for free movement of wear of the springs and balls, when you get to those, just don't loose them as they might shoot out of their holes once the 3rd motion shaft is moved/removed from the gearbox.They are a pain to find in the garage/kitchen as they are small!!
Edited by minimuk, 02 January 2012 - 06:29 PM.
#321
benjy_18
-

- TMF+ Member
-
- 1,038 posts
One Carb Or Two?
- Local Club: LSMOC
Posted 02 January 2012 - 06:36 PM
hey graham!
cant beleive how long its been since i last commented on this
you and hugh are racing ahead of me now but at least i can keep an eye on this to help me out, projects coming along really well though!
hope the new year brings you luck
Ben
cant beleive how long its been since i last commented on this
you and hugh are racing ahead of me now but at least i can keep an eye on this to help me out, projects coming along really well though!
hope the new year brings you luck
Ben
#322
hughJ
-
- Members
-
- 727 posts
Soldiering Along
- Location: Highlands, Scotland
Posted 02 January 2012 - 07:28 PM
Hi Graham good to see your work - the cylinder head looks smashing! And you do have the engine in the house!! So sorry about busting the roller bearing. I thought it was just me did things like that. And isn't the feeling horrible when something like that busts - sick to the stomach. It will pass but its something else to replace.
Graham. make sure you hide the weld to the subframe. I gather there are new MOT rules in which welding repairs to a subframe isn't permitted anymore. That and lazyness made me buy a subframe (as my Xmas present from Anne). Your welding is so good you can easily do an invisible repair.
Glad I'm not touching my engine!
All the best
Hugh
#323
minifcd
-

- Members
-
- 246 posts
Mini Mad
- Location: Stamford
Posted 02 January 2012 - 08:46 PM
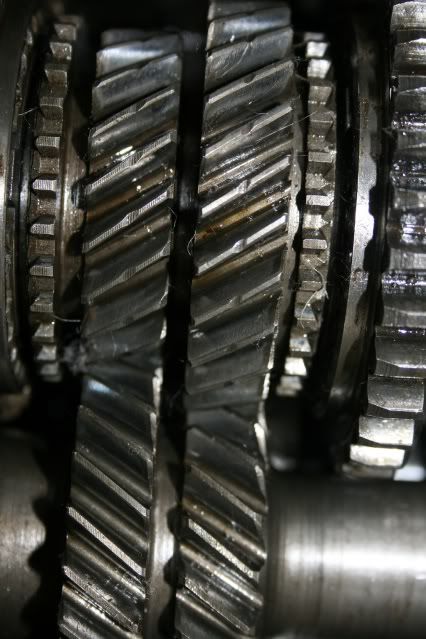
Hi graham, engine looks great! Its definately a good idea to replace those baulk rings, as they can contribute to crunchy gears, but also have a good look at all of the small teath with the points, on each gear and in the synchro hubs. If they have flattened or rounded points then the gear won't engage smoothly and so grind and crunch. I had to replace two gears and a synchro hub on my last project for this reason so worth a check.
Good luck.
Good luck.
#324
Andrew O
-

- Members
-
- 1,425 posts
Previously known as Andrewo330.
Posted 03 January 2012 - 03:03 PM
Might have to report you for that cylinder head. Its Pornographic content
#325
grahama
-
- Members
-
- 2,442 posts
Up Into Fourth
- Location: Warrington
- Local Club: None in my area !!
Posted 03 January 2012 - 07:44 PM
lol, they are probably my three favourite pics so far. Makes me feel like I am getting somewhere !!
#326
Andrew O
-
- Members
-
- 1,425 posts
Previously known as Andrewo330.
Posted 03 January 2012 - 07:59 PM
Yeah fair play that Cilinder head is B E A utifulll
#327
grahama
-
- Members
-
- 2,442 posts
Up Into Fourth
- Location: Warrington
- Local Club: None in my area !!
Posted 08 January 2012 - 08:08 PM
Hi all,
been inside thinking how to undo the third motion box nut as it seemed tighter than the other end. In the end I took it into work and jammed it under out weights bench, piled on loads of weights and with an extension bar it undid, just like that !!!
Stripped the diff and cleaned it up into it's component parts but stopped short of splitting the crown wheel bit as it looked fine so why create yet more work.
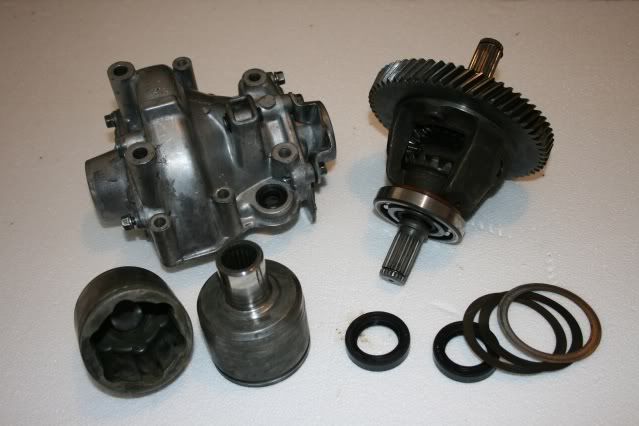
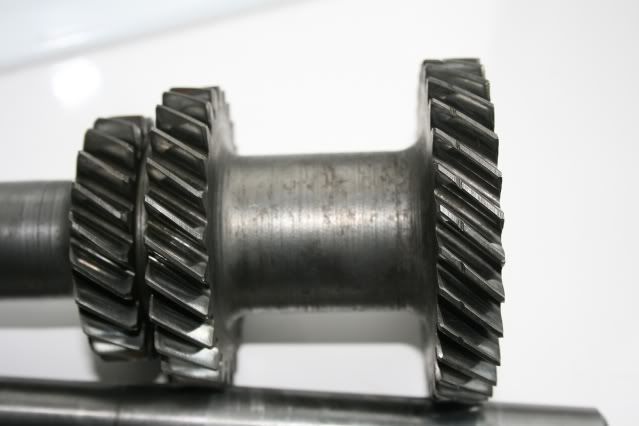
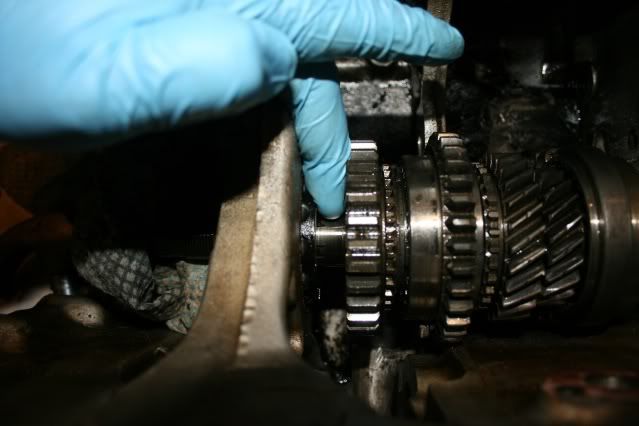
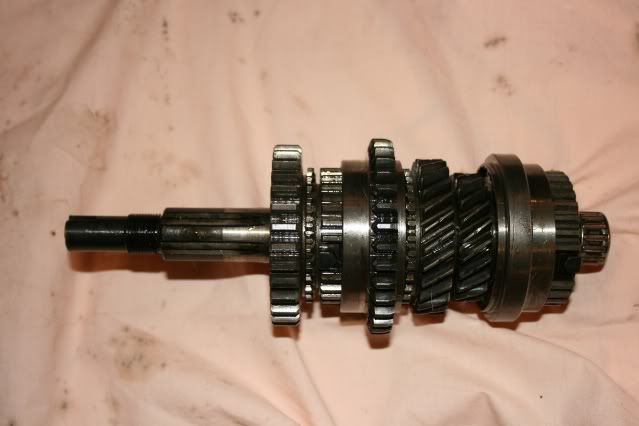
All nice and clean, wd40 to protect it ubtil the rebuild. Now, after the two tight nuts were moved I removed the lay gear and the reverse gear to clean and inspect, came up fine, shaft ok, lay gears ok, reverse gear fine. To me that is, have asked in problems for a more expert view.
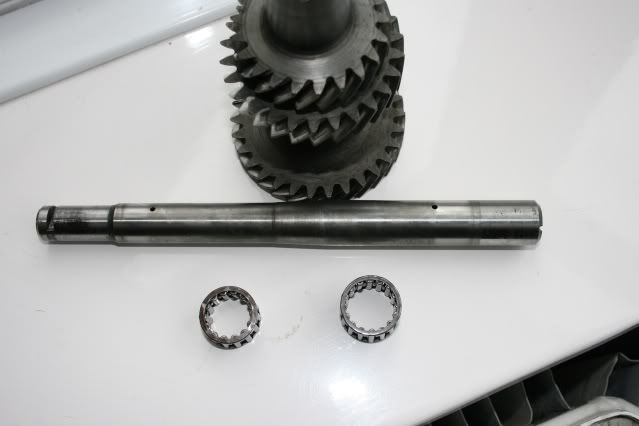
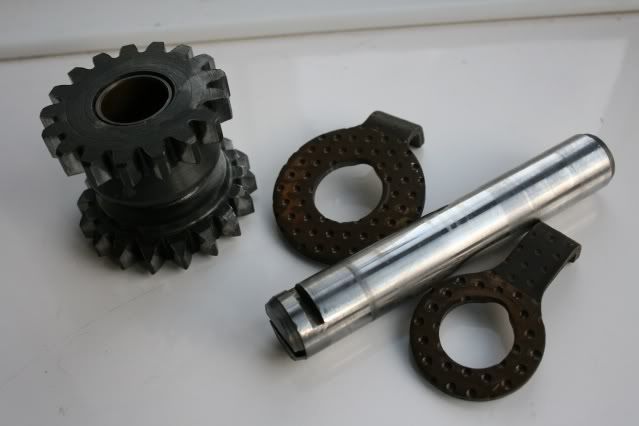
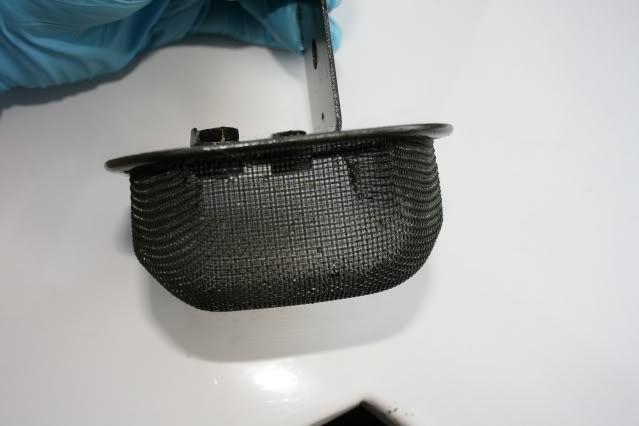
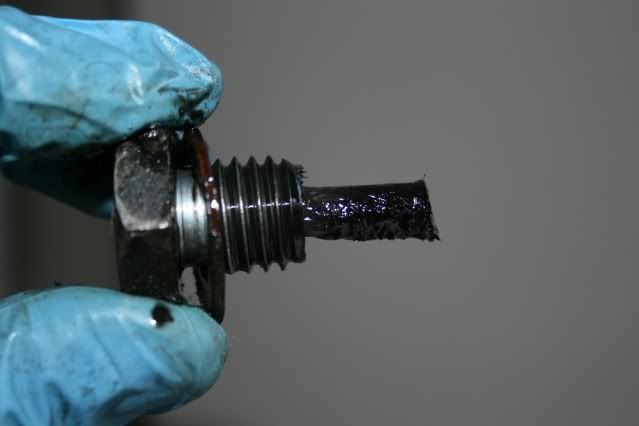
Getting the lay gear and reverse gear and shaft out was just a case of undoing a few nuts and tapping the shafts out. The bearings on the main shaft were the next problem. I also took out the oil strainer and sump plug for a clean. The strainer will be replaced with a centre oil pickup but I was amazed with how clean the strainer was. Has all my oil burnt off leaning no work for the strainer to do, I don't know but the sump plug had some crap clinging to it.
Mmmmmmmm bearings on the main shaft !! I decided to make a slide hammer with a thread attachment out of the old nut to pull it off the main shaft.
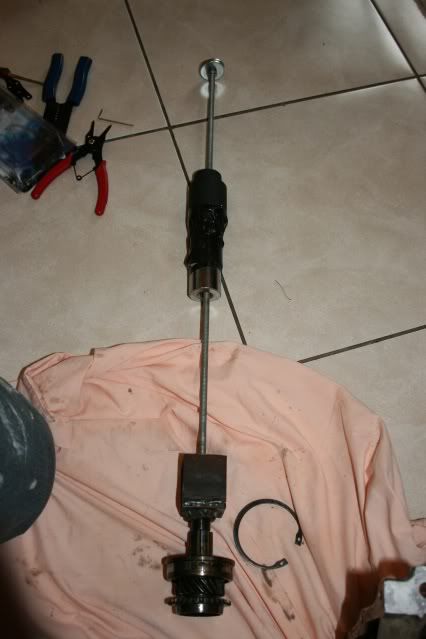
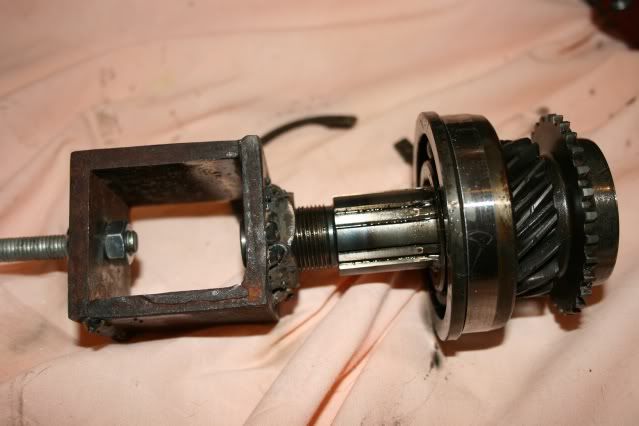

Used some taped together sockets for the weight on the slider and after two or three slams, the bearing popped off, easy !! Hugh, I have some Scottish in me as too tight to buy a tool for 1 job, lol. After this I had read that you knock the 3rd motion/diff end to move the gears over and create a space for a collet thing to push the other bearing off, so I made some out of some hard plastic I had.
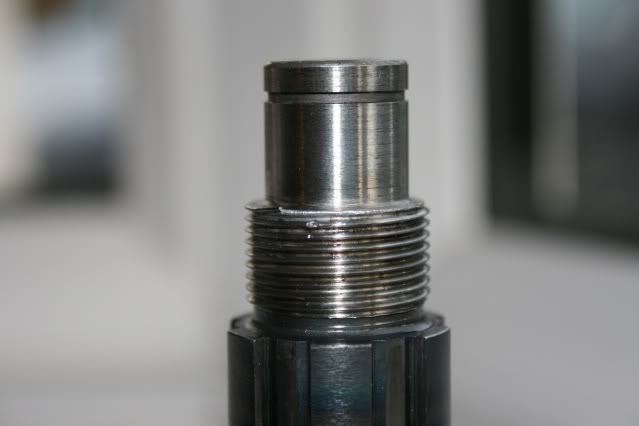
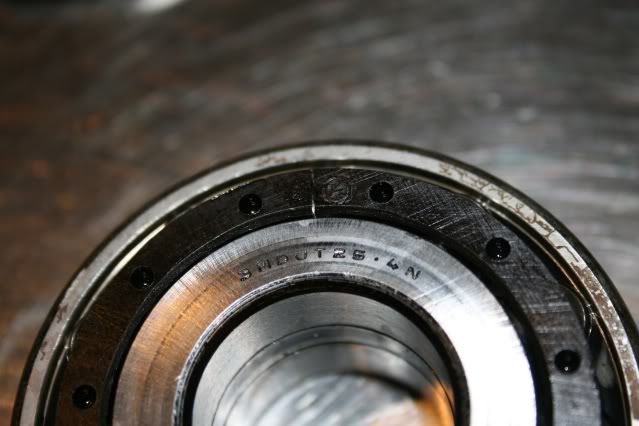
I knocked the shaft back towards the diff end and the spacers, filling the gap as shown, pushed the bearing out. Had a couple of problems but not major, the very start of the thread on the input end came off as I couldn't screw my tool on far enough and I may have broken the double roller bearing as it has a split in, but the thread will be fine with a new nut and am finding out about the bearing split.
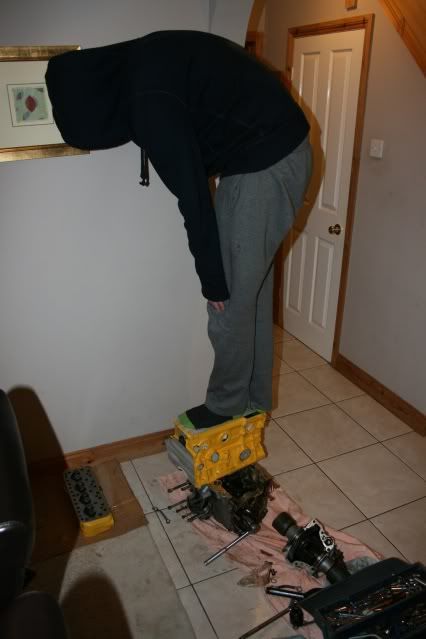
Anyway, after a full day of making tools, City getting shafted by the Referee in the FA Cup, and Jan scouling at me for not starting the back room decorating I was left with this...
Result !!
Just got to clean it up, paint it and put it all back together !!
Graham
been inside thinking how to undo the third motion box nut as it seemed tighter than the other end. In the end I took it into work and jammed it under out weights bench, piled on loads of weights and with an extension bar it undid, just like that !!!
Stripped the diff and cleaned it up into it's component parts but stopped short of splitting the crown wheel bit as it looked fine so why create yet more work.
All nice and clean, wd40 to protect it ubtil the rebuild. Now, after the two tight nuts were moved I removed the lay gear and the reverse gear to clean and inspect, came up fine, shaft ok, lay gears ok, reverse gear fine. To me that is, have asked in problems for a more expert view.
Getting the lay gear and reverse gear and shaft out was just a case of undoing a few nuts and tapping the shafts out. The bearings on the main shaft were the next problem. I also took out the oil strainer and sump plug for a clean. The strainer will be replaced with a centre oil pickup but I was amazed with how clean the strainer was. Has all my oil burnt off leaning no work for the strainer to do, I don't know but the sump plug had some crap clinging to it.
Mmmmmmmm bearings on the main shaft !! I decided to make a slide hammer with a thread attachment out of the old nut to pull it off the main shaft.
Used some taped together sockets for the weight on the slider and after two or three slams, the bearing popped off, easy !! Hugh, I have some Scottish in me as too tight to buy a tool for 1 job, lol. After this I had read that you knock the 3rd motion/diff end to move the gears over and create a space for a collet thing to push the other bearing off, so I made some out of some hard plastic I had.
I knocked the shaft back towards the diff end and the spacers, filling the gap as shown, pushed the bearing out. Had a couple of problems but not major, the very start of the thread on the input end came off as I couldn't screw my tool on far enough and I may have broken the double roller bearing as it has a split in, but the thread will be fine with a new nut and am finding out about the bearing split.
Anyway, after a full day of making tools, City getting shafted by the Referee in the FA Cup, and Jan scouling at me for not starting the back room decorating I was left with this...
Result !!
Just got to clean it up, paint it and put it all back together !!
Graham
Edited by grahama, 08 January 2012 - 08:13 PM.
#328
Carlos W
-

- TMF+ Member
-
- 10,115 posts
Mine is purple, but I have been told that's normal
- Location: Sittingbourne, Kent
Posted 08 January 2012 - 08:29 PM
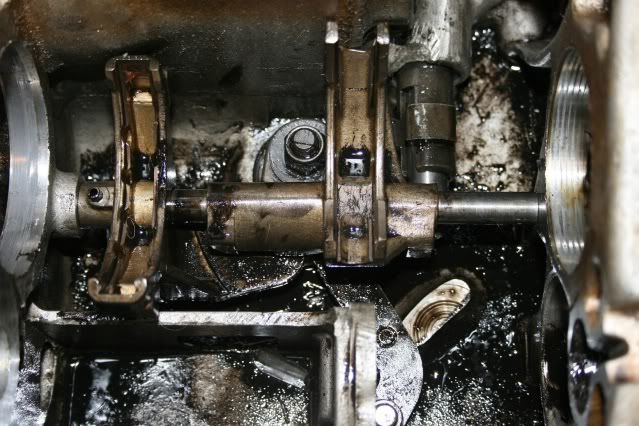
looking good Graham, now to knock the pins out on the selectors!
I found that the pin on the left of your bottom picture hits the bottom of the casing but is far enough through so that it's no longer in the shaft!
I found that the pin on the left of your bottom picture hits the bottom of the casing but is far enough through so that it's no longer in the shaft!
#329
grahama
-
- Members
-
- 2,442 posts
Up Into Fourth
- Location: Warrington
- Local Club: None in my area !!
Posted 08 January 2012 - 08:34 PM
Bloody hell, more awkward stuff tomorrow then !!! but will be all clean and up for inspection so not all bad !!
#330
Carlos W
-
- TMF+ Member
-
- 10,115 posts
Mine is purple, but I have been told that's normal
- Location: Sittingbourne, Kent
Posted 08 January 2012 - 08:37 PM
It wasn't difficult, if you turn it so you can get as much of the pin through as possible through it's out of the shaft that runs through the middle!
Edited by Carlos W, 08 January 2012 - 08:37 PM.


2 user(s) are reading this topic
0 members, 2 guests, 0 anonymous users


