Looking at the selector pin, was the spring in the diffy housing in one piece, or broken on the end, check the ball again, there could be a 'dent/mark' in it, 15P a new one spring probably the same. definately some kinda dirt got stuck there at some point, did you say there was a problem with the second gear? Baulk rings looking cool.


Mini Virgin Rebuild Of 83 Mayfair.
Started by
grahama
, May 22 2010 05:09 PM
1006 replies to this topic
#346

minimuk
-

- Members
-

- 1,947 posts
Camshaft & Stage Two Head
- Location: Midlands
Posted 10 January 2012 - 06:49 PM
#347
minifcd
-

- Members
-
- 246 posts
Mini Mad
- Location: Stamford
Posted 10 January 2012 - 07:25 PM
Yeah, they're the grooves I meant. They don't look bad at all, you could get away with reusing them, but its gonna be down to how many miles the box has covered and if you know how the smooth the gear changes were before you started restoration. I would say if you have room in your budget, then replace them anyway. I did on my first mini even though they weren't that bad as I wanted to be sure I didn't need to strip it again.
#348
grahama
-
- Members
-
- 2,442 posts
Up Into Fourth
- Location: Warrington
- Local Club: None in my area !!
Posted 10 January 2012 - 07:51 PM
Scott,
The ball bearing is mint and the spring is fine. probably some dirt. I put the selector in with the ballbearinf, spring and sleeve locked it in and tried the selector. Positive change into the different positions. I have not driven it, embarasingly, except in first, which went in fine, as when I looked at it there was no battery, flat tyres and no water or much oil in it. Battery on to check it started and drove it onto the driveway !!
The guy said it was crunching going into 2nd but never saw / heard it to be honest. It can't have been doing so much if the gears are in such good nick, one nick on all of them, dog teeth still pointy, synchros looking ok. The clock said 10k miles, bit unbeleivable but some things line up. Clutch was original and dated, body panels stamp dated, original subframes in good nick, mint interior, no oversills, the list goes on. Can't tell if it has had any work done though apart from the engine number saying 1985 when the car is 1983, lots of underseal on protecting it when I got it.
All I can do is inspect everything, put it back together andd hope for the best. Worst case scenario is taking the box off and sending it to Guessworks at a later date !!
mmmmmmmmmmmm !!!
Graham
Edited by grahama, 10 January 2012 - 07:52 PM.
#349
minimuk
-
- Members
-
- 1,947 posts
Camshaft & Stage Two Head
- Location: Midlands
Posted 10 January 2012 - 09:05 PM
like your approach, doing well, because you are not sure the car done 10K or 110K, check, check and double check is the way, and replace in in doubt.
#350
minifcd
-
- Members
-
- 246 posts
Mini Mad
- Location: Stamford
Posted 10 January 2012 - 09:09 PM
I think the shaft looks fine from the picture. The marks are from the contact area of the ball bearing as it rolls over the crest when selecting each of the gears. Thats why there appears to be 5 marks, 2 on one crest and 3 on the other. As the shaft twists ever so slightly to select either synchro and moves in and out to engage the gear the marks appear. One way would be 1st and 3rd whilst the other way would be 2nd, 4th and reverse hense giving 5 marks. Thats normal wear I believe. I think your doing a cracking job and the box does look low mileage compared to the 70,000 mile one I last rebuilt. Make sure its all clean as you put it back together and you can't go wrong mate.
#351
AndyMiniMad.
-

- Members
-
- 3,295 posts
Up Into Fourth
- Location: Under The Bonnet.
Posted 17 January 2012 - 09:44 PM
What a great job you are doing! have been watching this thread, and it has brought back loads of memories, good and bad!!..If the gearbox was crunching when going from third to second then usually that points to a worn baulk ring, they are only £7 so I would be tempted to replace first and second rings, they are the ones that wear the quickest. New double roller bearing is needed as your cage is split. input shaft bearing should be fine, but again they are quite cheep..When you fit the new nose bearing, dont forget that you will need to replace the outer race in the transfer case as they are apparently matched..a pig of a job! I always replace the idler gear bearing in the gearbox case. but thats just me being fussy.....Im very impressed with your fabrication skills...Great stuff!!
#352
PhilipGCaldwell
-

- Members
-
- 870 posts
One Carb Or Two?
Posted 19 January 2012 - 09:11 PM
top work grahama, would love to come visit sometime, only live local
#353
hughJ
-

- Members
-
- 727 posts
Soldiering Along
- Location: Highlands, Scotland
Posted 20 January 2012 - 08:25 PM
Graham all I can do is admire your courage. Hope it all goes well. I am impressed with the amount of knowledge people are passing on to you. Gearboxes are a mystery to me!
All the best
Hugh
All the best
Hugh
#354
grahama
-
- Members
-
- 2,442 posts
Up Into Fourth
- Location: Warrington
- Local Club: None in my area !!
Posted 20 January 2012 - 09:37 PM
Cheers Phil, have pm'd you, hope to meet you soon.
Hugh, encouraging as ever, when you get into the gearbox it is pretty simple and I thought whilst I am not outside I may aswell have a go at cleaning it up.
Otherwise I am waiting on a set of piston rings and a final deglazing, (just want to measure the bore sizes first), and I can rebuild the engine, how succesfully that will be we will see. Phil this is where you may well come in, lol. Then I need to buy some gearbox bits, bearings etc, but have to take Jan away first to get in her good books !!! Decorating is done so roll on next week.
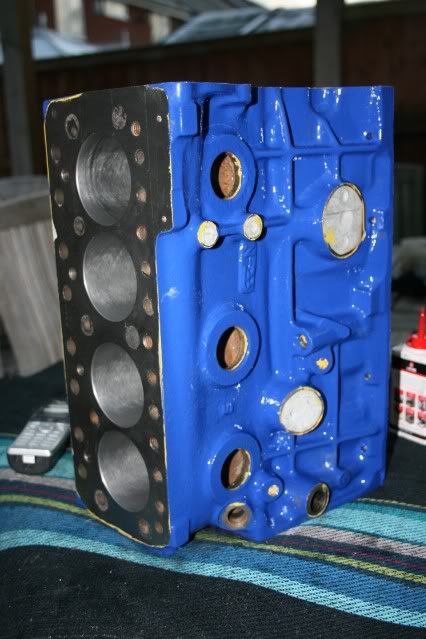
Didn't get away with the yellow block so it is now blue . Head to paint too, will post some progress pics soon.
Graham
Hugh, encouraging as ever, when you get into the gearbox it is pretty simple and I thought whilst I am not outside I may aswell have a go at cleaning it up.
Otherwise I am waiting on a set of piston rings and a final deglazing, (just want to measure the bore sizes first), and I can rebuild the engine, how succesfully that will be we will see. Phil this is where you may well come in, lol. Then I need to buy some gearbox bits, bearings etc, but have to take Jan away first to get in her good books !!! Decorating is done so roll on next week.
Didn't get away with the yellow block so it is now blue
. Head to paint too, will post some progress pics soon.Graham
#355
richgilberto
-

- Noobies
-
- 70 posts
Stage One Kit Fitted
- Location: New York, NY
- Local Club: Long Island Mini Enthusiasts
Posted 24 January 2012 - 02:20 AM
I'm having a great time reading this thread as my mini is nearly identical to the one you started with (except for the rust somehow) - It's an 84 automatic with the 12" wheels and disc brakes but it's all the same, right down to the Zircon Blue exterior and Bounty Blue interior. I'm doing a switcharoo with the scheme of things, taking off the black bumpers and grille and giving it a mock cooper look.
Keep at it man!
Cheers,
Rich
Keep at it man!
Cheers,
Rich
#356
grahama
-
- Members
-
- 2,442 posts
Up Into Fourth
- Location: Warrington
- Local Club: None in my area !!
Posted 25 January 2012 - 10:34 PM
Hi all,
small update time, still avoiding going outside so some engine stuff and as you know gearbox. Well, gearbox is awaiting a few bits but no cash yet as have been getting the last few things for the engine first.
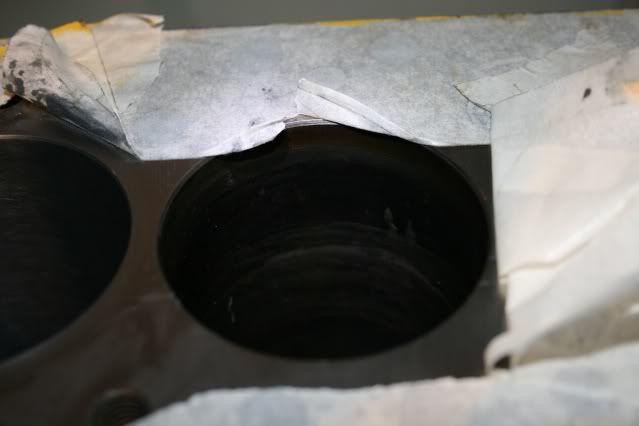
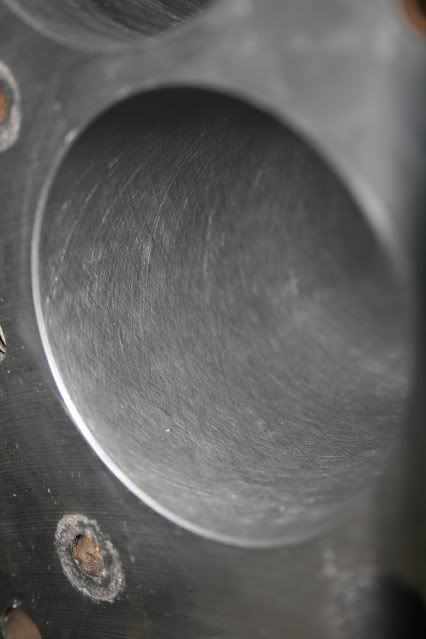
This was the sort of state the cylinder bores, not too bad but need a deglazing before the rebuild .
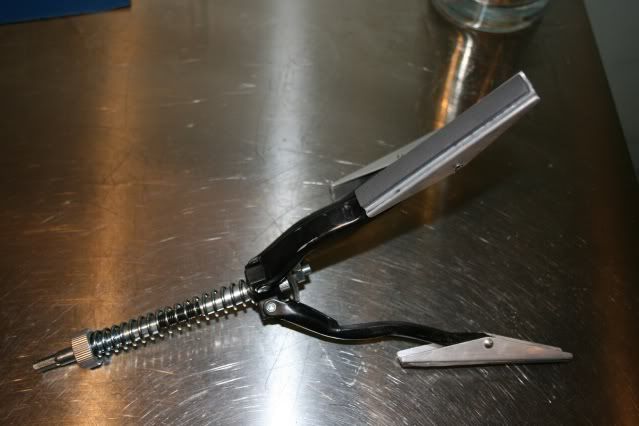
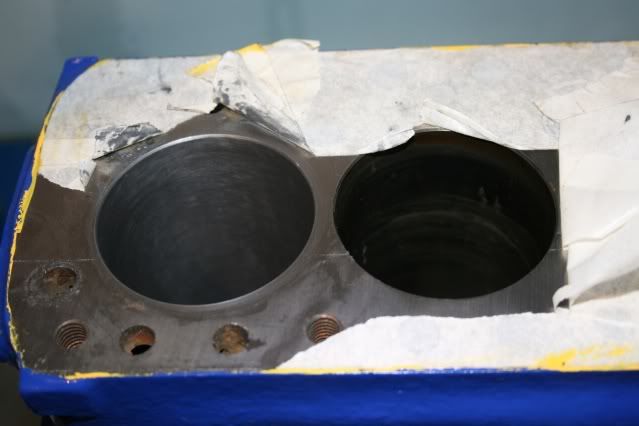
So I bought a deglazing tool, described as a honing tool but it wont be up to that I'm sure, cross hatching and deglazed is what I am after. The before and after pic for the first go came out ok I think.
Coming along nicely but I want to go a little further as there is a mark I want to get rid of. However the material that is removed was worrying me so I ordered some telescopic gauges to measure inside the cylinders. Before they arrived I checked the piston ring end gap to see how much they had worn.
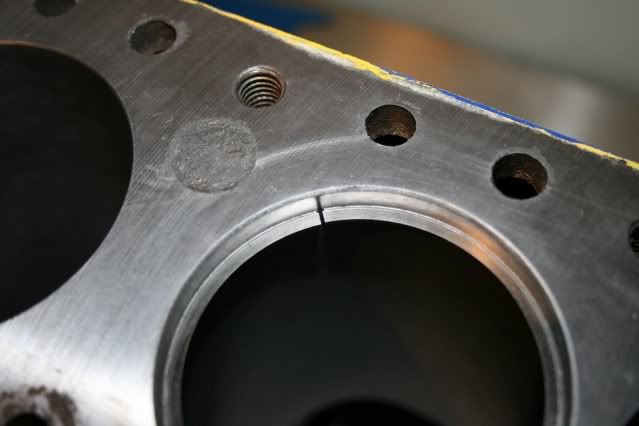
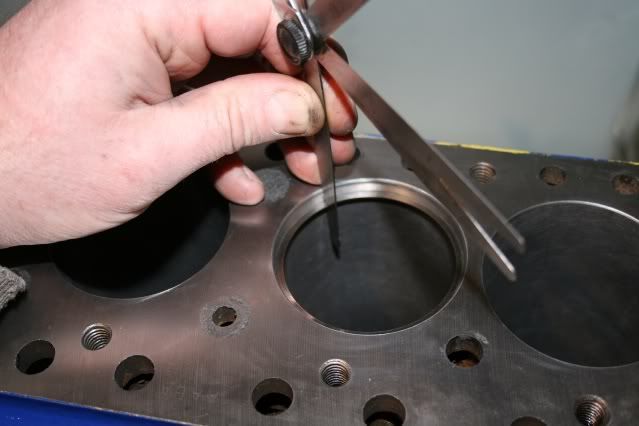
To do this you put a ring in as pic one, pat it level with a cylinder head and measure the end gap as in pic 2. All gaps were 7 tho above top of tollerences Therefore I asked around and 'blow by' seemed to be the problem causing oil consumption, but some said they were fine, but I decided to change them. Then the fun started.
My pistons weren't recognised by anyone and when they did find them the rings were obsolete, ahhhhhhhhhhhhhhhhh !! Defo can't afford new pistons and rebore etc, so off to my engine fella again who has all the BL spec books and he found some that, although not original, were the correct size ! Down side £65, but he did get a bearing out of the bell housing case for me for free at the same time, so well pleased really !!
Then did the end gap test again and the oil scraper ring and middle ring were within tollerences and the top one much closer, (3 tho over), so pretty pleased. The old springs were much less bouncy than the new ones so I think I made the right decision to change them.
Then I tested the cylinder wear.
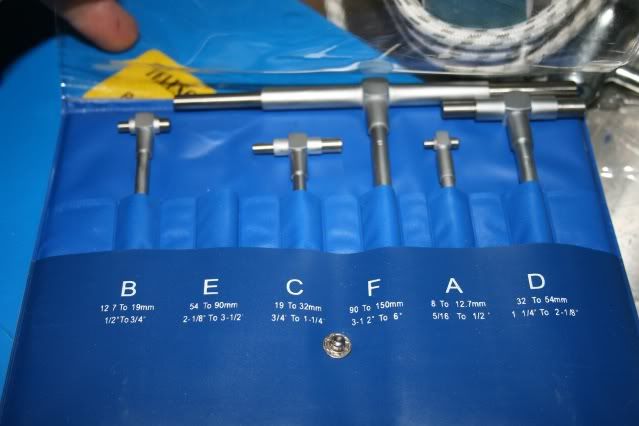
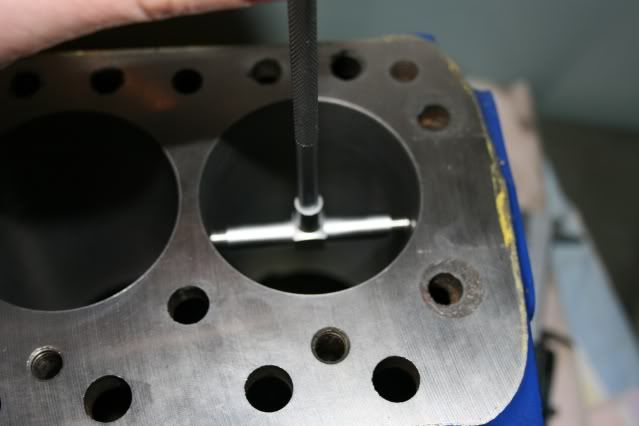
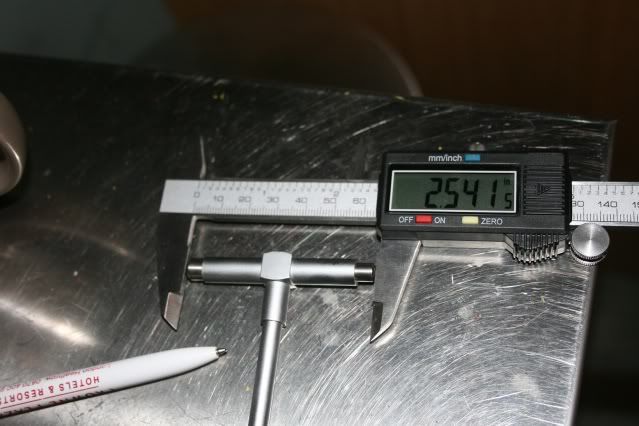
The telescopic gauges arrived and I watched good old U tube to see how to use them properly, quite easy really, but they are a good guide, not absolute on the dot measurements. With this in mind I made 3 measurements for each dimension check both front to back and side to side in the cylinder, and top, middle and bottom of the cylinder.
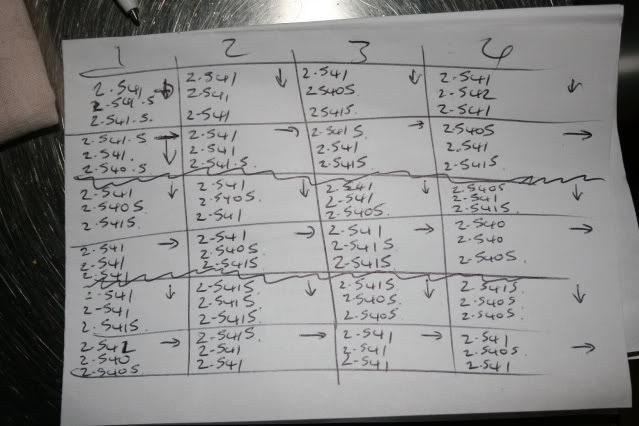
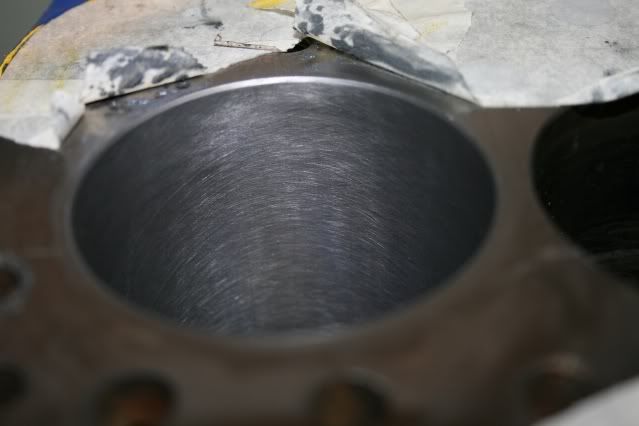
Lots of measurements later and after averaging them all, I decided that the wear on the cylinders was small, about 1 - 1 1/2 tho so I will do a little more deglazing. The measurements also told me that there was no taper or ovaling of the cylinders, as accurately as I could, so all good again. Piston skirt to cylinder measurements were within tollerences too.
Hopefully all this means it wont burn too much oil when put together. I have also made the 'electronic aquaintance' of a local mini owner on here, who has put an engine together already and will be my right hand man when it all goes wrong, lol. Ta Phil !!!
As you may have noticed the block is now blue, lost that battle but not too fussed really, it's his mini, but the blue is much bluer than the body colour will be, so we will see who was right at a later date !!
All ready for the rebuild now !!
Graham
small update time, still avoiding going outside so some engine stuff and as you know gearbox. Well, gearbox is awaiting a few bits but no cash yet as have been getting the last few things for the engine first.
This was the sort of state the cylinder bores, not too bad but need a deglazing before the rebuild .
So I bought a deglazing tool, described as a honing tool but it wont be up to that I'm sure, cross hatching and deglazed is what I am after. The before and after pic for the first go came out ok I think.
Coming along nicely but I want to go a little further as there is a mark I want to get rid of. However the material that is removed was worrying me so I ordered some telescopic gauges to measure inside the cylinders. Before they arrived I checked the piston ring end gap to see how much they had worn.
To do this you put a ring in as pic one, pat it level with a cylinder head and measure the end gap as in pic 2. All gaps were 7 tho above top of tollerences
Therefore I asked around and 'blow by' seemed to be the problem causing oil consumption, but some said they were fine, but I decided to change them. Then the fun started. My pistons weren't recognised by anyone and when they did find them the rings were obsolete, ahhhhhhhhhhhhhhhhh !! Defo can't afford new pistons and rebore etc, so off to my engine fella again who has all the BL spec books and he found some that, although not original, were the correct size ! Down side £65, but he did get a bearing out of the bell housing case for me for free at the same time, so well pleased really !!
Then did the end gap test again and the oil scraper ring and middle ring were within tollerences and the top one much closer, (3 tho over), so pretty pleased. The old springs were much less bouncy than the new ones so I think I made the right decision to change them.
Then I tested the cylinder wear.
The telescopic gauges arrived and I watched good old U tube to see how to use them properly, quite easy really, but they are a good guide, not absolute on the dot measurements. With this in mind I made 3 measurements for each dimension check both front to back and side to side in the cylinder, and top, middle and bottom of the cylinder.
Lots of measurements later and after averaging them all, I decided that the wear on the cylinders was small, about 1 - 1 1/2 tho so I will do a little more deglazing. The measurements also told me that there was no taper or ovaling of the cylinders, as accurately as I could, so all good again. Piston skirt to cylinder measurements were within tollerences too.
Hopefully all this means it wont burn too much oil when put together. I have also made the 'electronic aquaintance' of a local mini owner on here, who has put an engine together already and will be my right hand man when it all goes wrong, lol. Ta Phil !!!
As you may have noticed the block is now blue, lost that battle but not too fussed really, it's his mini, but the blue is much bluer than the body colour will be, so we will see who was right at a later date !!
All ready for the rebuild now !!
Graham
#357
Andrew O
-

- Members
-
- 1,425 posts
Previously known as Andrewo330.
Posted 25 January 2012 - 10:59 PM
Looking good, Keep it up
#358
minimuk
-
- Members
-
- 1,947 posts
Camshaft & Stage Two Head
- Location: Midlands
Posted 26 January 2012 - 02:18 PM
I see yr going all the way, attention to detail, You will have good compression on those bores for sure, excellent. Shame you had to buy a whole set of gauges, unless you start on bigger engines soon,..... 
#359
grahama
-
- Members
-
- 2,442 posts
Up Into Fourth
- Location: Warrington
- Local Club: None in my area !!
Posted 26 January 2012 - 02:59 PM
Thanks for the encouragement Andrew, and Minimuk, they were onlt £11 so I have then for the future now if I do another !!!
It's the oil burning I wanted to avoid with the rebuild, as when I started it up on seeing it first time, the exhaust was a little blue, so hopefully this will fix it, I hope so !!
When I took it all apart I only intended to put it back together after a clean, but as you all know, it doesn't end up like that. I am on my second year with it now, alright not working on it all the time because sometimes I just can't be bothered, but I'll get there. Glad I have done it really as now I know it should be right for a while to come, if the rebuild goes right, lol.
Graham
#360
hughJ
-
- Members
-
- 727 posts
Soldiering Along
- Location: Highlands, Scotland
Posted 28 January 2012 - 09:48 PM
Is there no end to this man's skills. More than a Chemist when it comes to de-rusting. And now a precision Engineer. Great Graham! That cross-hatching on the cylinder bore is what you are wanting - looks great - running at an angle. It helps retain oil as the new rings bed in. With your new rings, rebuilt head and nice new valve stem oil seals there should be no blue smoke!
Looks absolutely smashing
Hugh
Looks absolutely smashing
Hugh


4 user(s) are reading this topic
0 members, 3 guests, 0 anonymous users
-
Bing (1)


