I thought that was where the heater hoses went through?? Such a long time since the hoses came off !!


Mini Virgin Rebuild Of 83 Mayfair.
Started by
grahama
, May 22 2010 05:09 PM
1006 replies to this topic
#511

grahama
-
- Members
-

- 2,442 posts
Up Into Fourth
- Location: Warrington
- Local Club: None in my area !!
Posted 23 May 2012 - 06:27 AM
#512
minimuk
-

- Members
-
- 1,947 posts
Camshaft & Stage Two Head
- Location: Midlands
Posted 23 May 2012 - 07:09 AM
I thought that was where the heater hoses went through?? Such a long time since the hoses came off !!
you can use those holes for that, I did, origionally you should have 2 23mm holes above the bulk-head 1st one 4" under the fusebox, the other 4" under the passenger side windscreen wiper there abouts, first one hot water supply going into heater, second one return hose to water pump. Then again pending what year yr car is/was. Honestly those bulkhead holes are standard coming of the factory floor for LHD cars.

#513
Brams96
-

- Members
-
- 2,308 posts
Up Into Fourth
- Local Club: Kentish Mini Club
Posted 23 May 2012 - 09:16 AM
It depends on the year your car is, some hoses go through the bulkhead itself & some through the LHD Master cylinder holes. If your car is never going to be LHD then you dont need the master cylinder holes or other holes with just rubber bungs in them. Same as the floor drain holes, if you need to empty that much water from your car, stop driving into lakes!
#514
minimuk
-
- Members
-
- 1,947 posts
Camshaft & Stage Two Head
- Location: Midlands
Posted 23 May 2012 - 10:23 AM
It depends on the year your car is, some hoses go through the bulkhead itself & some through the LHD Master cylinder holes. If your car is never going to be LHD then you dont need the master cylinder holes or other holes with just rubber bungs in them. Same as the floor drain holes, if you need to empty that much water from your car, stop driving into lakes!
Mr Brams, I totally agree with you and don't stop anyone from welding up holes nor do I drive into lakes, I was just merely making the point where those bulk-head holes are/where for.wether you weld those shut or push water hoses through, I could not give a t..ss.
#515
grahama
-
- Members
-
- 2,442 posts
Up Into Fourth
- Location: Warrington
- Local Club: None in my area !!
Posted 24 May 2012 - 03:36 PM
Hi all,
I will find a place for the hoses to go, but think I will just blank the bulkhead up as am fed up with welding now !! Thanks for all the comments though, they do keep you going. Didn't realise I had had the mini for 2 years now, wasted a lot of time I feel !!!
Anyhoo, a small update.
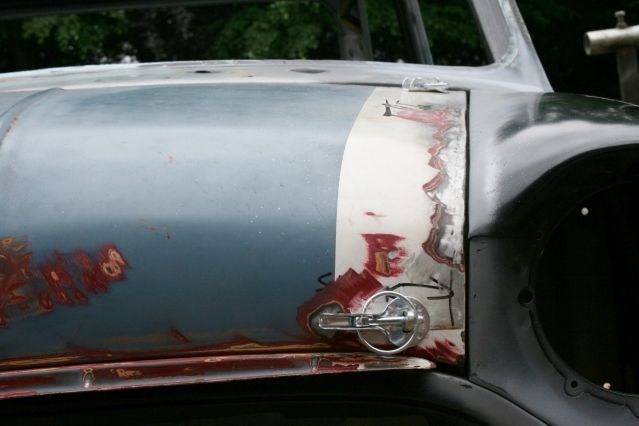
Set about repairing the pasenger door yesterday and finished it off today.
I used the top of an old rear quarter panel to make the patch for the bottom of the door as it already had the 90 deg bend in and was the right length. Saved me some work. Stripped off the paint and cut round it on the rusty section and tacked it in.

I also had a split in the metal around the upper hinge mounting holes so out it came, patch made and tacked in.
That was yesterday's couple of hours and today I finished the repaire off.
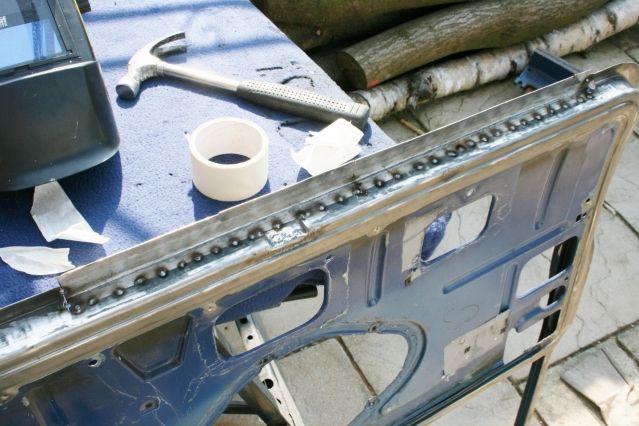
Seamed up the patch and ground down the welds, perfectt hey are not but a solid repair done. I have looked at minifcd's repairs, the ones that look invisible, and just can't keep the metal from warping slightly during welding which prevents me from a flush repair. No idea what I can do better to make the metal stay flat as I need the penetration and therefore heat !!
This was a little easier to keep flat as the metal behind acted like a heat sink, so much better finish.
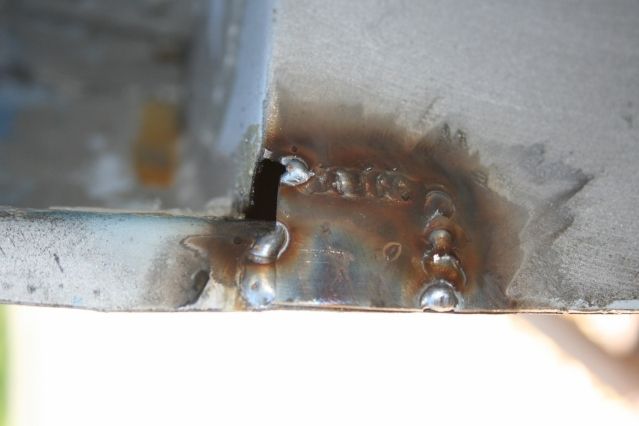
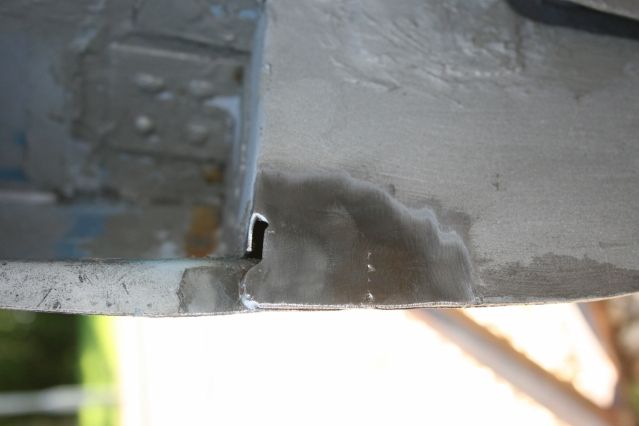
I also noticed that the frame had a split in it at the corner of the window frame and so I welded that up too and ground it down

Only a couple of hours again, finish off the floor rerady for stone chip tomorrow as the sun will be shining !
Graham
I will find a place for the hoses to go, but think I will just blank the bulkhead up as am fed up with welding now !! Thanks for all the comments though, they do keep you going. Didn't realise I had had the mini for 2 years now, wasted a lot of time I feel !!!
Anyhoo, a small update.
Set about repairing the pasenger door yesterday and finished it off today.
I used the top of an old rear quarter panel to make the patch for the bottom of the door as it already had the 90 deg bend in and was the right length. Saved me some work. Stripped off the paint and cut round it on the rusty section and tacked it in.
I also had a split in the metal around the upper hinge mounting holes so out it came, patch made and tacked in.
That was yesterday's couple of hours and today I finished the repaire off.
Seamed up the patch and ground down the welds, perfectt hey are not but a solid repair done. I have looked at minifcd's repairs, the ones that look invisible, and just can't keep the metal from warping slightly during welding which prevents me from a flush repair. No idea what I can do better to make the metal stay flat as I need the penetration and therefore heat !!
This was a little easier to keep flat as the metal behind acted like a heat sink, so much better finish.
I also noticed that the frame had a split in it at the corner of the window frame and so I welded that up too and ground it down
Only a couple of hours again, finish off the floor rerady for stone chip tomorrow as the sun will be shining !
Graham
Edited by grahama, 24 May 2012 - 03:39 PM.
#516
minimuk
-
- Members
-
- 1,947 posts
Camshaft & Stage Two Head
- Location: Midlands
Posted 24 May 2012 - 04:15 PM
well professional, nice door work there Graham, when you put yr mind to it all looks so easy now.most mini's I have seen use a blanking plate on those 'holes', pending what year your heater is, mine is a '90 heater and both the hoses come out of the matrix on the nearside, so I have used those bulkhead holes for feed and return on my MUK. I am sure you will figure it out somehow.
Weather like this is lovely to work outside.......
Weather like this is lovely to work outside.......
Edited by minimuk, 24 May 2012 - 04:16 PM.
#517
minifcd
-

- Members
-
- 246 posts
Mini Mad
- Location: Stamford
Posted 24 May 2012 - 06:18 PM
Great work Graham. I've not done any door repairs yet myself, am due to start them any day now, but from what I've seen the metal looks quite thin, so you've done very well. Nice work.
#518
hughJ
-

- Members
-
- 727 posts
Soldiering Along
- Location: Highlands, Scotland
Posted 24 May 2012 - 08:25 PM
Graham That is nice work. Don't put yourself down boy!! Besides unless you look at cars by lying on the road (as we do!) no one sees it. And never compare yourself to Scott. He is more than a perfectionist!! Good to see you moving along.
Hugh
Hugh
#519
grahama
-
- Members
-
- 2,442 posts
Up Into Fourth
- Location: Warrington
- Local Club: None in my area !!
Posted 25 May 2012 - 07:27 PM
Hi all,
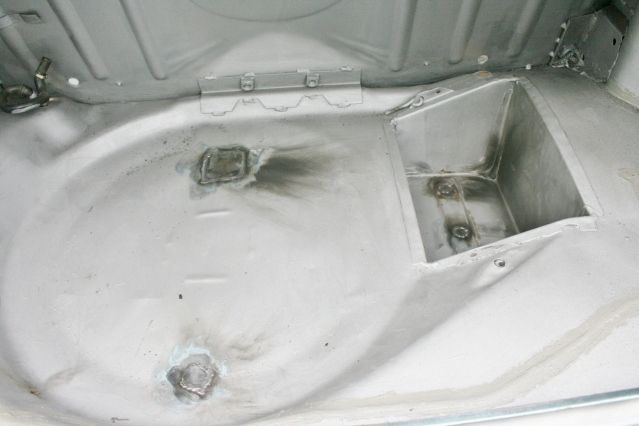
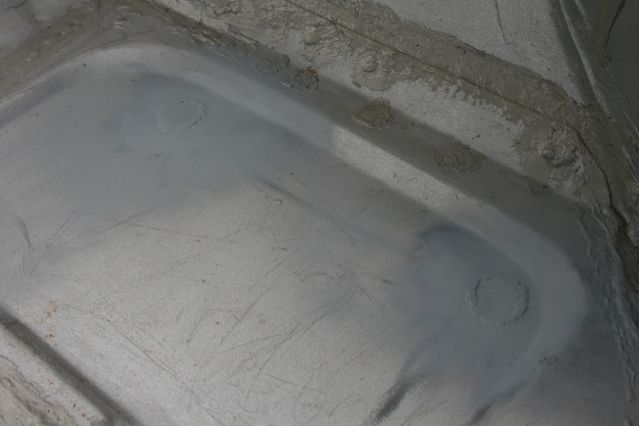
bloody hell the wind got up today !! The 'save my gas blowing away' sheet came out again much to my Dad's amusement. So as promised I finished the floor
All patched up, grounded down and etched over. Just need a going over with my bridge primer and on to proper primer.
I have made a schoolboy error though, Waxoil and iron grindings do not go well together and they rust there too when resting on the top. A clean up required before any top primer goes on, and a bloody good hoover too as they are all over the mini in places I have not even worked on.
Just for you RHDrivers out there, including me,

there, phew !! am going to tiger seal the smaller holes and paint over as too fiddly to get nice on the outside.
Did my closers for the valance a while ago now and was dissapointed with the resulting drain holes I left. So while the spit was out I sorted them.
patched, ground down and etched, much better result, still a drain hole for condensation to escape but not the massive one I started with !
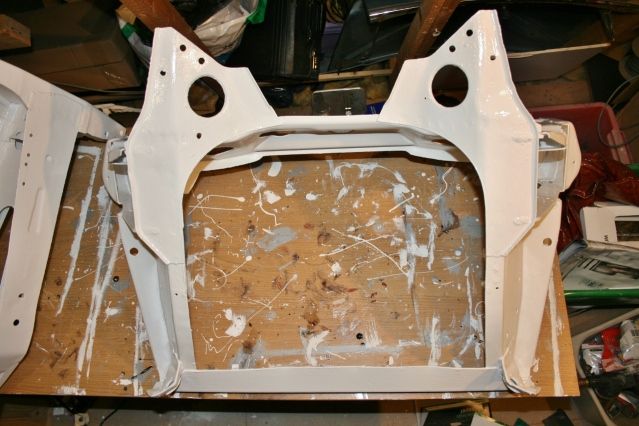
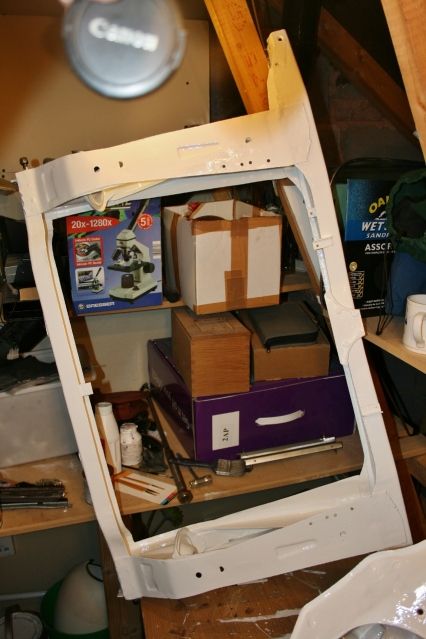
I have also been in the loft / mini storage area painting the subframes. the rear one I did a while ago but the front was a little rusty after a Winter on the car so kurusted it and primed then 3 layers of Hammerite, (I know but it's only a subframe) .

Not a perfect paint job to be fair, but for £20 and a few hours work I am pleased. My next project I will probably blast and powder coat them but I need this one done so they are ready for bits to go on now. Was about 50deg up there today painting them !! Also looked over the mini stash
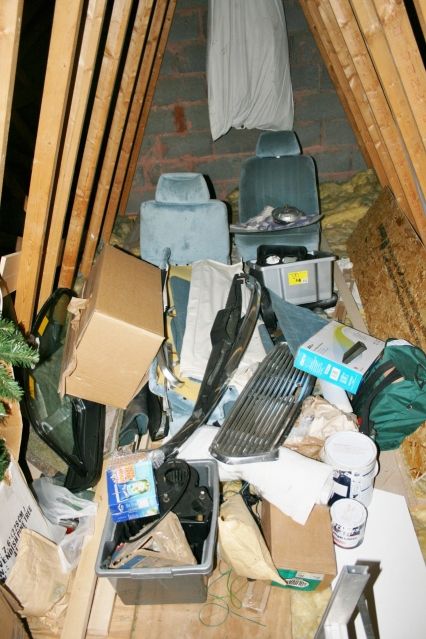
This is most of the mini except the engine and body, all in order honest !!
Well that's it till next week when it will be cleaning and stone chip time. Any hints for removing steel grindings greatly appreciated !!
Graham
bloody hell the wind got up today !! The 'save my gas blowing away' sheet came out again much to my Dad's amusement. So as promised I finished the floor
All patched up, grounded down and etched over. Just need a going over with my bridge primer and on to proper primer.
I have made a schoolboy error though, Waxoil and iron grindings do not go well together and they rust there too when resting on the top. A clean up required before any top primer goes on, and a bloody good hoover too as they are all over the mini in places I have not even worked on.
Just for you RHDrivers out there, including me,
there, phew !! am going to tiger seal the smaller holes and paint over as too fiddly to get nice on the outside.
Did my closers for the valance a while ago now and was dissapointed with the resulting drain holes I left. So while the spit was out I sorted them.
patched, ground down and etched, much better result, still a drain hole for condensation to escape but not the massive one I started with !
I have also been in the loft / mini storage area painting the subframes. the rear one I did a while ago but the front was a little rusty after a Winter on the car so kurusted it and primed then 3 layers of Hammerite, (I know but it's only a subframe) .
Not a perfect paint job to be fair, but for £20 and a few hours work I am pleased. My next project I will probably blast and powder coat them but I need this one done so they are ready for bits to go on now. Was about 50deg up there today painting them !! Also looked over the mini stash
This is most of the mini except the engine and body, all in order honest !!
Well that's it till next week when it will be cleaning and stone chip time. Any hints for removing steel grindings greatly appreciated !!
Graham
#520
Andrew O
-

- Members
-
- 1,425 posts
Previously known as Andrewo330.
Posted 25 May 2012 - 09:29 PM
Very nice work. Well done
Andrew.
Andrew.
#521
grahama
-
- Members
-
- 2,442 posts
Up Into Fourth
- Location: Warrington
- Local Club: None in my area !!
Posted 03 June 2012 - 09:54 PM
Hi all,
well, my lad is 18 tomorrow and I haven't touched the mini for a while due to all the jobs Jan found for me this last week. Honestly I think the queen is sailing her barge up to Warrington for the day to join in the barbiw fun. Still, she had a cleaner in for the day to sort the house out, an ideal time to finish off the engine and gearbox in the living room I thought, lol.
Well first thing I had to do is torque up the 1st and 3rd motion nuts. To do this I had to lock the box into gear which meant moving the selector pin round. This took me an hour and some until I found I still had the sleeve in the detent slot which stopped it turning. 5 mins later and with Matthew standing on the box, I torqued up the box to 150 lb/ft. All spinning nice and freely so quite pleased.
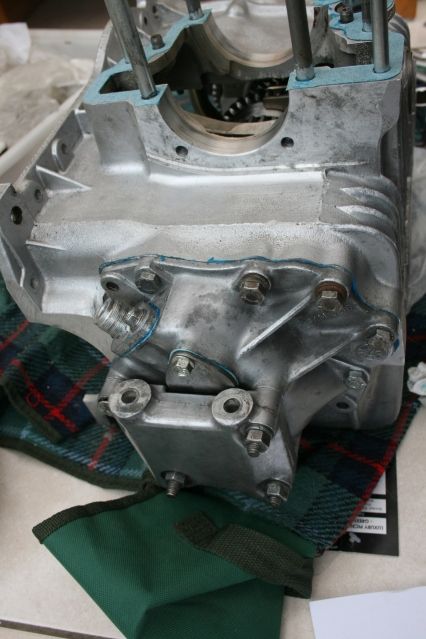
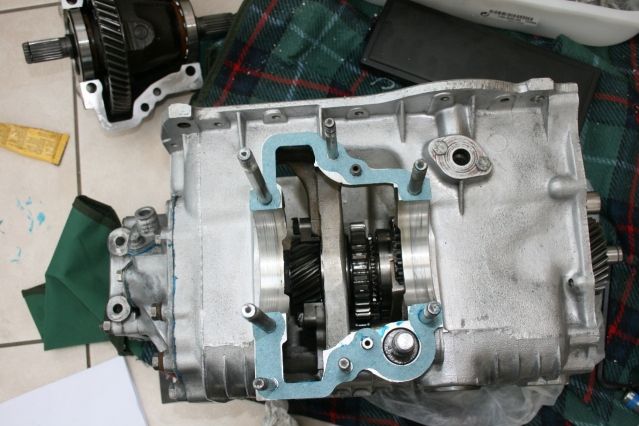
I sealed the accelerater housing with the gaskets and some blue hymolar and the same on the diff case.
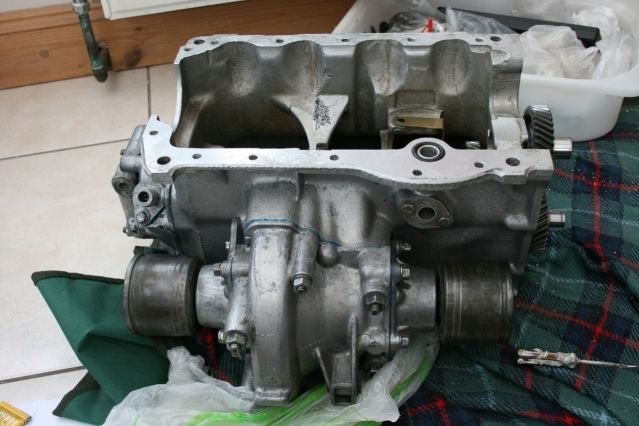
Then I refitted the diff itself, put in the new detent pin and torqued it all up. The pot joints went on with new seals too.
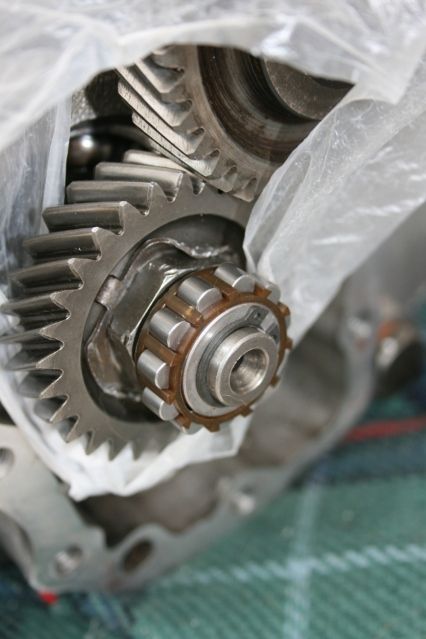
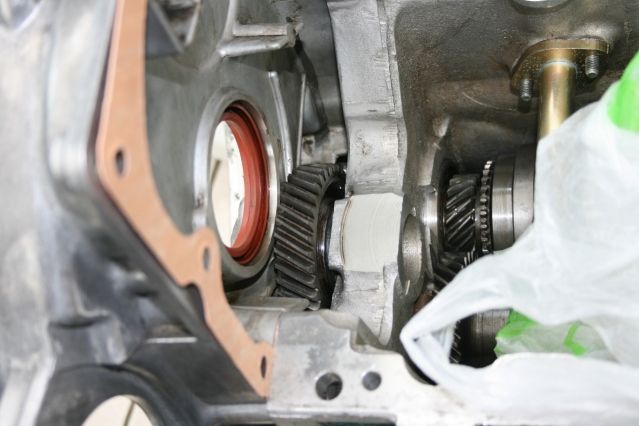
I bust the first motion bearing at the start so a new one went on with a new outer in the casing. The end float on the idler gear was fine so just the engine to get on the box. Bloody hell they are heavy lol. Matt steadied it as I slid it off the stand and carried it over to the box, popped it on and lined up the dowels. All together and the bolts in, I am pretty chuffed. Wondering about doing a bit on the shell before guests arrive tomoz cas weather looks nice in the morning but I bet Jan wont let me !

Engine lovliness at last !
Graham
well, my lad is 18 tomorrow and I haven't touched the mini for a while due to all the jobs Jan found for me this last week. Honestly I think the queen is sailing her barge up to Warrington for the day to join in the barbiw fun. Still, she had a cleaner in for the day to sort the house out, an ideal time to finish off the engine and gearbox in the living room I thought, lol.
Well first thing I had to do is torque up the 1st and 3rd motion nuts. To do this I had to lock the box into gear which meant moving the selector pin round. This took me an hour and some until I found I still had the sleeve in the detent slot which stopped it turning. 5 mins later and with Matthew standing on the box, I torqued up the box to 150 lb/ft. All spinning nice and freely so quite pleased.
I sealed the accelerater housing with the gaskets and some blue hymolar and the same on the diff case.
Then I refitted the diff itself, put in the new detent pin and torqued it all up. The pot joints went on with new seals too.
I bust the first motion bearing at the start so a new one went on with a new outer in the casing. The end float on the idler gear was fine so just the engine to get on the box. Bloody hell they are heavy lol. Matt steadied it as I slid it off the stand and carried it over to the box, popped it on and lined up the dowels. All together and the bolts in, I am pretty chuffed. Wondering about doing a bit on the shell before guests arrive tomoz cas weather looks nice in the morning but I bet Jan wont let me !
Engine lovliness at last !
Graham
Edited by grahama, 03 June 2012 - 09:57 PM.
#522
minimuk
-
- Members
-
- 1,947 posts
Camshaft & Stage Two Head
- Location: Midlands
Posted 03 June 2012 - 11:59 PM
nice new addition to the family, well done, and have a great day !!!
#523
fattail95
-

- Members
-
- 873 posts
One Carb Or Two?
- Location: England
Posted 04 June 2012 - 07:41 PM
Wicked rebuild - will be following this closely.
#524
grahama
-
- Members
-
- 2,442 posts
Up Into Fourth
- Location: Warrington
- Local Club: None in my area !!
Posted 11 June 2012 - 05:28 PM
Hi all,
WELDING FINNISHED, WEH HEY !!!!! Just thought i'd share my delight. Here's how my day went, small but very uplifting.

After welding up the floor holes last week I finally got round to seaming them up on the inside too. Ground them down, not flush as there is sound deadening and carpet going on there so just not worth it.

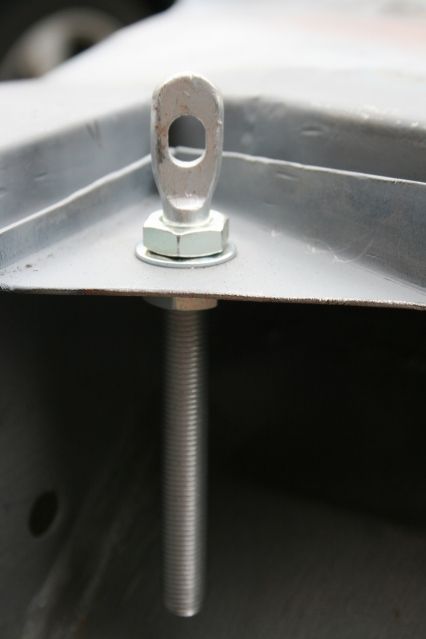
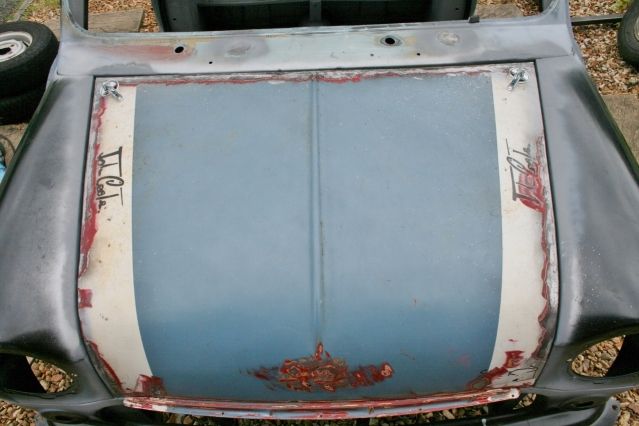
I sais a while ago that the bonnet needed to be on pins as I am 6' 1" and Matt is 6' 3" so working under a hinged bonnet just wont work. I started the pins, first with the rears as they seemed easier. I drilled and fitted them and filed a slot in the bonnet to take the pin end but the nut securing the pin is too close to the bonnet and I had to cut a larger hole on the bonnet strengthener underneath to allow for the nut. Dissapointed but it works.
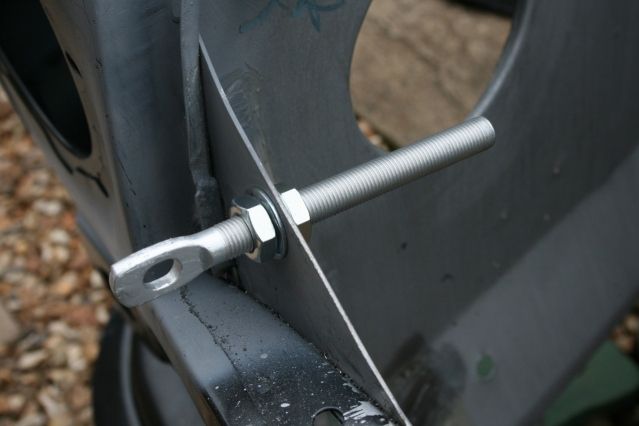
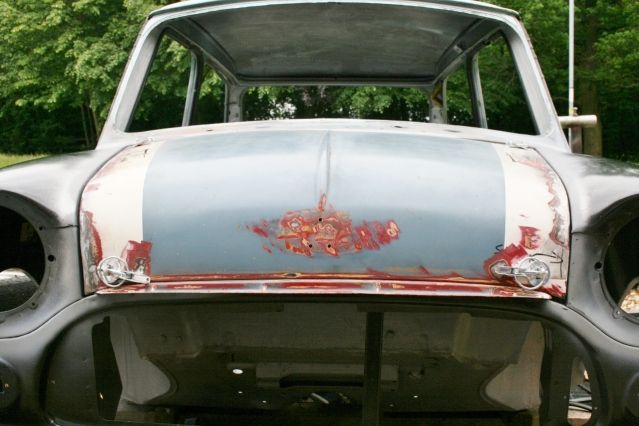

Front were same really but I think I may have placed them too low on the bonnet and they may foul the chrome trim. Will try tomorrow with the trim piece when I get into the loft to find it. If too bad then I may not have finished welding lol !!

The rears look nice in place and the gaps either side of the bonnet are acceptable so I will take that. Moving along to the next stage, stonechip soon !!
Graham
WELDING FINNISHED, WEH HEY !!!!! Just thought i'd share my delight. Here's how my day went, small but very uplifting.
After welding up the floor holes last week I finally got round to seaming them up on the inside too. Ground them down, not flush as there is sound deadening and carpet going on there so just not worth it.
I sais a while ago that the bonnet needed to be on pins as I am 6' 1" and Matt is 6' 3" so working under a hinged bonnet just wont work. I started the pins, first with the rears as they seemed easier. I drilled and fitted them and filed a slot in the bonnet to take the pin end but the nut securing the pin is too close to the bonnet and I had to cut a larger hole on the bonnet strengthener underneath to allow for the nut. Dissapointed but it works.
Front were same really but I think I may have placed them too low on the bonnet and they may foul the chrome trim. Will try tomorrow with the trim piece when I get into the loft to find it. If too bad then I may not have finished welding lol !!
The rears look nice in place and the gaps either side of the bonnet are acceptable so I will take that. Moving along to the next stage, stonechip soon !!
Graham
#525
Andrew O
-
- Members
-
- 1,425 posts
Previously known as Andrewo330.
Posted 11 June 2012 - 05:44 PM
Excellent work there Graham.
What's next then ?
Andrew
What's next then ?
Andrew


0 user(s) are reading this topic
0 members, 0 guests, 0 anonymous users


