
 This topic is locked
How hard was it to wire in the 12v sockets?
293 replies to this topic
#32

Jordie
-
- TMF+ Member
-

- 13,567 posts
Traders Area Specialist Mod, North and Scotland Area Manager
- Name: Jordan
- Location: North East
Posted 12 May 2012 - 05:47 PM
not hard at all.
take a wire from a switched live (in my case, top left of top fuse). put a fuse inline or fusebox etc. then connect wire to positive side.
wire up the earth wire to chassis somewhere.
take a wire from a switched live (in my case, top left of top fuse). put a fuse inline or fusebox etc. then connect wire to positive side.
wire up the earth wire to chassis somewhere.
#33
davej
-

- Members
-
- 985 posts
Kelly Jones
- Location: North Wales
Posted 12 May 2012 - 07:37 PM
Ah right I might have a go at that at some point, cheers.
#34
Jordie
-
- TMF+ Member
-
- 13,567 posts
Traders Area Specialist Mod, North and Scotland Area Manager
- Name: Jordan
- Location: North East
Posted 12 May 2012 - 07:50 PM
mines a double socket n waterproof. made for boats n was ideal to mount under the dash rail. can get the ebay link for you if needed.
use a 15amp fuse n suitable wiring.
use a 15amp fuse n suitable wiring.
#35
Jordie
-
- TMF+ Member
-
- 13,567 posts
Traders Area Specialist Mod, North and Scotland Area Manager
- Name: Jordan
- Location: North East
Posted 13 May 2012 - 03:30 PM
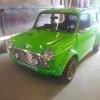
had a run out to stanhope, country durham with the tynemouth mini club today. car behaved perfectly.
having an intermitant issue with the fuse box, seems to be loose contacts on top fuse so loosing brake lights, indicators and rear window heater.
Will temp fix it tomorrow with some blu tack but a new fusebox ordered.
heres a pic from today


having an intermitant issue with the fuse box, seems to be loose contacts on top fuse so loosing brake lights, indicators and rear window heater.
Will temp fix it tomorrow with some blu tack but a new fusebox ordered.
heres a pic from today
#36
Jordie
-
- TMF+ Member
-
- 13,567 posts
Traders Area Specialist Mod, North and Scotland Area Manager
- Name: Jordan
- Location: North East
Posted 19 May 2012 - 08:35 PM
Looking for a centre console so i can fit 3x aux gauges there.
got oil pressure, volts and vaccumm gauges to fit.
got oil pressure, volts and vaccumm gauges to fit.
#37
Jordie
-
- TMF+ Member
-
- 13,567 posts
Traders Area Specialist Mod, North and Scotland Area Manager
- Name: Jordan
- Location: North East
Posted 21 May 2012 - 04:36 PM
Fusebox changed yesterday so electrics working again as they should.
got an alternator to fit when i get back of holiday, little steps to making a reliable car. current alternator is gunna need some work as it sounds terrible when under load.
got an alternator to fit when i get back of holiday, little steps to making a reliable car. current alternator is gunna need some work as it sounds terrible when under load.
#38
Jordie
-
- TMF+ Member
-
- 13,567 posts
Traders Area Specialist Mod, North and Scotland Area Manager
- Name: Jordan
- Location: North East
Posted 29 May 2012 - 04:14 PM
brake valve compensator thing on bulkhead broken, no brake pressure/fluid to rear.
Dug out another one today, cleaned it up, lick of black paint and will fit it tomorrow...as well....Fit EBC blackstuff pads at front and re-bleed all the brakes with new fluid.
Car alarm is here, so gunna start making preperation to fit that.
Dug out another one today, cleaned it up, lick of black paint and will fit it tomorrow...as well....Fit EBC blackstuff pads at front and re-bleed all the brakes with new fluid.
Car alarm is here, so gunna start making preperation to fit that.
#39
Jordie
-
- TMF+ Member
-
- 13,567 posts
Traders Area Specialist Mod, North and Scotland Area Manager
- Name: Jordan
- Location: North East
Posted 30 May 2012 - 02:58 PM
front brake pads removed, cleaned and copper greased to stop the sqweeeaaaaaking.
changed the brake pressure valve gizmo on the bulkhead, because i had no fluid to the rear brakes. Fitted a good one i had, gave it a lick of black paint yesterday in preperation. Bleed the brakes and nice firm pedal again, makes a difference to your confidence knowing you have 4 brakes operating again.
Refitted the split pin on clutch arm pin thing as it was hanging out....previous owner not bent the leg over. Tightened up the screws holding horn to the inner wing and a couple of loose bits and bobs. (....aka preventing things falling off or breakdowns in future!)
Looking to identify electronic ingition system for my dizzy next.
Oh and ive got an alarm system to fit at some stage, but probally wont get around to that for awhile.
#40
Jordie
-
- TMF+ Member
-
- 13,567 posts
Traders Area Specialist Mod, North and Scotland Area Manager
- Name: Jordan
- Location: North East
Posted 02 June 2012 - 08:22 AM
jewel rear lenses fitted.
gear gaitor n handbrake gaiter fitted
new alternator fitted
carb tuned after abit of mods n resealing air filter.
hope to look at fitting electronic ignition today.
gear gaitor n handbrake gaiter fitted
new alternator fitted
carb tuned after abit of mods n resealing air filter.
hope to look at fitting electronic ignition today.
#41
Jordie
-
- TMF+ Member
-
- 13,567 posts
Traders Area Specialist Mod, North and Scotland Area Manager
- Name: Jordan
- Location: North East
Posted 02 June 2012 - 01:08 PM
elec ign fitted. had to remove pin in dizzy. pics later. running nicely at minute
#42
Jordie
-
- TMF+ Member
-
- 13,567 posts
Traders Area Specialist Mod, North and Scotland Area Manager
- Name: Jordan
- Location: North East
Posted 02 June 2012 - 02:43 PM
Fitting britpart electronic ignition to my A-Series (pre A+) dizzy with non vac advance. (Removing the PIN from dizzy body)
Britpart ETC5835K
1) Remove dizzy cap and unscrew 2 screws to remove the points and condenser. Disconnect the cable.
2) remove the outer 2 screws holding base plate in. screws are opposite each other.
3) you will now have this and can see the pin which stops the britpart kit fitting.

4) Place in vice and use small hacksaw to cut the pin down. You dont need to fully remove it just shorten it down. see pic of my finished item.

5) screw base plate back into the dizzy body
6) place britpart electronic module in place of the points and secure with 2 screws.
7) run the cables with a little slack around the dizzy to the hole, secure with grommet.
8) place the small round black piece over the centre piece of the dizzy.
9) fit rotor arm
10) refit cap, connect up your cables.
Notes: The kit came with a small round black piece as described in step 8 and a what appears to be an extended rotor arm. When fitting both of these, my distributor cap would not go on. I placed the black small round piece onto the centre of the dizzy and used my old rotor arm, which allowed the cap to fit and its working.
My car is fitted with ballest ignition (2 white/black wires to coil negative, 1 white/pink + 1 white/yellow to coil positive). So the black wire from the electronic module in dizzy, connected to the old wire for the points which i believe goes from there to coil negative. I run a new 12v feed direct from fusebox to the red wire.
Car started straight away and is running nicely.
Britpart ETC5835K
1) Remove dizzy cap and unscrew 2 screws to remove the points and condenser. Disconnect the cable.
2) remove the outer 2 screws holding base plate in. screws are opposite each other.
3) you will now have this and can see the pin which stops the britpart kit fitting.
4) Place in vice and use small hacksaw to cut the pin down. You dont need to fully remove it just shorten it down. see pic of my finished item.
5) screw base plate back into the dizzy body
6) place britpart electronic module in place of the points and secure with 2 screws.
7) run the cables with a little slack around the dizzy to the hole, secure with grommet.
8) place the small round black piece over the centre piece of the dizzy.
9) fit rotor arm
10) refit cap, connect up your cables.
Notes: The kit came with a small round black piece as described in step 8 and a what appears to be an extended rotor arm. When fitting both of these, my distributor cap would not go on. I placed the black small round piece onto the centre of the dizzy and used my old rotor arm, which allowed the cap to fit and its working.
My car is fitted with ballest ignition (2 white/black wires to coil negative, 1 white/pink + 1 white/yellow to coil positive). So the black wire from the electronic module in dizzy, connected to the old wire for the points which i believe goes from there to coil negative. I run a new 12v feed direct from fusebox to the red wire.
Car started straight away and is running nicely.
#43
mike.
-

- Members
-
- 6,176 posts
Crazy About Mini's
Posted 02 June 2012 - 06:30 PM
Looks like a great little buy that, really nice colour and looks soooo much better on the new wheels - Although could do with lowering a tad at the rear if you don't mind me saying :)
#44
Jordie
-
- TMF+ Member
-
- 13,567 posts
Traders Area Specialist Mod, North and Scotland Area Manager
- Name: Jordan
- Location: North East
Posted 02 June 2012 - 06:44 PM
ive got hi los in a box downstairs actually
oh and the tooling to make brand new hi-los from scratch, just need to work out prices at local metal forgers to pour the casts for me.

Still need to do something with the drivers door, but tempted to buy enough paint to do the whole car
oh and the tooling to make brand new hi-los from scratch, just need to work out prices at local metal forgers to pour the casts for me.
Still need to do something with the drivers door, but tempted to buy enough paint to do the whole car
#45
Jordie
-
- TMF+ Member
-
- 13,567 posts
Traders Area Specialist Mod, North and Scotland Area Manager
- Name: Jordan
- Location: North East
Posted 18 June 2012 - 08:24 PM
Decided to fit one of our fibreglass rear parcel / speaker shelfs. this one is covered in sound carpet.
So speakers removed, parcel shelf material removed, leaving mess from a previous owner attacking the shelf.

So take one of the fibreglass speaker shelfs, cut holes for 6x9s and recover with carpet. (you could paint it or leathette etc).
Bit of trimming around the seat edge and the corners (C posts) and in it goes.....

Unfortunately I dont have the speaker grilles as previous owner didnt fit them, but there blue alpine 6x9s so match the exterior colour well.
Then tried a replica boot liner for fitment, fits pretty well. I am going to cover it with anti slip material to stop anything in the boot sliding around.

So speakers removed, parcel shelf material removed, leaving mess from a previous owner attacking the shelf.
So take one of the fibreglass speaker shelfs, cut holes for 6x9s and recover with carpet. (you could paint it or leathette etc).
Bit of trimming around the seat edge and the corners (C posts) and in it goes.....
Unfortunately I dont have the speaker grilles as previous owner didnt fit them, but there blue alpine 6x9s so match the exterior colour well.
Then tried a replica boot liner for fitment, fits pretty well. I am going to cover it with anti slip material to stop anything in the boot sliding around.


Also tagged with one or more of these keywords: roundnose
Projects →
Mini Saloons →
1976 Mini 1000 Le "stripey"Started by cafeclassic , 03 Sep 2025 |
|

|
||
Projects →
Mini Saloons →
Mini Cooper Project - Finally StartsStarted by piphatch , 08 Jan 2025 |
|

|
||
Projects →
Mini Saloons →
1965 Austin Mini Restoration - Canadian Mk1Started by DoubleEh , 14 Nov 2022 |
|

|
||
Projects →
Mini Saloons →
Project Joe - 1991 Mini Mayfair 998Started by Eggers , 02 Jun 2022 |
|

|
||
Projects →
Mini Saloons →
Mpi Dashboad ProblemStarted by mikeprez , 22 Dec 2021 |
|

|
0 user(s) are reading this topic
0 members, 0 guests, 0 anonymous users


