Baghdad To Bolton ( A Full Rebuild To Aid Recovery )
#31
Posted 03 July 2013 - 08:44 PM
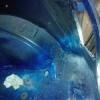
The mini had bits of surface rust, nothing drastic, in fact it was more like a dusting but the photos make it look worse.
Anyway out came the grinder and metal prep from frost. That stuff is quite expensive but we use to use similar stuff in the army so that will do for me.
Then etch prime, primer and paint.
So again I had to break of from the project.
My brother in law lost his 18 day old baby girl to a rare heart condition, so I decided to take part in Toughmudder 2012 in the November to raise money for Alder Hey who looked after her in her final hours.
Whilst I got on with the gruelling training for the event that really was my bread and butter from my army days, my wife Lisa set about doing the fundraising side of things. She managed to get the papers, magazines and tv involved. They heard my story and that of Maddie and help us out so much.
Lisa knew that I had worked with some top operators in Iraq and one of them my good friend Dafydd Dennis owned Crossfit Cardiff. One email to him set of a huge chain reaction amongst the crossfit community. They all paid to do some crazy workout dedicated to Maddie and raised a huge amount of cash.
I completed Toughmudder and Lisa and myself with the help of everyone else that donated managed to raise £8000.
It was then time to get back to it.
I'd seen plenty of people welding in the Mk1 conversion plates and to be fair I didn't find them to bad.
#32
Posted 03 July 2013 - 09:07 PM
Edited by Davethepioneer, 03 July 2013 - 09:23 PM.
#33
Posted 03 July 2013 - 09:08 PM
Then I had to figure out how to mount these hinges. Shown here without the little damper.
I got hold of some decent square bar.
Then I had to figure out my brace bars. To work on them I needed the front subframe on. I'd stripped and painted them earlier on in the restoration but wasn't happy so I had no problem using them f they were to get scratch.
Then I couldn't remember where I'd put the tower bolts, so a quick trip to mini sport soon sorted that.
I've got an anodised solid mount covered in tape f anyone was wondering what it was under the tower bolt.
Anyway subframe on.
I'd also like to say at this point that the rear subframe has been fitted up to make sure it all bolted on ok.
I needed to get a slight curve in the brace bar so cut slits in the metal, bent in position then welded up.
#34
Posted 03 July 2013 - 09:24 PM
14.1CFM displacement and has a large tank capacity of 90 litres, runs at 230V single-phase power, It operates at a maximum of 10bar (145PSI). £256 that will do for me.
So I'm not sure how other people go about it but this is how I like to do it. I prefer to etch prime then seam seal. I'm not saying its correct but some of the etch primer gets into the little nooks and a little paint is better than none, just my opinion though.
I definatly recommend this super etch, it's not cheap but its fantastic.
Anyway etch primer
Edited by Davethepioneer, 03 July 2013 - 09:25 PM.
#36
Posted 03 July 2013 - 09:44 PM
#37
Posted 03 July 2013 - 09:57 PM
Good work there Dave.
#38
Posted 03 July 2013 - 10:02 PM
#39
Posted 03 July 2013 - 10:03 PM
Good work there Dave.
Cheers fella, appreciate it.
#40
Posted 03 July 2013 - 10:03 PM
A few tools to help me, and this was only half of them.
Sorting the gaps out.
Again the gaps are a working progress and not complete yet. One mistake I have made when getting it all clamped together is that it put the bonnet under tension, so the only thing I could think of was cutting relief gaps in, letting the spring go out of it and then weld back up.
#41
Posted 03 July 2013 - 10:29 PM
Those wing tops are a great fit. Fancy a holiday in Wales
#42
Posted 03 July 2013 - 10:31 PM
Now I'm pretty sure I would need to change the disc and calipers but do the drive flange and cv joint fit straight onto a 10" setup if I were to go back to mini sport and exchange my calipers ad disc for there 10" ones? Does that make sense lol
#43
Posted 03 July 2013 - 10:32 PM
Those wing tops are a great fit. Fancy a holiday in Wales
Cheers fella, unfortunately there way to tight for when it flips. I will hopefully have some pictures tomorrow. It's a little compromise but I'm happy with it
#44
Posted 03 July 2013 - 10:37 PM
To run 10's dave you need new disc's,calipers, drive flanges and hubs although i do think you can run them with slight machining (someone should confirm though)
Wish my projects moved this fast haha how long has it taken you so far then ?
Cheers
Cliff
#45
Posted 03 July 2013 - 10:43 PM
Cheers Cliff. I started around Jan 2012, it's been on and off but I don't have a deadline it will be done when its done lol
Also tagged with one or more of these keywords: roundnose
Projects →
Mini Saloons →
1965 Austin Mini Restoration - Canadian Mk1Started by DoubleEh , 14 Nov 2022 roundnose |
|
|
||
Projects →
Mini Saloons →
Project Joe - 1991 Mini Mayfair 998Started by Eggers , 02 Jun 2022 roundnose |
|
|
||
Projects →
Mini Saloons →
Mpi Dashboad ProblemStarted by mikeprez , 22 Dec 2021 roundnose |
|
|
||
Projects →
Mini Saloons →
1978 Oew - Willy The MiniStarted by smalltreegrower , 11 Nov 2021 roundnose |
|
|
||
Projects →
Mini Saloons →
1968 Mk2 Cooper BuildStarted by Minime998 , 15 Sep 2021 roundnose |
|
|
0 user(s) are reading this topic
0 members, 0 guests, 0 anonymous users