done a little bit of cleaning up of the head at work just to take the grease off at the mo. borrowed frieds valve spring compresser...nope wont fit becase the valve hats sit below the heads top surface so will have to buy my own grr
when thats done i can mask up al the surfaces that need to be kept smooth (valve seats and the deck etc) and blast it at work basicly just to get a nice clean casting, should look nice lol
not sure if work mind but oh well im doing it anyway lol


Supercharged Bmw K Head Conversion
Started by
mini93
, Oct 11 2006 06:25 PM
99 replies to this topic
#46

mini93
-
- Members
-

- 8,615 posts
He's just too casual!
- Location: Warwick
- Local Club: Medievil minis of Warwickshire
Posted 22 September 2007 - 08:39 PM
#47
miniboo
-

- Members
-
- 9,327 posts
Lord of Original Thinking
Posted 23 September 2007 - 12:12 AM
That title any good
#48
mini93
-
- Members
-
- 8,615 posts
He's just too casual!
- Location: Warwick
- Local Club: Medievil minis of Warwickshire
Posted 23 September 2007 - 10:51 AM
aah tis a start indeed  thanks boo
just how about supercharged twincam?
thankies
thanks boojust how about supercharged twincam?
thankies
#49
Sprocket
-
- Members
-
- 7,266 posts
Great on Injection faults
- Location: Warrington
- Local Club: Manchester Minis
Posted 23 September 2007 - 11:37 AM
cheers minisprocket!!
No worries mate
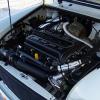
Now heres a picture of my work in progress, again
 Something for you to aim for? Target now is Minis V Beetles in april next year
#50
mini93
-
- Members
-
- 8,615 posts
He's just too casual!
- Location: Warwick
- Local Club: Medievil minis of Warwickshire
Posted 23 September 2007 - 12:04 PM
ah im not setting a deadline for mine...it wil be ready when its ready...just went to get a valve compresser from hellfrauds...£25 naa i think il get it through work for cheepies guess i can wait a few days
is the pipe welded to the cover a breather?? and the one from the head oil return to the block?
also didnt think about topping oil up before really...eeerm...where? iv seen on a site on the net someone used the old mechanicle fuel pump with special bracket made up
i need to get the booklet from specialist components!!!! should make good reading indeed
is the pipe welded to the cover a breather?? and the one from the head oil return to the block?
also
didnt think about topping oil up before really...eeerm...where? iv seen on a site on the net someone used the old mechanicle fuel pump with special bracket made upi need to get the booklet from specialist components!!!! should make good reading indeed
Edited by mini93, 23 September 2007 - 12:05 PM.
#51
Sprocket
-
- Members
-
- 7,266 posts
Great on Injection faults
- Location: Warrington
- Local Club: Manchester Minis
Posted 23 September 2007 - 02:35 PM
Look a bit harder in the picture and you can see the oil filler, theres no cap on it. Yes the pipe on the cover is a breather, and the one on the head is an oil drain. The oil drain will need offset milling in such a way that the bottom of the oil gallery is level with the ID of the pipe. The oil return on the flywheel housing is a cut down breather can and the filler cap is a Mocal jobbie from Demon Tweeks.
Another breather is coming off the top of the oil filler cap and both the one on the head and the filler cap are being routed to an oil catch tank. Both these are 25mm OD
Another breather is coming off the top of the oil filler cap and both the one on the head and the filler cap are being routed to an oil catch tank. Both these are 25mm OD
#52
mini93
-
- Members
-
- 8,615 posts
He's just too casual!
- Location: Warwick
- Local Club: Medievil minis of Warwickshire
Posted 23 September 2007 - 02:39 PM
ah i did think it could go there but wasnt too sure, is putting oil return from the head at that point a common practice with the head owners? or is this kinda thing outlines in the booklet?
#53
Sprocket
-
- Members
-
- 7,266 posts
Great on Injection faults
- Location: Warrington
- Local Club: Manchester Minis
Posted 23 September 2007 - 02:41 PM
Its a recent update on the conversion, Jimster did it first, and John K has also done it on his recent build of his Gold car. Apparently it works a treat
#54
Udo
-

- Members
-
- 1,670 posts
Camshaft & Stage Two Head
- Location: Lincoln
Posted 23 September 2007 - 06:55 PM
Does the oil drain from the end of the head replace the orginal BMW head ones and is it a supplemently one?
I'm planning on fitting the oil drain from the end of the head, when I eventually get the time to start building mine, but just thought I'd check.
cheers
I'm planning on fitting the oil drain from the end of the head, when I eventually get the time to start building mine, but just thought I'd check.
cheers
#55
Sprocket
-
- Members
-
- 7,266 posts
Great on Injection faults
- Location: Warrington
- Local Club: Manchester Minis
Posted 23 September 2007 - 07:22 PM
As far as im concerned yes it does, though the more the merrier. Remember this heads original orientation was horizontal. Now that it sits in a vertical orientation the oil galleries are not designed to carry the oil away from certain places.
At the end of the day iys up to you, as to what is totaly necessary. I will be using this one and one on the end cover only.
At the end of the day iys up to you, as to what is totaly necessary. I will be using this one and one on the end cover only.
#56
mike.
-

- Members
-
- 6,176 posts
Crazy About Mini's
Posted 24 September 2007 - 09:01 PM
So what sort of gearbox set-up is this beast going to have to handle all this power?
#57
mini93
-
- Members
-
- 8,615 posts
He's just too casual!
- Location: Warwick
- Local Club: Medievil minis of Warwickshire
Posted 24 September 2007 - 09:14 PM
well its going to be dogbox, i really want sequential box but wether thats gona be a future update once the engines up and running who knows, iv got a jackknight dogbox in the rally car, heared good things about the swift dogbox so ill look into that me closer to the time
sumone i knew was talking about developing there own sequential system, but unsure if thats going to happen due to somthing thats recently happened, he was saying he wanted my rally car to be a testbox...however that could cost me alot of money on the rally car if it goes wrong at about £300 a single venue entry free and then if it decided to take out other components in the engine at the same time, could be expensive test indeed.
if i do go for test ill be checking everything, making sure everythings secure that the switching unit isnt going to blow apart somehow alowing debris to float into oil passageways
straight cut drops, not sure of the ratio, ill be going for which ever helps use of the dogbox, dont want the gearbox spinning faster than the crank speed
going to run ATB diff, might utlise equile length drive shafts but thats going to be a decision close to the time of perchase and 10 inch wheels
Edited by mini93, 24 September 2007 - 09:16 PM.
#58
CanadianMiniFan
-
- Members
-
- 1,591 posts
Camshaft & Stage Two Head
Posted 25 September 2007 - 01:26 AM
awesome.
#59
mini93
-
- Members
-
- 8,615 posts
He's just too casual!
- Location: Warwick
- Local Club: Medievil minis of Warwickshire
Posted 25 September 2007 - 07:26 PM
well that build guide certainly makes good reading has made things alos clearer as i was wondering about the welding required to the head, especialy the end plate part, good news i believe theres sumone at work who can do or teach me to TIG weld which will be benificial all the time if not i might take evening courses at college again. cam timings a little blury still but i shall read into that more elsewhere closer to the time
it also makes me want to get it done asap which is a problem as i wont have my shell ready put it pay day on friday tho, so i think rollcage asap, then start on panel work so that will be composite front end and might be new drivers floorpan or just a patch depending
hmmm i almost feel a shopping list coming on lol
has made things alos clearer as i was wondering about the welding required to the head, especialy the end plate part, good news i believe theres sumone at work who can do or teach me to TIG weld which will be benificial all the time if not i might take evening courses at college again. cam timings a little blury still but i shall read into that more elsewhere closer to the time it also makes me want to get it done asap which is a problem as i wont have my shell ready put it
pay day on friday tho, so i think rollcage asap, then start on panel work so that will be composite front end and might be new drivers floorpan or just a patch dependinghmmm i almost feel a shopping list coming on lol
Edited by mini93, 25 September 2007 - 07:27 PM.
#60
mini93
-
- Members
-
- 8,615 posts
He's just too casual!
- Location: Warwick
- Local Club: Medievil minis of Warwickshire
Posted 06 October 2007 - 11:50 AM
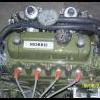
yesterday a bought a valve spring compresser...which didnt fit after a trip to halfords and a further £27 down i have one that fits right so last night i went ahead with removing the valves. there all safly in there own little sandwhich bags to make sure i dont mix up the components aswell
snapped a few piccys of the ports and stuff aswell

inlet valves removed (little blury)

and inlet ports

exhaust valve removed

and the exhaust ports

a nice view of the chamber aswell with the valves removed

piccy of the valve spring seat and valve, the rubber seat is still in place (i can imagin not being able to find new ones if i damage them acidently)
also at work i decided to clean the cam cover, so shot blasted it all nice down the metal filled in some dents with metal set bit of primer n rub down and back to work for some black paint, going to rub it down again this weekend and then get another layer (or i might buy some shinier stuff)
piccy:

also a piccys of the valve components:

i might clean up the ports this weekend aswell, just decarbonise them might make them a little smother aswell
after a trip to halfords and a further £27 down i have one that fits right so last night i went ahead with removing the valves. there all safly in there own little sandwhich bags to make sure i dont mix up the components aswellsnapped a few piccys of the ports and stuff aswell
inlet valves removed (little blury)
and inlet ports
exhaust valve removed
and the exhaust ports
a nice view of the chamber aswell with the valves removed
piccy of the valve spring seat and valve, the rubber seat is still in place (i can imagin not being able to find new ones if i damage them acidently)
also at work i decided to clean the cam cover, so shot blasted it all nice down the metal filled in some dents with metal set bit of primer n rub down and back to work for some black paint, going to rub it down again this weekend and then get another layer (or i might buy some shinier stuff)
piccy:
also a piccys of the valve components:
i might clean up the ports this weekend aswell, just decarbonise them might make them a little smother aswell


1 user(s) are reading this topic
0 members, 1 guests, 0 anonymous users


