I've started making seat brackets for the kirkey seats, started with cardboard templates, cut them out of thick aluminium today, draw filed all the edges, i'll bend the mounting flanges tomorrow, drill holes, bolt them to the seat and then finally drill into the floor. I'll have a piece of iron to put under the floors so the seat doesn't rip through the floor, but i'm looking forward to having a seat in it! means i can put in the tach and toss up my 4 panel rear view mirror. making my own brackets and using a racing seat gives me options as to seating position, and i think i've found the best compromise of visibility and comfort! i'll never be the most perfect in a mini, but hey! its part of the fun

First Car Resto
Started by
CanadianMiniFan
, Jan 05 2007 01:50 AM
379 replies to this topic
#271

CanadianMiniFan
-
- Members
-

- 1,591 posts
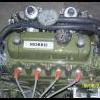
Camshaft & Stage Two Head
Posted 25 February 2010 - 02:12 AM
#272
Al*
-
- Members
-
- 1,476 posts
One Carb Or Two?
- Local Club: ERC / SMOA
Posted 25 February 2010 - 02:31 AM
i was down at Kens yesterday and had a look at your car.. its coming along.. keep at it... looking good.
#273
CanadianMiniFan
-
- Members
-
- 1,591 posts
Camshaft & Stage Two Head
Posted 25 February 2010 - 03:47 AM
thanks man, did you see the seat in it? yeah i just have to keep on chipping away at it, do as much as i can before paint, gotta save and save for it hahahaha?
#274
CanadianMiniFan
-
- Members
-
- 1,591 posts
Camshaft & Stage Two Head
Posted 26 February 2010 - 01:58 AM
got the seat brackets done today, cut them out yesterday, draw filed all the edges, then today i had to get the flanges bent at a metal shop, the vices at our shop couldn't handle the thick aluminium! haha, drilled all the holes and countersunk them for neatness. the seat is bolted in now, i still have to drill lightening holes and get some iron bar under the floor. but i'm happy!! a very nice seating position.
#275
CanadianMiniFan
-
- Members
-
- 1,591 posts
Camshaft & Stage Two Head
Posted 27 February 2010 - 03:27 AM
I got the tach pod mounted today as well as wired up the tach. it took some time but it looks great now and works well too! i'm happy with it
#276
CanadianMiniFan
-
- Members
-
- 1,591 posts
Camshaft & Stage Two Head
Posted 28 February 2010 - 04:37 PM
forgot to mention it's a black face smiths tach wtih an adjustable redline. fits in with the standard clocks nicely
#277
CanadianMiniFan
-
- Members
-
- 1,591 posts
Camshaft & Stage Two Head
Posted 03 March 2010 - 03:20 AM
So my brother's friend works at a metal shop, and has access to nice pieces of aluminium. The cars lowered and i figured, i should haev some protection for my vunerable sump. sooo I managed a nicely laser cut sump guard for 50 CDN, and a 6 pack of Canadian beer. Shes tasty 


#278
CanadianMiniFan
-
- Members
-
- 1,591 posts
Camshaft & Stage Two Head
Posted 17 March 2010 - 12:48 AM
so just a few little things, i've made the dash shelf recently, out of thick door card material, and i'll jsut have to get a vinyl piece to make it look nice. my Wood and Pickett arches came in the other day, so did my mk1 Austin hood badge and vinyl firewall cover. i think thats it for now!
#279
CanadianMiniFan
-
- Members
-
- 1,591 posts
Camshaft & Stage Two Head
Posted 20 March 2010 - 10:44 PM
so i thought i'd fit the arches today, so the holes are drilled before paint. well, the wood and pickett fibreglass arches don't quiiite fit as intended. the fronts weren't bad, cut the slots i needed to and repositioned them enough times to get them in decent position. didn't screw them onto the lip yet. then the backs. i had to cut quite a bit off of the part that wraps around the valence, and after that it could be higher an dalmost flush with the valence, but then the bumper lip slot was in the wrong spot, so i'll have to re fibreglass that. and its still going to take careful drilling to make sure it stays in line. but they cover the wheels just enough!
#280
Teapot
-

- Members
-
- 5,010 posts
TMF Legend
- Location: Seaton, East Devon
Posted 21 March 2010 - 09:05 AM
Nice project ... be even nicer with pictures!
Keep up the good work
Keep up the good work
#281
CanadianMiniFan
-
- Members
-
- 1,591 posts
Camshaft & Stage Two Head
Posted 22 March 2010 - 01:34 AM
haha yes i am quite poor at bringing the camera, i will really try and make a better effort to do that.
#282
CanadianMiniFan
-
- Members
-
- 1,591 posts
Camshaft & Stage Two Head
Posted 24 June 2010 - 02:09 AM
Alright heres a few pictures, I've got the seat brackets finished, seat in, doors, hood and trunk on to be aligned for final bodywork, vinyl dash shelf cover, drilled the hood and trunk for the badges, and i now have keys for all the locks, (ignition, doors and trunk). Got the sumpguard fitted. no mean feat, as after i got the brackets, all the holes drilled, the aluminium was a bit too weak, so i had to bolt a piece of angle iron onto the back lip, and now its all good.


^ this is before the vinyl dash shelf cover


^ this is before the vinyl dash shelf cover
#283
CanadianMiniFan
-
- Members
-
- 1,591 posts
Camshaft & Stage Two Head
Posted 24 June 2010 - 02:20 AM
Here's a picture of the arches fitted up, no wheels as they aren't screwed on, held by 'clicko' fasteners (temporary) but you get the idea. and a front on of the austin badge.


#284
CanadianMiniFan
-
- Members
-
- 1,591 posts
Camshaft & Stage Two Head
Posted 26 June 2010 - 09:47 PM
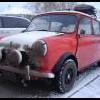
Alright i've repaired the arches, the rear ones had notches that were not in the correct spot, whoops, and painted a few small parts, just trying to do as much as i can before paint so everything goes back together a little easier. I also had to sand down the trunk where the indent for the license plate goes, and it was filled nicely, but underneath is still quite wrinkly, so the holes i had to drill (as they were plugged, god knows why) arent the straightest, but 5/6 screws go in, and the license plate holder hangs straight, so i conceded one screw and in the future may replace the trunk. cleaned up a bit of wiring, routed the door check wiring to the appropriate sides, bought new door check straps as mine were broken. I've been thinking about getting some uprated headlights for the car, as the two i have don't match and i'd like to have decent visibility. i guess we'll see on that one. it's sitting quite nicely with the arches on
#285
CanadianMiniFan
-
- Members
-
- 1,591 posts
Camshaft & Stage Two Head
Posted 30 June 2010 - 04:15 AM
Few small developments, the trunk was a bit mangled, as i mentioned above, so ken found a Cooper S trunk lid in the used parts...result? i don't think i'll get the badge holes plugged and i'll just buy "austin cooper s" badge, seems a shame to ruin a real Cooper S trunk. I'm pretty much just waiting to get the car painted, july 15 i believe is an approximate date it'll go in for that.


3 user(s) are reading this topic
0 members, 3 guests, 0 anonymous users


