Jump to content


Photo
- - - - -

A Midas Duet


  • Please log in to reply
187 replies to this topic

#91 biggav

biggav

    Crazy About Mini's

  • Members
  • PipPipPipPipPipPipPipPipPipPip
  • 5,830 posts
  • Local Club: South Central

Posted 16 June 2007 - 10:11 PM

Should i move my battery up into the boot and get rid of the box??

i had envisaged :teehee: a aluminum/cabon/grp sheet fixed to the underside of the rear beam axle, then sloping up to the valance (i'm getting rid of my valance) with fins at the inside of the radius arms and a few in the centre

my front bumper/ bodykit was damaged in the same crash that the rear was ripped off, so maybe i could join from the bottom of the bumper under the engine to clean that up.

#92 lvm18

lvm18

    Mini Mad

  • Members
  • PipPipPipPip
  • 164 posts
  • Local Club: Midas Owners Club

Posted 16 June 2007 - 10:28 PM

i think anything like the battery box is in the way of air flow. its like a big brick standing in the way. Best in the boot space

The one that ed4ran showed that Force Racing produce is exactly what I was thinking about....more or less same as on Midas too. I dont think extra fins are necessary, just the one on each side to pull the force the air flow away from the wheel arches but dont impede the suspension travel at any point.

#93 biggav

biggav

    Crazy About Mini's

  • Members
  • PipPipPipPipPipPipPipPipPipPip
  • 5,830 posts
  • Local Club: South Central

Posted 16 June 2007 - 10:35 PM

Here's mine at riv run after the crash....

Posted Image

after some photoshopping to clean up the Damage...

Posted Image

and a photoshop with a diffuser....

Posted Image


if only you could press a print button and actually make it happen!!!!!

#94 lvm18

lvm18

    Mini Mad

  • Members
  • PipPipPipPip
  • 164 posts
  • Local Club: Midas Owners Club

Posted 16 June 2007 - 10:50 PM

........... if only you could press a print button and actually make it happen!!!!!


You can!

There are 3D printers available which build models up from resin. They are called rapid prototype machines like this one:

http://www.zcorp.com...detail.asp?ID=1

#95 lvm18

lvm18

    Mini Mad

  • Members
  • PipPipPipPip
  • 164 posts
  • Local Club: Midas Owners Club

Posted 16 June 2007 - 10:55 PM

......and here is another rapid prototyping machine.... for making brand new body shells:

Posted Image


Posted Image


Posted Image


Posted Image

Edited by lvm18, 16 June 2007 - 11:05 PM.


#96 CanadianMiniFan

CanadianMiniFan

    Camshaft & Stage Two Head

  • Members
  • PipPipPipPipPipPipPipPip
  • 1,591 posts

Posted 17 June 2007 - 12:18 AM

Here's mine at riv run after the crash....

Posted Image

after some photoshopping to clean up the Damage...

Posted Image

and a photoshop with a diffuser....

Posted Image


if only you could press a print button and actually make it happen!!!!!


Where's Aron's interpertation? i liked that one the best gav...

#97 Ethel

Ethel

    ..is NOT a girl!

  • TMF Team
  • PipPipPipPipPipPipPipPipPipPipPip
  • 26,029 posts
  • Local Club: none

Posted 17 June 2007 - 02:47 AM

Don't think you want to pull up the tray too steeply at the rear or you're likely to just get turbulence.

I have a Midas - the earlier Mini based one. It's also in dry dock as it slowly becomes Turbofied.

Be interested in any tips on Megajolt as that'll be the next bit to sort - where did you get your trigger wheel sorted?

I found a 1300 Montego radiator goes in really tidily as the fan's on the other side, but it has pipes at both ends so might be a squeeze plumbing a 16v head. The 1600 and 2.0L ones would fit well too as they just get longer.

I have a SD1 steering column in mine using the bottom 3 or 4 inches of the mini's to couple to the rack. It clears the pedals nicely, is adjustable and gives a better driving position.

I bought my Midas with a really dodgy MOT from a car dealers - I was curious but wasn't convinced it would make a practical car. It had a clapped out 998 lump with no oil pressure but it would still just touch a ton and cornered like you wouldn't believe even though there was inches of play in the suspension. Best shock was stripping it to rebuild after I blew the engine to discover a 2 inch hole in the top of the petrol tank - right above the exhaust!

Lot's of fun and not too stressing to drive, once you've worked out the lack of head clearance and reversing with the door open as you can see bugger all through the rear window and the side window is too small to get your head through :teehee:

It's also nice when you catch Ferrari drivers checking out your drive.

#98 lvm18

lvm18

    Mini Mad

  • Members
  • PipPipPipPip
  • 164 posts
  • Local Club: Midas Owners Club

Posted 17 June 2007 - 10:07 AM

Hi Ethel,

The trigger wheels fitted at the moment are ones I got from SC Components. Its a direct fit on the front of a standard 1275 pulley with integrated damper.

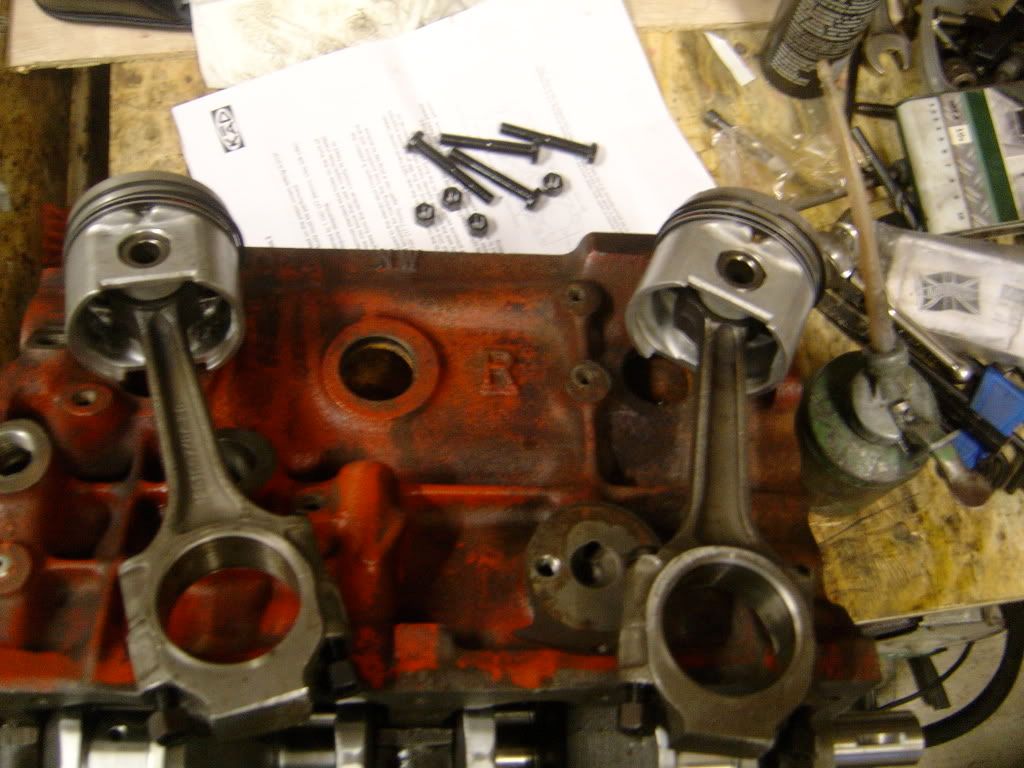
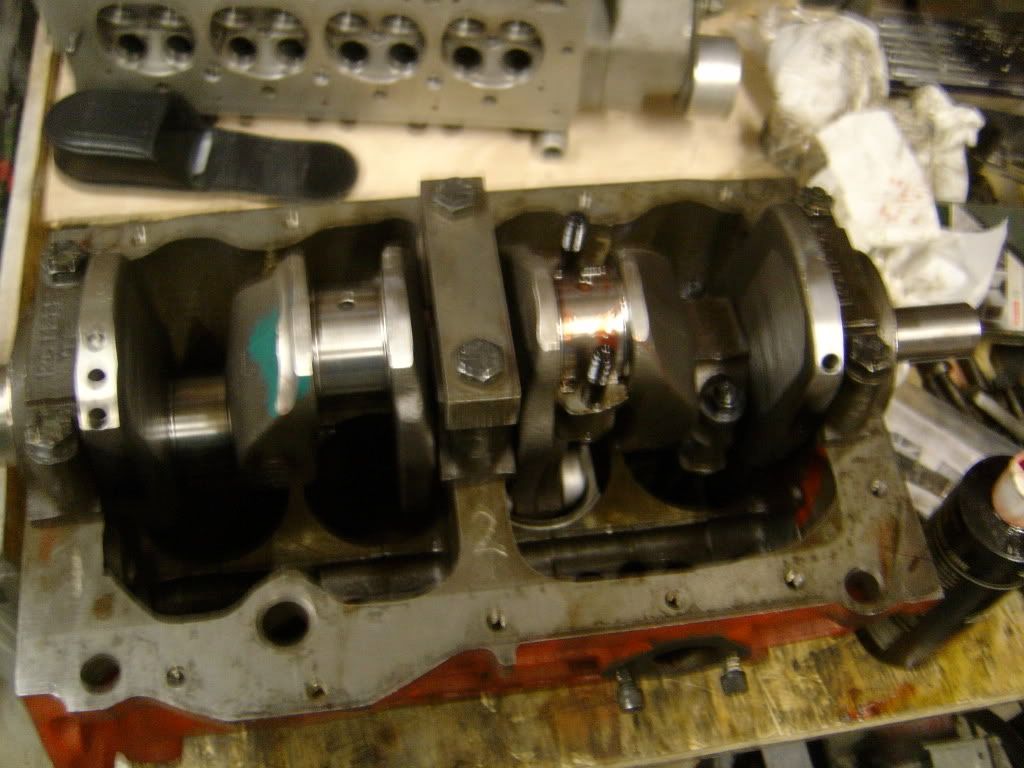
The KAD headed engine is going to be modified by KAD to have a new trigger wheel fitted to the back of the pulley, with the VR sensor mounting pillars cut down to suit. This is because it would interfere with the cam belt on the front...(likely to snap belt with wear).

Happy to discuss anything megajolt. It was so easy to fit. If you lived local you could come round and copy my wiring loom for the megajolt as it is off the car at the moment. The Mk2s are the not that different in length so the wires should be a more or less exact fit.

I'd be careful turboing a Midas. Make sure you have plenty of places to cool it down....and fit an electric cooling fan to exhaust the heat. They get very hot under the bonnet with Turbos.

That info about coupling could be useful info to minis who want the steering column lowering........

I have found that the Midas is a great day to day car, unlike a lot of other kit based cars. Historically though, the Midas was more of a semi production car than a kit car. They do accelerate quickly to triple figures with the aerodynamic shape. A ton is not a problem. Like you, I found rear visibility in the Coupe not so great...especially if you dont have the heated rear window, like me. On occasions its door open in reverse for me, ala van reversing. I dont have that problem in the convertible though. A lot better visibility. Head clearance was an issue with my leather seats (from a rover 220 tomcat) as they are a little high, but I found that if you lay the seats back further, that issue disappears, so its lay back driving style now :w00t:.

I can guarantee that each day at least a dozen drivers or people stare at the car, from Astons and Ferraris, to minis and imps.... I like to think they are admiring it....but more probably just curious. :thumbsup:. Its also a big conversation, ice breaking, point with people in the 40's plus age group, who are more likely to remember the Mini Marcos. I think the mini is going to get more and more of that attention too, as time progresses and they become rarer.

Kind regards,

David


Don't think you want to pull up the tray too steeply at the rear or you're likely to just get turbulence.

I have a Midas - the earlier Mini based one. It's also in dry dock as it slowly becomes Turbofied.

Be interested in any tips on Megajolt as that'll be the next bit to sort - where did you get your trigger wheel sorted?

I found a 1300 Montego radiator goes in really tidily as the fan's on the other side, but it has pipes at both ends so might be a squeeze plumbing a 16v head. The 1600 and 2.0L ones would fit well too as they just get longer.

I have a SD1 steering column in mine using the bottom 3 or 4 inches of the mini's to couple to the rack. It clears the pedals nicely, is adjustable and gives a better driving position.

I bought my Midas with a really dodgy MOT from a car dealers - I was curious but wasn't convinced it would make a practical car. It had a clapped out 998 lump with no oil pressure but it would still just touch a ton and cornered like you wouldn't believe even though there was inches of play in the suspension. Best shock was stripping it to rebuild after I blew the engine to discover a 2 inch hole in the top of the petrol tank - right above the exhaust!

Lot's of fun and not too stressing to drive, once you've worked out the lack of head clearance and reversing with the door open as you can see bugger all through the rear window and the side window is too small to get your head through :D

It's also nice when you catch Ferrari drivers checking out your drive.


#99 lvm18

lvm18

    Mini Mad

  • Members
  • PipPipPipPip
  • 164 posts
  • Local Club: Midas Owners Club

Posted 19 June 2007 - 10:34 PM

Started work on the bottom end.

In order to fit the head I had to drill out the extra 2 stud holes like the cooper s and 1300gt engines. This was taped out using first a primary tap and then a plug tap to 5/16" UNC (same as gearbox bolts) to a depth of 17.77mm. In addition, the existing stud holes were drilled further down to a depth of 29.94mm and the taped with a 3/8" UNC plug tap.

Posted Image

Posted Image

The difference between a primary tap and a plug tap is that the plug tap has the thread nearly all the way to the bottom, whereas the primary and secondary tap have a taper to start the tap off. The plug tap is used to get the thread right to the bottom of the drilling.

See the difference here

Posted Image

Started to put crank in by first putting mains shells in (with the hole), then pouring a fair amount of engine build lube.

Posted Image

#100 lvm18

lvm18

    Mini Mad

  • Members
  • PipPipPipPip
  • 164 posts
  • Local Club: Midas Owners Club

Posted 19 June 2007 - 10:35 PM

then placed gently crank in, sticking the crank thrust washers in with a bit of lube and then putting some more lube on the main journals. I bought a new crank rather than a regrind, for £150 + VAT it wasnt worth me doing a regrind, especially when I got the big ends, thrust washers and mains shells thrown in.

Posted Image

Edited by lvm18, 19 June 2007 - 10:37 PM.


#101 lvm18

lvm18

    Mini Mad

  • Members
  • PipPipPipPip
  • 164 posts
  • Local Club: Midas Owners Club

Posted 19 June 2007 - 10:42 PM

Then I placed the mains caps on, with more lube on shell inside cap. On the previous strip down I ground marks on the caps to tell me where they go back. Its a bit unnecessary really as its obvious... but more important on the con rods as they are bored as one piece. If you fit the wrong con rod cap with wrong rod chances are you will have a tight crank turning over....or worse! On strip down, centre punch 1 dot, 2 dots, 3 dots or 4 dots on both cap and rod to determine which fits where. It makes life easier later. Stating the obvious....but handy to know if its your first build.

Posted Image

#102 lvm18

lvm18

    Mini Mad

  • Members
  • PipPipPipPip
  • 164 posts
  • Local Club: Midas Owners Club

Posted 19 June 2007 - 10:44 PM

All caps in place ready to be torqued up.

If you've done it right you should be able to turn the crank over by hand once its full torqued up.

Posted Image

#103 lvm18

lvm18

    Mini Mad

  • Members
  • PipPipPipPip
  • 164 posts
  • Local Club: Midas Owners Club

Posted 19 June 2007 - 10:48 PM

Started putting con rods and pistons in. I want to make sure the bottom end holds together well so I invested in a set of ARP con rod nuts and bolts. For peace of mind. Better still is a set of Arrow or Carillo rods.....but they cost about 3 or 4 times the price.

Posted Image

#104 lvm18

lvm18

    Mini Mad

  • Members
  • PipPipPipPip
  • 164 posts
  • Local Club: Midas Owners Club

Posted 19 June 2007 - 10:52 PM

Fitting caps is same process as mains. Fit the shell, pour some lube on and pull con rod up to big end journal (lube on jounal too) and then fit cap. The ARP bolts need lubricating initially then the nut wound up and off 3 times to ensure the correct torque setting is correct.

Posted Image

#105 CanadianMiniFan

CanadianMiniFan

    Camshaft & Stage Two Head

  • Members
  • PipPipPipPipPipPipPipPip
  • 1,591 posts

Posted 19 June 2007 - 11:28 PM

cool, i remember doing all this, while building up my bottom end a little while ago.


2 user(s) are reading this topic

0 members, 2 guests, 0 anonymous users