No worries Nev! I think I'm going to get some of those myself, seems a good way to protect all my hard work.
You excited to have him back?

Project Golden Balls.
Started by
nev_payne
, Jan 28 2008 09:33 PM
303 replies to this topic
#121

Deathrow
-

- TMF IT Specialist
-

- 5,744 posts
Have you tried turning it off and on again?
- Name: Adam
- Location: Manchester, UK
Posted 24 July 2010 - 11:40 AM
#122
nev_payne
-
- Members
-
- 2,249 posts
Up Into Fourth
- Location: UK
Posted 24 July 2010 - 10:18 PM
Oh yes and quite a relief as well!
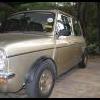
Piccies from collection and convoy back. Just as well I followed the truck back - the masking tape gave way on the driver's side and the door began swinging open merrily on every left turn


Once home the garage was blitzed:

Also got the carpet back from the cleaners this morning (many thanks to Wendy!) amazing how well it's come up:

Picked my friend up from town after getting things sorted out and we began working on him. Stripped out the manky headlining, and removed all the panels/paper/collected nuts/bolts from the respray. A wipe down inside and out and a damn good vacuum clean to get rid of dust gave way for a blank slate:


Seriously.. the amount of dirt inside the car we got out was mad
Tucked up SirD his loaned-in-kind cover and called it a day at about 9pm:

Now I just need to find my bed!

Tomorrow the wheels come back off for better access to the underside. Waxoyl time!
Piccies from collection and convoy back. Just as well I followed the truck back - the masking tape gave way on the driver's side and the door began swinging open merrily on every left turn
Once home the garage was blitzed:
Also got the carpet back from the cleaners this morning (many thanks to Wendy!) amazing how well it's come up:
Picked my friend up from town after getting things sorted out and we began working on him. Stripped out the manky headlining, and removed all the panels/paper/collected nuts/bolts from the respray. A wipe down inside and out and a damn good vacuum clean to get rid of dust gave way for a blank slate:
Seriously.. the amount of dirt inside the car we got out was mad
Tucked up SirD his loaned-in-kind cover and called it a day at about 9pm:
Now I just need to find my bed!
Tomorrow the wheels come back off for better access to the underside. Waxoyl time!
Edited by nev_payne, 24 July 2010 - 10:18 PM.
#123
nev_payne
-
- Members
-
- 2,249 posts
Up Into Fourth
- Location: UK
Posted 25 July 2010 - 03:16 PM
Not so much to report on today.
Got SirD back up on 4 stands. Going to get the wheels sorted out now as they're looking pretty worn out. Mainly just more cleaning and the waxoyling:
Covering up for the roof gallery and engine bay spraying. Sills and pillars suitably drowned at this point.


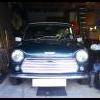
Money shot:

Me hard at work sporting gratuitous extremities for all to see. Nice go fast stripes Nev.

Also tidying up the heater matrix and brought in for storage until required.
Got SirD back up on 4 stands. Going to get the wheels sorted out now as they're looking pretty worn out. Mainly just more cleaning and the waxoyling:
Covering up for the roof gallery and engine bay spraying. Sills and pillars suitably drowned at this point.
Money shot:
Me hard at work sporting gratuitous extremities for all to see. Nice go fast stripes Nev.
Also tidying up the heater matrix and brought in for storage until required.
#124
shough
-
- Members
-
- 196 posts
Mini Mad
- Location: Surrey
- Local Club: N/A
Posted 26 July 2010 - 01:17 PM
Wow looks brilliant, same colour as my clubman back home.
You have inspired me to do a respray looks so good.
Keep up the good work and the updates coming.
You have inspired me to do a respray looks so good.
Keep up the good work and the updates coming.
#125
Stevee
-

- Members
- 0 posts
- Local Club: #
Posted 26 July 2010 - 02:48 PM
wow a knightsbrigde thats a nice nice mini :]
proper nice good luck with it all
i want to get an mpi at some piont :]
proper nice good luck with it all
i want to get an mpi at some piont :]
#126
liam_italian
-

- Members
-
- 1,417 posts
One Carb Or Two?
- Local Club: TMF
Posted 26 July 2010 - 10:29 PM
Looking good, cant wait to see it finished
#127
nev_payne
-
- Members
-
- 2,249 posts
Up Into Fourth
- Location: UK
Posted 27 July 2010 - 08:32 AM
Will pop some more pictures up this evening.
Cleaned up the air duct boxes, tubes, carbon canister, and rear pocket bins last night and soaked the lot in rubber+vinyl cleaner. Also cleaned up the rubber seals. Most of them are pretty good but some replacements on the cards. Notably the top half of the door seals and the window seal that sits in the door - the driver's side has never been right since I bought SirD.
Friend popped over yesturday as well and made a start on the inner arches and the front wiring loom.
Just gonna leave this here:
- Top door seals
- Window seals inner door frame
- Alternator
- Sound padding for bulkhead int and ext
- Sportspack arch bolts
- Stainless seam guard clips
- Rear lights
- Headlining
- Clean headlamps
- Headlamp surround seals
- Sheets for bodywork
- Emery paper and WD40
- Sound deadening
Edited by nev_payne, 28 July 2010 - 07:36 PM.
#128
njathind
-
- Members
-
- 447 posts
Speeding Along Now
- Local Club: Chichester Mini Club
Posted 27 July 2010 - 08:47 AM
wow a knightsbrigde thats a nice nice mini :]
proper nice good luck with it all
i want to get an mpi at some piont :]
Just a little tip if your buying an injection mini (spi or mpi) MAKE SURE IT'S 100% RUST FREE of if not your bank balance will feel it
Edited by njathind, 27 July 2010 - 08:47 AM.
#129
nev_payne
-
- Members
-
- 2,249 posts
Up Into Fourth
- Location: UK
Posted 28 July 2010 - 07:40 PM
Nothing really to report for last night but I'm on the look out for genuine sound deadening for interior/exterior on the bulkhead.
Cleaning up the headlamps and pulling some other bits down from the garage for inspection and cleaning up. Ordered up stainless steel seam cover clips, and Granville Rust remover for some suspect areas. Also need to strip down both the doors (yes... the glass stayed IN the doors when reskinned and sprayed ).
).
Derp.
Cleaning up the headlamps and pulling some other bits down from the garage for inspection and cleaning up. Ordered up stainless steel seam cover clips, and Granville Rust remover for some suspect areas. Also need to strip down both the doors (yes... the glass stayed IN the doors when reskinned and sprayed
).Derp.
#130
Deathrow
-
- TMF IT Specialist
-
- 5,744 posts
Have you tried turning it off and on again?
- Name: Adam
- Location: Manchester, UK
Posted 03 August 2010 - 12:38 AM
Why did they leave the glass in  |.
|.
Looking lovely Nev .
.
You'll have to tell me what you think of those rubber wheel arch protectors when you get them.
|.Looking lovely Nev
.You'll have to tell me what you think of those rubber wheel arch protectors when you get them.
#131
nev_payne
-
- Members
-
- 2,249 posts
Up Into Fourth
- Location: UK
Posted 05 August 2010 - 10:51 AM
Okies bit of an update for you lot. I've been looking after a work collegue's house for this week but my friend has kept me up to speed with any progress they've made:


The remaining rust spots (typically in the most awkward places in all 4 wheel arches) have now been treated and painted up. My firend has also test-fitted the headlamp bowls (needing to replace the foam surround and re-rivet them). Radiator, block loom and the brake system are now in place for test fitting (the master cylinder needs a service, very much a case of DOT4 in, DOT4 straight out again).
Interior now has the dash rails and switches back in as well (again test-fitting). The dash itself is on hold until I can find a suitable "faux-genuine" replacement.
Thanks to R1MiniMagic the sound deadening pads are also on their way.
I'll get some more pictures when I get back home this weekend
Edited by nev_payne, 05 August 2010 - 10:53 AM.
#132
nev_payne
-
- Members
-
- 2,249 posts
Up Into Fourth
- Location: UK
Posted 17 August 2010 - 02:59 PM
Update: more test fittage.
Blitzed the garage again:

Wiring looms in place and plugs accounted for, also a test fit of the manifolds. Yes - it's a very drunk setup at the moment - not disimilar from how it looked before coming off the engine originally :

Also fitted R1Mini's soundpadding - a perfect fit good sir and many thanks for the quick com's to my advert :

Rod selector has also been cleaned up with the pressure washer, degreaser, a lick of paint on the support bracket and finally WD40 until I grab a closer inspection. Hmmm sort-of-shiney :
:

Waxoyl into the rear pockets after a dust down and also into the cross-beam under the front seats. Onto the arches and doors next.
Blitzed the garage again:
Wiring looms in place and plugs accounted for, also a test fit of the manifolds. Yes - it's a very drunk setup at the moment - not disimilar from how it looked before coming off the engine originally
:Also fitted R1Mini's soundpadding - a perfect fit good sir and many thanks for the quick com's to my advert
:Rod selector has also been cleaned up with the pressure washer, degreaser, a lick of paint on the support bracket and finally WD40 until I grab a closer inspection. Hmmm sort-of-shiney
:Waxoyl into the rear pockets after a dust down and also into the cross-beam under the front seats. Onto the arches and doors next.
Edited by nev_payne, 17 August 2010 - 03:01 PM.
#133
Deathrow
-
- TMF IT Specialist
-
- 5,744 posts
Have you tried turning it off and on again?
- Name: Adam
- Location: Manchester, UK
Posted 17 August 2010 - 10:38 PM
Looking good! Well apart from that manifold, how is it managing to sit so sideways?
Keep it up.
Keep it up
.
#134
nev_payne
-
- Members
-
- 2,249 posts
Up Into Fourth
- Location: UK
Posted 18 August 2010 - 07:58 AM
It's just resting there with 2 loose nuts for now. Nothing sinister  Just really a parts check from the many boxes and trays that came out 2 years ago.
Oh also ordered up a new expansion tank (as the top pipe is held in by Epoxy following a breakage), and a few odd bolts. Also need to source sportspack studs (forgot to order them up with everything else )
)
Just really a parts check from the many boxes and trays that came out 2 years ago.Oh also ordered up a new expansion tank (as the top pipe is held in by Epoxy following a breakage), and a few odd bolts. Also need to source sportspack studs (forgot to order them up with everything else
)
Edited by nev_payne, 18 August 2010 - 08:00 AM.
#135
nev_payne
-
- Members
-
- 2,249 posts
Up Into Fourth
- Location: UK
Posted 26 August 2010 - 12:58 AM
I finished working on SirD at about 1:20am this morning  . It should be written down as a sign of madness alongside hairy palms and talking to one's self.
So here's some piccies (excuse the quality).Yes at last, the fuel system and exhaust manifold are in and fitted as a final-fit. Took half an hour of swearing at the manifold spacers that sit inside mind:


The doors have been stripped, cleaned and sound padding fitted. Will waxoyl them up later on today, ready for reconstruction:

Lights are in as test-fit. These new lenses need the backing foam so it's really just a look-see for now. Not sure on whether to keep the classic-bulbs, or go with LED ones:

My best friend for the next few weeks while everything goes back together:

Finally, sorted a bit of a mystery. Since buying SirD I've never worked out how the breather system attached to the cylinder head until tonight. It now sits, properly bolted down on all sides:

Also done:
- Got the new accelerator cable in after punching out the old clip.
- Wiper motor and arm cleaned up and are now fitted to SirD with the wiper grommets.
- Security ECU fitted to the inside of dash.
- Rear loom cleaned up and pseudo-fitted.
Also need to speak to MiniSpares regarding http://minispares.co...ty=pb&pid=34056 - why does it fall 1/3" short of the top bracket??
Been quite a day!
. It should be written down as a sign of madness alongside hairy palms and talking to one's self. So here's some piccies (excuse the quality).Yes at last, the fuel system and exhaust manifold are in and fitted as a final-fit. Took half an hour of swearing at the manifold spacers that sit inside mind:
The doors have been stripped, cleaned and sound padding fitted. Will waxoyl them up later on today, ready for reconstruction:
Lights are in as test-fit. These new lenses need the backing foam so it's really just a look-see for now. Not sure on whether to keep the classic-bulbs, or go with LED ones:
My best friend for the next few weeks while everything goes back together:
Finally, sorted a bit of a mystery. Since buying SirD I've never worked out how the breather system attached to the cylinder head until tonight. It now sits, properly bolted down on all sides:
Also done:
- Got the new accelerator cable in after punching out the old clip.
- Wiper motor and arm cleaned up and are now fitted to SirD with the wiper grommets.
- Security ECU fitted to the inside of dash.
- Rear loom cleaned up and pseudo-fitted.
Also need to speak to MiniSpares regarding http://minispares.co...ty=pb&pid=34056 - why does it fall 1/3" short of the top bracket??
Been quite a day!
Edited by nev_payne, 26 August 2010 - 01:02 AM.


1 user(s) are reading this topic
0 members, 1 guests, 0 anonymous users


