Jump to content


Photo
- - - - -

1988 City E For Essex Boy

roundnose

  • Please log in to reply
78 replies to this topic

#46 1984mini25

1984mini25

    Crazy About Mini's

  • Members
  • PipPipPipPipPipPipPipPipPipPip
  • 8,781 posts
  • Location: -

Posted 31 October 2017 - 10:56 PM

thanks Panky --  i might have interested but the seller seems to not give a ******* ..


www.ebay.co.uk/itm/classic-mini-Inc-Ltd-Editions-door-handle-furniture-Grey-Genuine-bL-parts/142552612505


I'll wait for someone who I want to give my hard-earned to..

:-)


I've got a load of grey and brown door furniture that I've 'collected' over the years when I've replaced it for chrome stuff.


#47 ga2davt

ga2davt

    Stage One Kit Fitted

  • Noobies
  • PipPipPip
  • 97 posts
  • Location: Brentwood, Essex

Posted 01 November 2017 - 08:10 AM

wow -- i'd definitely be interested... mine is replaced with chrome and needs to go back.

I've got hounds tooth (not saw tooth) back seats and two spoke (wrong) steering wheel and a four spoke (correct) steering wheel on the way. Hopefully the steel wheels as well... This is coming together nicely..


#48 ga2davt

ga2davt

    Stage One Kit Fitted

  • Noobies
  • PipPipPip
  • 97 posts
  • Location: Brentwood, Essex

Posted 01 November 2017 - 09:52 PM


Are you really, REALLY sure you want to convert this Mini back to '88 City E spec????

Things like the original sawtooth seats (similar to your '83 City E houndstooth seats but bigger pattern) are getting very hard to find (http://www.theminifo...-seat-or-cover/) & the way the car looks now does look (sort of) good.... I can imaging Gru (sorry that should read You) driving around with Matt your Minion beside you :P


Not sure what interior colours were fitted in a red City E but it could be Poo Brown!

http://car-from-uk.c...le.php?id=22301

http://www.barons-au...id=19&cid=1244#


Poo brown?? You mean like this.. I thought they were black on the eBay site. They are NOS --never used, 30 years old.. I'm sorry, but I like them... There are vinyl dyes that could make it black or red or any other colours, even white, if I get fed up with 'Poo Brown.' It is hounds tooth. I looked up the trim code on the VIN and it said something like graphite?? I've forgotten I'm afraid - i'll have to look again.


I'm keeping an eye out for the proper originals, but will take similar period parts in the meantime.   

Attached File  seat 2.JPG   153.01K   0 downloads


Or is yellow-blue better?

Attached File  seat 1.JPG   110.59K   0 downloads


I got this NOS binnacle today. It's grey but again vinyl dye can take it 'back to black' (Amy Winehouse ..) if I want this later.  

Attached File  dash 2.JPG   107.6K   0 downloads


Or yellow-blue...

Attached File  dash 1.JPG   100.26K   0 downloads


The engine bay and front subframe were covered with Bilt Hamber Epoxy Mastic 2-pack primer 

Attached File  front sub part 2.JPG   117.36K   2 downloads


Under the primer there is Bilt Hamber Hydrate 80 that makes it go black when dried. 

Attached File  front sub part 1.JPG   128.91K   1 downloads


Put a cover on it as there was so much condensation this morning and it is a better if the paint dries without condensation.. 

Attached File  covered.JPG   111.43K   1 downloads


#49 ga2davt

ga2davt

    Stage One Kit Fitted

  • Noobies
  • PipPipPip
  • 97 posts
  • Location: Brentwood, Essex

Posted 02 November 2017 - 09:00 PM

On top of the Bilt Hamber Hydrate 80 and Epoxy Mastic primer, there is now "Tractor & Machinery Enamel Paint: David Brown Highway Yellow" from Arc-Rite-Welding. It's the colour of the double yellow lines on the road..


I'm growing to dislike the yellow colour a little more each day. I got it because "the other driver didn't see me" all those years ago when he wrote off my Mini in a crash. I'd find it very difficult to believe someone doesn't see this yellow car... so bright yellow it is... (for now..) 


Anyway as a compromise I'll put second coat on, coloured Flame Red, the original colour of the car. I need to wait a week between coats though.


Here's the engine bay, painted tonight 

Attached File  yellow engine bay.JPG   123.34K   2 downloads


And the front sub frame, painted tonight

Attached File  yellow front sub frame.JPG   120.63K   1 downloads


#50 1984mini25

1984mini25

    Crazy About Mini's

  • Members
  • PipPipPipPipPipPipPipPipPipPip
  • 8,781 posts
  • Location: -

Posted 02 November 2017 - 11:23 PM


wow -- i'd definitely be interested... mine is replaced with chrome and needs to go back.


I've got hounds tooth (not saw tooth) back seats and two spoke (wrong) steering wheel and a four spoke (correct) steering wheel on the way. Hopefully the steel wheels as well... This is coming together nicely..


I'll have a dig though the boxes of stuff and see how much or a full set and more I have spare. I've also the front grey/brown seatbelts with storks for a Mayfair i no longer have use for.


#51 ga2davt

ga2davt

    Stage One Kit Fitted

  • Noobies
  • PipPipPip
  • 97 posts
  • Location: Brentwood, Essex

Posted 03 November 2017 - 07:03 PM

Just read feybrand build... really impressive !


I'm not painting anything tonight .. chilling out .. but unwrapped some cool parcels.. 


Steering wheel three years too old

Attached File  two spoke.JPG   94.9K   0 downloads


The right steering wheel - thanks Rocket! (Terry)

Attached File  four spoke.JPG   102.3K   1 downloads


Can anyone guess why I got these?

Attached File  mini spares.JPG   70.86K   1 downloads


Have a nice weekend!


#52 1984mini25

1984mini25

    Crazy About Mini's

  • Members
  • PipPipPipPipPipPipPipPipPipPip
  • 8,781 posts
  • Location: -

Posted 03 November 2017 - 09:22 PM

Can anyone guess why I got these?

attachicon.gifmini spares.JPG


Have a nice weekend!


Yes I can, but I personally wouldn't. As what you'll find is a few years down the line, when you go to remove the blots from the engine mounts the captive nuts (riv nuts) will just spin and make removing them a bigger pita than necessary.


What I've always done is use a flat bladed screwdriver to line up the holes in the mounts with the subframe, then with the help of some masking tape to hold the bolt in the ring end of the spanner, drop the bolts in from the top.


32803720800_aab93a436d_c.jpg


33144316796_ca37c7642f_c.jpg


33058315321_3ee8a2f7d3_c.jpg


#53 73MkIII

73MkIII

    Mini Mad

  • Noobies
  • PipPipPipPip
  • 158 posts
  • Location: Worcestershire

Posted 04 November 2017 - 08:27 AM


Can anyone guess why I got these?

attachicon.gifmini spares.JPG


Have a nice weekend!


Yes I can, but I personally wouldn't. As what you'll find is a few years down the line, when you go to remove the blots from the engine mounts the captive nuts (riv nuts) will just spin and make removing them a bigger pita than necessary.


What I've always done is use a flat bladed screwdriver to line up the holes in the mounts with the subframe, then with the help of some masking tape to hold the bolt in the ring end of the spanner, drop the bolts in from the top.


32803720800_aab93a436d_c.jpg


33144316796_ca37c7642f_c.jpg


33058315321_3ee8a2f7d3_c.jpg


Is it worth putting anti seize on them or would they then come undone?


#54 1984mini25

1984mini25

    Crazy About Mini's

  • Members
  • PipPipPipPipPipPipPipPipPipPip
  • 8,781 posts
  • Location: -

Posted 04 November 2017 - 11:03 AM

It might help. But riv nuts are just a pop rivet with a thread inside, witch are fitted/crimped in the same way. Great for fixing bits of trim, wheel arches, door mirrors etc...


#55 ga2davt

ga2davt

    Stage One Kit Fitted

  • Noobies
  • PipPipPip
  • 97 posts
  • Location: Brentwood, Essex

Posted 04 November 2017 - 12:47 PM

Thanks 1984mini25,

I think I'm learning that it's a good idea to share ideas, seek opinions and go slower before jumping in..

I got the car on impulse and didn't think that I really wanted an original car.

I don't think I'd have known that the heel board was shot without getting an experienced helper to look at the car and it wasn't clear that rear sub-frame was weak either.

Now I've got three steering wheels and spare engine mounts with captive nuts. 


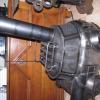
So today I loosely fixed the heel board to the rear sub frame

Attached File  subframe.JPG   112.6K   2 downloads


And loaded the car onto a truck - unfortunately my friend Matt slept through, otherwise I'd have had another picture of him on here    :-)

Attached File  car on van.JPG   144.69K   0 downloads

Attached File  IMG_0784.JPG   92.96K   0 downloads


And left it with Jamie at 'Little Legends' Mini Specialists on Canvey Island, Essex. We agreed a price (top secret) and 4 weeks to replace full heel board, outer/inner sills with jacking points. I left him the rear subframe and fixings so he can trial fit it. He said I can come over and work on the car in his garage on his rollover jig (with my tools) from 0900 to 1300 on Saturday mornings and he takes pictures as he goes ...   

Attached File  car with Little Legends.JPG   140.96K   0 downloads


Now I'm looking forward to making a big bonfire, eating lots of bbq food and letting off a load of fireworks with friends, family and neighbours --  about 40-50 of us are getting together -- yippee !! 


#56 ga2davt

ga2davt

    Stage One Kit Fitted

  • Noobies
  • PipPipPip
  • 97 posts
  • Location: Brentwood, Essex

Posted 07 November 2017 - 10:44 PM

First -- reason to be pissed off... I replaced the front pads on my daily driver, it was squealing so I took it to local garage, as I needed the car on the road. They charged me for stripping and refitting. Last night I'm 30 miles from home, lost brakes so used low gears and handbrake to get home. Jacked up the car to see insides of newly powder coated wheel trashed and a missing bolt that should have been holding caliper on... The garage didn't bother tightening the bolt.... but used their air impact wrench to over tighten the wheel studs.. Needed a big breaker bar to release them..bah humbug!!    


With no shell here, the other bits can be refurbished.


The rubber boots on the steering rack were replaced with Delphi parts. The rack was sanded and painted with Bilt Hamber Hydrate 80. I'll put  a coat of black top coat on tomorrow & I need to get grease.


The rear swivel arms were cleaned up and a refurb kit used to replace seals. A bit OTT but I didn't want to reassemble them without new seals. They are scraped, de-greased & sanded. I don't know if they need paint. The brake flexi-pipes are seized so I'll grind them off tomorrow. 


Yesterday the engine block was de-greased with stuff like Gunk and tonight I got the engine hoist to move it to where I can paint it.


Maybe some photos tomorrow...


#57 ga2davt

ga2davt

    Stage One Kit Fitted

  • Noobies
  • PipPipPip
  • 97 posts
  • Location: Brentwood, Essex

Posted 09 November 2017 - 09:56 PM

It would be fab if I had some great pictures of progress after about 2 hours every night working on the car. But alas ...


Here's a picture of the rear swivel arms. I wanted new seals and grease nipples, so got a whole refurb kit. I didn't ream out the bearing. It was lubricated with semi-viscous grease, and it was added to the swivel arm itself as well as adding via the grease point.  

Attached File  rear swivel.JPG   141.2K   0 downloads


Some bits on the front sub-frame were stripped down as the rubber bush was perished. Stainless nuts & bolts replaced the steel, with lots of copper-slip. 

Attached File  front sub.JPG   176.83K   0 downloads


The steering rack had perished rubber boots. There were replaced and the rack made ready for paint. Awaiting 1/3rd pint of EP90 gear oil that I'll collect at the weekend. Stainless nuts as well. The whole car will have steel replaced with stainless (& copper-slip) where it isn't high tensile. Nylocs as well. 

Attached File  replace rack rubber.JPG   160.66K   0 downloads   


#58 ga2davt

ga2davt

    Stage One Kit Fitted

  • Noobies
  • PipPipPip
  • 97 posts
  • Location: Brentwood, Essex

Posted 11 November 2017 - 11:44 AM

Yippee... got some original wheels.. they should scrub up nicely ..


Attached Files


#59 1984mini25

1984mini25

    Crazy About Mini's

  • Members
  • PipPipPipPipPipPipPipPipPipPip
  • 8,781 posts
  • Location: -

Posted 11 November 2017 - 12:10 PM

I really don't want to should like I'm constantly nit picking. But, there's a few types of mini 12" steels ones with and with out spacers and ones with and without the slotted holes for the clips to hold the city hub caps on. As it's not as simple as the ones with spacers have the holes either, as some of mine don't. But from what I've found over the years, is the wheels without the 1/4" spacer tend to have the holes.


There was also someone on Facebook with a box full of Mayfair and city hub caps. (the first 4 in front of the larger ones) https://www.facebook...3&theater&ifg=1


#60 ga2davt

ga2davt

    Stage One Kit Fitted

  • Noobies
  • PipPipPip
  • 97 posts
  • Location: Brentwood, Essex

Posted 11 November 2017 - 07:20 PM

I don't think you are nit-picking. I appreciate your advice and once thing I learn as I get older and hopefully wiser is to listen to people.

My steel wheel have the spacers and I think they have the slotted holes. I'll put up some pictures when the wheels are refurbished.

I've contacted the FB guy. Thanks for the hint and well spotted!


cheers

Philip


Also tagged with one or more of these keywords: roundnose

0 user(s) are reading this topic

0 members, 0 guests, 0 anonymous users