


Yours is similar to my MPI Ben, with the difference being that someone had done a lot of the front end repairs previously (albeit to a poor standard). Everything from the front bulkhead backwards on mine is remarkably solid, but I can only assume that water ingress from the screen did most of the damage at the front. It had had a dodgy scuttle replacement and new front end, but I think it was Stevie Wonder who did the panel fitting. It's all had to come off again, including inner wings etc.
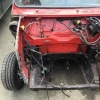
Back when I had a brand new MPI in 1998, I remember parking mine up wet in my parents garage (I know, I know, I was young and stupid) and was horrifed just a month later with the surface rust I found in the engine bay. You can see what dry ventilated storage does for a mini by looking at the MPI that Ben at Mill Road Garage is currently working on. Just goes to show, even these late cars can survive!!
Seems like we're doing a similar thing then! Do you have a project thread?


 Getting there slowly. Definitely a good idea. I'll get it taped up tonight. Your drive through wales on your way to IMM looked awesome!


