I wish I'd photographed more of my MPI while stripping it, but luckily I can use your build as a reference now, ha ha.
Your welcome! 


Mini Mad

Posted 16 July 2019 - 09:31 AM
I wish I'd photographed more of my MPI while stripping it, but luckily I can use your build as a reference now, ha ha.
Your welcome!
Mini Mad
Posted 16 July 2019 - 09:34 AM
Just read through the thread, keep up the good work, and don't worry about the speed you're going at, progress is progress!
Thank you! 
Mini Mad
Posted 22 July 2019 - 08:51 AM
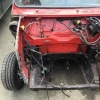
Very brief update, I took the passenger side door off and sheared off all four bolts event after spraying them with penetration fluid every day for a week. Gutted. Another small task t add to the list.
If anyone has experiance in fixing this common issue and has any tips they can offer I would appreciate it!!
Door off (you can see how bad the N/S wing was). The arch practically fell off.

Disk is clearly unrecoverable and Callipers don't look far behind. Its amazing what sitting still on a drive for a year and in a garage for 4 years does to a car.


Edited by Ben Rose, 22 July 2019 - 08:53 AM.
Super Mini Mad
Posted 22 July 2019 - 09:05 AM
The old tin worm is a powerful thing isn't it! If your arches are in decent condition, hang on to them as it seems originals are getting hard to find. I stupidly gave a set away to a chap who bought some other bits and pieces that I didn't need after stripping my car down.
Mini Mad
Posted 22 July 2019 - 12:31 PM
The old tin worm is a powerful thing isn't it! If your arches are in decent condition, hang on to them as it seems originals are getting hard to find. I stupidly gave a set away to a chap who bought some other bits and pieces that I didn't need after stripping my car down.
Mad, genuinely believe they must have cut corners on these later 99-00 cars. Good tip about the arches. Mine seem OK so I'll keep hold tight.
Mini Mad
Posted 23 July 2019 - 10:48 AM
On to the interior removal...
Front seat brackets look a bit rusty but saveable.

Carpet looks good so I am going to try to recondition it. Just these little protection plates need to be removed and replaced. Not sure how to do that yet.

Little self tappers holding rear seat in.

Rear door bins are dirty but saveable.


Reminding myself the order the seatbelt goes back in.

Stone chip inside rear door bin??


And on panel under rear seat. panels look in relatively good condition.


Enough for tonight.


Mini Mad
Posted 23 July 2019 - 10:53 AM
Found the original manuals too which I'm really pleased about.


Up Into Fourth

Posted 23 July 2019 - 05:08 PM
You might as well get new discs but the callipers usually clean up OK - easiest way is to have them blasted (crimp the pipes and leave the unions in place so media doesn't get inside them)and either zinc plate or paint them.
Mini Mad
Posted 23 July 2019 - 05:43 PM
You might as well get new discs but the callipers usually clean up OK - easiest way is to have them blasted (crimp the pipes and leave the unions in place so media doesn't get inside them)and either zinc plate or paint them.
Mini Mad
Posted 29 July 2019 - 09:22 AM
So managed to get a bit more done over the weekend...I am still pushing to get the wiring loom out and then engine.
Remaining seat belts out, rest of rear seat and rear door cards. The positive is the rear of the car seems in good condition.


Starting to pull the dash apart. Scared of what I will find as the rust falling on to the floor is incredible.


Plenty of sound deadening I can reuse as it looks to be in good condition considering what it is hiding.

First bolt removed on passenger side holding dash in

Don't know what this small illumination box "post 97 is". Must have changed the dash lighting for MPI.

Second bolt removed in centre of dash through radio hole.

Third and last bolt on drivers side is much more hidden.

I was fiddling with the dash when I managed to just pull off the entire top dash pad!!!!!!!! what the hell. It just fell apart in my hands.


Dash is out...


Back of Dash, it appears the rev counter is a separate module to the speed and temp gauges..


Laminate is coming away from the dash, repairable?


Behind the dash looks bad, I'm guessing there should be some kind of top rail which came away with the dash pad.


Boxing all the dash up..

Back out there tonight..

One Carb Or Two?

Posted 29 July 2019 - 10:26 AM
Mini Mad
Posted 29 July 2019 - 11:20 AM
Ahh cheers, yeah may be next year!Great detail you have there in the photos your posting...keep up the good work. shame it wasn't a project started so that it was finished in time for the IMM! You'll have to get it to a show once it's restored as we'll all want to take a butchers
When its finished I'll definitely be going to some shows.
Edited by Ben Rose, 29 July 2019 - 07:13 PM.
Mini Mad

Posted 01 August 2019 - 01:34 PM
I wish I'd photographed more of my MPI while stripping it, but luckily I can use your build as a reference now, ha ha.
Agreed  I haven't taken nearly enough photo's when stripping my MPi so this thread will really come in handy. I sent my wiring loom away to be fully tested and repaired and should hopefully get it back soon (with a few upgrades). Not looking forward to trying to put it back in
Mini Mad
Posted 02 August 2019 - 07:10 AM
I wish I'd photographed more of my MPI while stripping it, but luckily I can use your build as a reference now, ha ha.
Agreed
Super Mini Mad
Posted 02 August 2019 - 09:54 AM
Yours is similar to my MPI Ben, with the difference being that someone had done a lot of the front end repairs previously (albeit to a poor standard). Everything from the front bulkhead backwards on mine is remarkably solid, but I can only assume that water ingress from the screen did most of the damage at the front. It had had a dodgy scuttle replacement and new front end, but I think it was Stevie Wonder who did the panel fitting. It's all had to come off again, including inner wings etc.
Back when I had a brand new MPI in 1998, I remember parking mine up wet in my parents garage (I know, I know, I was young and stupid) and was horrifed just a month later with the surface rust I found in the engine bay. You can see what dry ventilated storage does for a mini by looking at the MPI that Ben at Mill Road Garage is currently working on. Just goes to show, even these late cars can survive!!


Projects →
Mini Saloons →
Mini Cooper Project - Finally StartsStarted by piphatch , 08 Jan 2025 |
|

|
||
Projects →
Mini Saloons →
1965 Austin Mini Restoration - Canadian Mk1Started by DoubleEh , 14 Nov 2022 |
|

|
||
Projects →
Mini Saloons →
Project Joe - 1991 Mini Mayfair 998Started by Eggers , 02 Jun 2022 |
|

|
||
Projects →
Mini Saloons →
Mpi Dashboad ProblemStarted by mikeprez , 22 Dec 2021 |
|

|
||
Projects →
Mini Saloons →
1978 Oew - Willy The MiniStarted by smalltreegrower , 11 Nov 2021 |
|

|
0 members, 1 guests, 0 anonymous users


