
It doesn't say anything like that on my megajolt??

One Carb Or Two?


Posted 13 June 2011 - 08:20 PM
Super Mini Mad
Posted 13 June 2011 - 08:28 PM
Hahaha, just paint over it.
It doesn't say anything like that on my megajolt??
 Can't paint it, looks to nice,
  ha
ha
One Carb Or Two?

Posted 13 June 2011 - 10:56 PM
Super Mini Mad
Posted 13 June 2011 - 11:28 PM
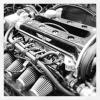
Great work, i have been quitely following this. Good to see the engine finally in, whos going to map it?
 It's taken a while hasn't it
  It's already pre mapped to the engine spec, but when its on the road I'll be taking it back to SC to have them check its running at optimum
One Carb Or Two?
Posted 14 June 2011 - 10:50 AM

One Carb Or Two?

Posted 14 June 2011 - 04:28 PM
Super Mini Mad
Posted 14 June 2011 - 05:53 PM
Good stuff, that makes life easier. please get a video once you have it up and running, really want to hear that.
Looking good mate!, i could be asking you some questions if i get stuck on putting mine in. Similar spec too.
Have you done a gearing chart for yours yet? as in speeds in each gear? I drew one up for my 3.2 diff if youd like the figures?
Matt
 So instead I made some clamps for the ECU to sit on the original rover bracket, just used some cut down DIN rail and rubber to sit between the bracket and ECU, thanks to work for the materials
  Just need a lick of paint=]
Super Mini Mad
Posted 15 June 2011 - 09:51 PM


 lol.
lol.
Super Mini Mad
Posted 16 June 2011 - 09:30 PM

 it will be when I get some scalebreaker from work I just need to buy a bracket for it.

Super Mini Mad
Posted 19 June 2011 - 08:08 PM
and the headaches started straight away! lol. giving me around 3-5mm clearance between the rad and alternator  So I've had to take the some metal off the bonnet slam panel and upright to clear the rad and mountings, not what I wanted to do but it was needed. I'm not sure if the new uprated rad will fit but I've given myself a chance of it fitting by removing the bodywork.
 but I don't want the paint to burn. The lower gearbox steadys are fitted as is the gear linkage

 so i'm not risking anything.
 Hopefully it will turn up tomorrow. I still need to get a coil, leads and plugs, clips and joiners for the cooling and breather circuits, I might buy some pipe and turn some joiners myself, it'll be a bit cheaper
  not good though as I won't even be able to get a lie in
Mini Mad

Posted 20 June 2011 - 12:52 PM
Super Mini Mad
Posted 20 June 2011 - 09:48 PM
who would want a lie in with a motor like that... looking good. as someone already said be good to get a video up when running.
keep up the good work
 I'll do some in car footage aswell
On The Road

Posted 20 June 2011 - 10:13 PM
Super Mini Mad
Posted 20 June 2011 - 10:53 PM
awesome project. Considering an SC twincam myself. How's the clearance with the bonnet on the head? Do you think you'll clear if you notch the bonnet ribs like SC says?
What clearance? lol. I think the bonnet actually touches the cam belt end of the head The X-brace needs to be removed from the steel bonnet, I have a fibreglass bonnet for this reason. I may need to get a 16v bulge bonnet...
On The Road
Posted 20 June 2011 - 11:55 PM
awesome project. Considering an SC twincam myself. How's the clearance with the bonnet on the head? Do you think you'll clear if you notch the bonnet ribs like SC says?
Thanksyou


0 members, 2 guests, 0 anonymous users


