hi ross, any ideas on colour yet?


Project Miglia
Started by
rosco454
, Oct 10 2009 09:31 PM
159 replies to this topic
#91

gregh55
-

- Banned
-

- 1,706 posts
Camshaft & Stage Two Head
- Local Club: naaa
Posted 28 January 2010 - 03:24 PM
#92
rosco454
-
- Members
-
- 908 posts
One Carb Or Two?
Posted 28 January 2010 - 04:50 PM
No final decision on colour,will cross that bridge when I come to it.I managed to take those pictures for you this afternoon so I will download them for you tonight.
Cheers Ross.
Cheers Ross.
#93
gregh55
-
- Banned
-
- 1,706 posts
Camshaft & Stage Two Head
- Local Club: naaa
Posted 28 January 2010 - 05:04 PM
tidy, im only asking because i was thinking of doing the same kind of thing with mine. . . but whats red on your would go blue to match my harneses lol
 cheers matey, talk later
cheers matey, talk later
#94
Pitcrew6464
-

- Members
-
- 1,673 posts
Camshaft & Stage Two Head
- Location: uk
- Local Club: mini 7 racing club
Posted 14 February 2010 - 09:11 PM
Hay roso454 you may be able to help me, do you know the measurements for mounting an internal remote gearchange like on the miglia's i need measurements for the holes for both rods and measurements for the mounting fixings including height.
#95
1380rich
-

- Members
-
- 325 posts
Speeding Along Now
- Local Club: nope
Posted 14 February 2010 - 09:22 PM
looking good ross, going to be done for avon and mitp this year?? be good to see it
rich
rich
#96
rosco454
-
- Members
-
- 908 posts
One Carb Or Two?
Posted 17 February 2010 - 09:10 AM
Hay roso454 you may be able to help me, do you know the measurements for mounting an internal remote gearchange like on the miglia's i need measurements for the holes for both rods and measurements for the mounting fixings including height.
Hi mate,
Basically there is no set measurements,you just make it to suit your seating position and whatever feels right for you.You only use the lower rod as the top steady rod is redundant,due to the linkage being solid mounted in the car the engine needs to be solid mounted as well as the steadies although i think some people use poly (prawn on here springs to mind).
I dont mind measuring mine up but it will only be of use if your seat is as far back as mine if that makes sense?
-----------------------------------------
Rich,ive just moved house so everything is in the garage piled up around it.Doesnt feel like il have the garage cleared before avon let alone run it!
Might have a bid on jims engine while its on ebay though,might help things along a little bit.
Cheers Ross.
#97
1380rich
-
- Members
-
- 325 posts
Speeding Along Now
- Local Club: nope
Posted 17 February 2010 - 06:11 PM
the mig NEEDS jims engine 
look forward to seeing it when its done
rich
look forward to seeing it when its done
rich
#98
Pitcrew6464
-
- Members
-
- 1,673 posts
Camshaft & Stage Two Head
- Location: uk
- Local Club: mini 7 racing club
Posted 15 April 2010 - 08:50 AM
Cheers Ross ill fit my seats then go from there my worrie is will it connect to the box alright as i have no engine and cars on a spit so cant make sure it will reach 
any suggestions sorry to hijack
any suggestions sorry to hijack
Edited by Pitcrew6464, 15 April 2010 - 08:50 AM.
#99
rosco454
-
- Members
-
- 908 posts
One Carb Or Two?
Posted 15 April 2010 - 09:24 AM
Pitcrew - Sent you a pm as it was a bit long winded!
I had almost forgotten about this thread,I might even go wild and post an update later on.
Cheers Ross.
I had almost forgotten about this thread,I might even go wild and post an update later on.
Cheers Ross.
#100
rosco454
-
- Members
-
- 908 posts
One Carb Or Two?
Posted 17 April 2010 - 09:36 AM
Right,heres an update since we are at about the 6 month mark.If nothing else it will prove that I have the slowest moving project in the world but that it is still just about ongoing 
Moved house in febuary so did nothing for a while before and a while after as I was busy packing/unpacking/pulling my hair out etc.
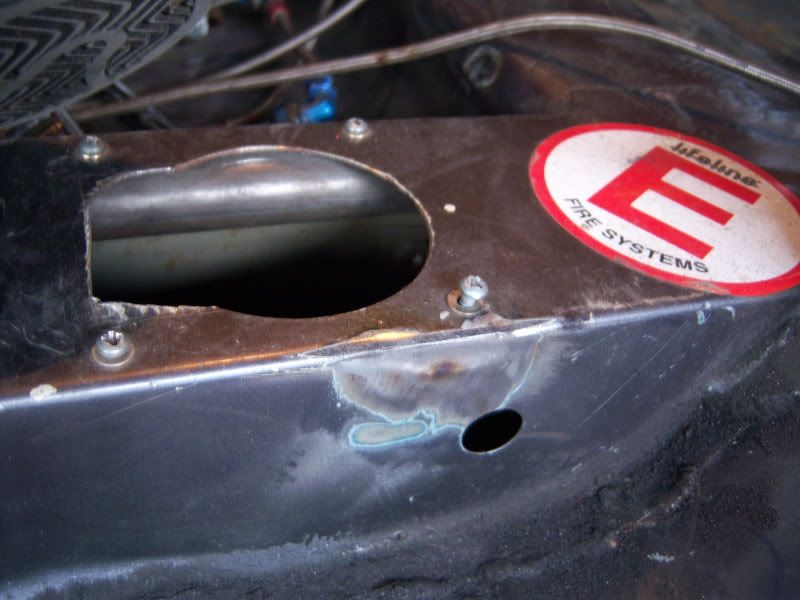
Once I got back working on the car I tidied up a few bits of brackets etc i had removed previously but only took one picture of where the battery cut off bracket had been.
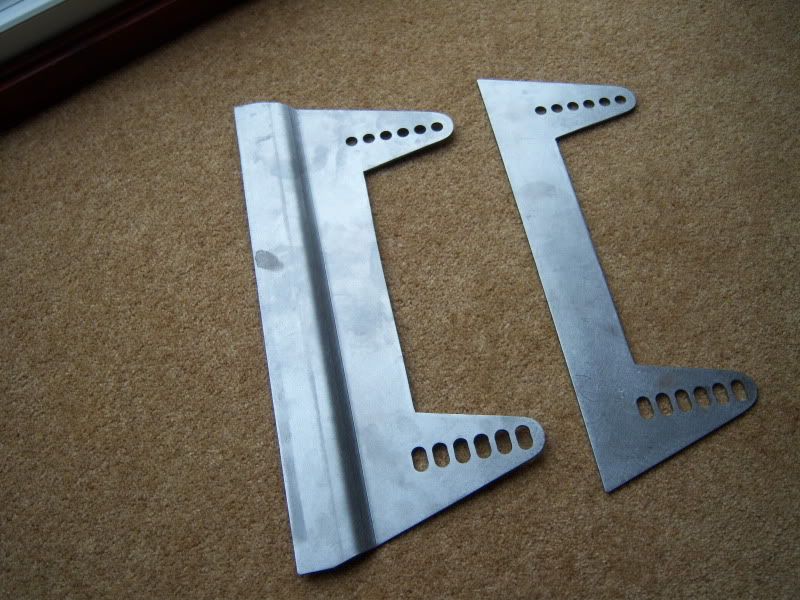
I had a local fabricator make me up a set of side mounts for the seat as none of the off the shelf ones were the right shape,the seat is hard to get into the right position as the door bar rises at the rear more than a regular miglia cage and gets in the way of the seat wing more.
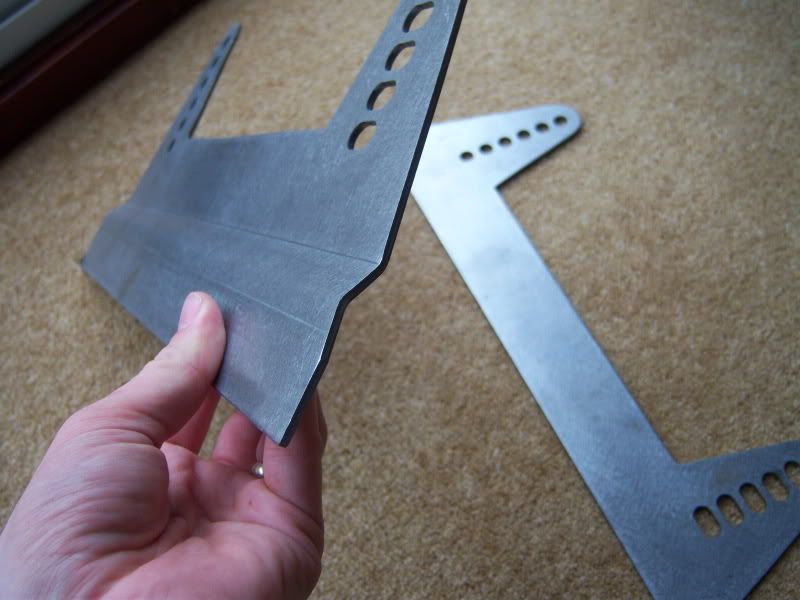
Had a right game on getting the seat into something like the right position due to the cage as I said above.The only way to get round the cage altogether would be to move the pedal box further towards the front bulkhead which i didnt want to do as the bulkhead would stop the clutch pedal getting full travel.After about 12 goes of getting the seat in/out of the car and lots of faffing around with mounting it at different angles etc I just about got sorted.Head head is a little higher than i would like but there is room for me to wear a lid ok so thats fine.Will be borrowing a more powerful welder in the next couple of weeks to get the mounts welded in place.
Seat in position.

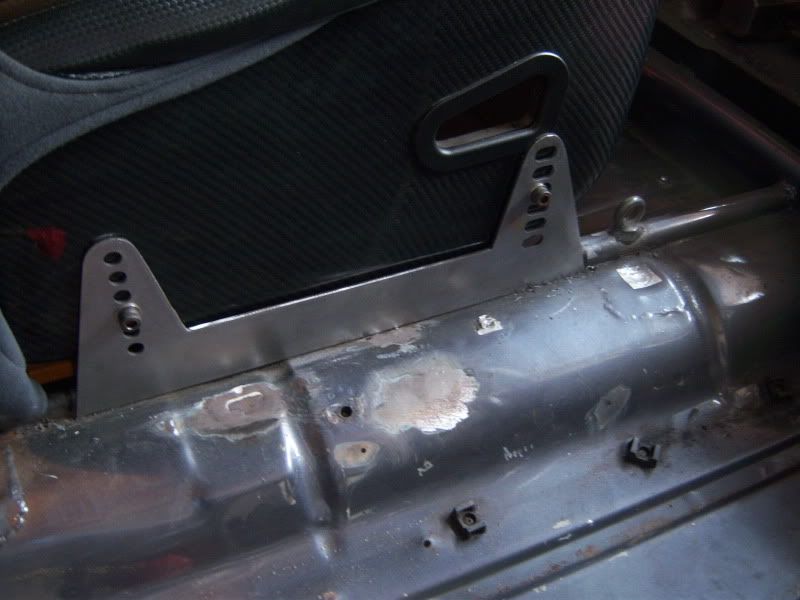
For positioning the seat,I borrowed a steering wheel with a 90mm dish as thats what i will be having eventually,still needs a 40-50mm spacer to get it in the right position put a bit of wood did the job until the mounts get welded in.
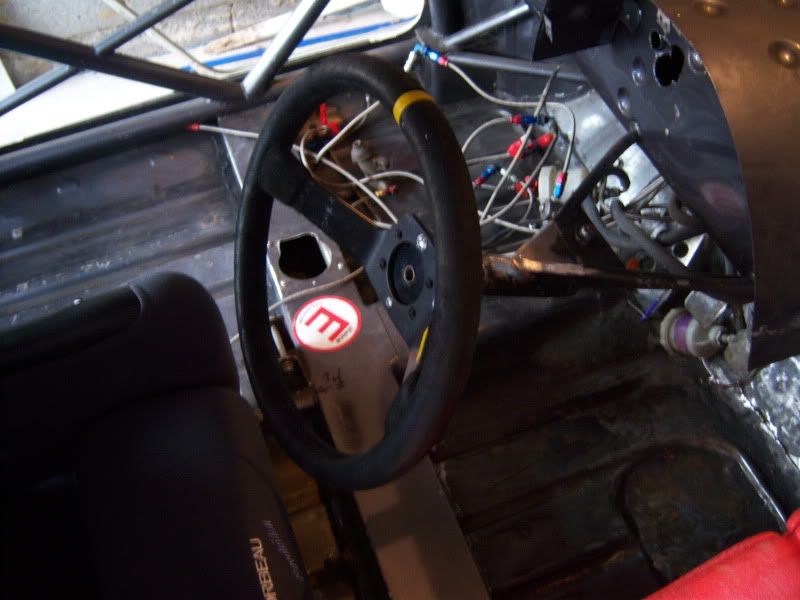
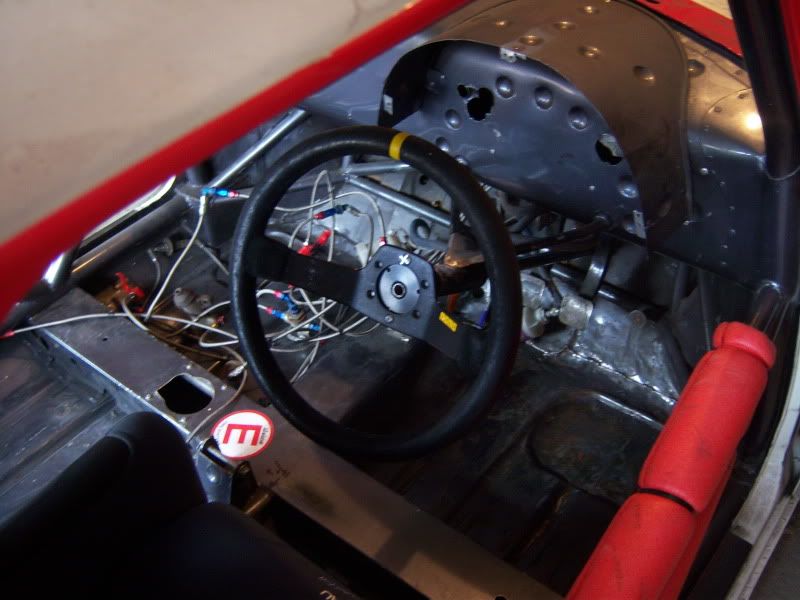
More to come,Ross.
Moved house in febuary so did nothing for a while before and a while after as I was busy packing/unpacking/pulling my hair out etc.
Once I got back working on the car I tidied up a few bits of brackets etc i had removed previously but only took one picture of where the battery cut off bracket had been.
I had a local fabricator make me up a set of side mounts for the seat as none of the off the shelf ones were the right shape,the seat is hard to get into the right position as the door bar rises at the rear more than a regular miglia cage and gets in the way of the seat wing more.
Had a right game on getting the seat into something like the right position due to the cage as I said above.The only way to get round the cage altogether would be to move the pedal box further towards the front bulkhead which i didnt want to do as the bulkhead would stop the clutch pedal getting full travel.After about 12 goes of getting the seat in/out of the car and lots of faffing around with mounting it at different angles etc I just about got sorted.Head head is a little higher than i would like but there is room for me to wear a lid ok so thats fine.Will be borrowing a more powerful welder in the next couple of weeks to get the mounts welded in place.
Seat in position.
For positioning the seat,I borrowed a steering wheel with a 90mm dish as thats what i will be having eventually,still needs a 40-50mm spacer to get it in the right position put a bit of wood did the job until the mounts get welded in.
More to come,Ross.
Edited by rosco454, 17 April 2010 - 09:38 AM.
#101
stevede
-

- Members
-
- 1,164 posts
As seen on TV
- Local Club: None
Posted 17 April 2010 - 09:40 AM
Nice to see you back Ross & that you have managed to make some progress.
Look forward to more updates
Regards
Steve
Look forward to more updates
Regards
Steve
#102
rosco454
-
- Members
-
- 908 posts
One Carb Or Two?
Posted 17 April 2010 - 10:11 AM
After that I moved onto what should have been a really simple job,repairing and refitting the footrest.I had removed it earlier as the mounts for it were messy an it was a bit knackered.I had planned to make another one myself but just decided to see if I could sort this one out.......
When I took it out at the start there was a bit of a tear in the mount where someone had messed around with it.Took it down to the fitting shop at work where they have a mig set up to weld aluminium and sorted the tear out,was a bit awkward as it was about 7mm wide at its biggest so I flattened a bit of copper bar to sit behind the gap as i welded and it came out ok.
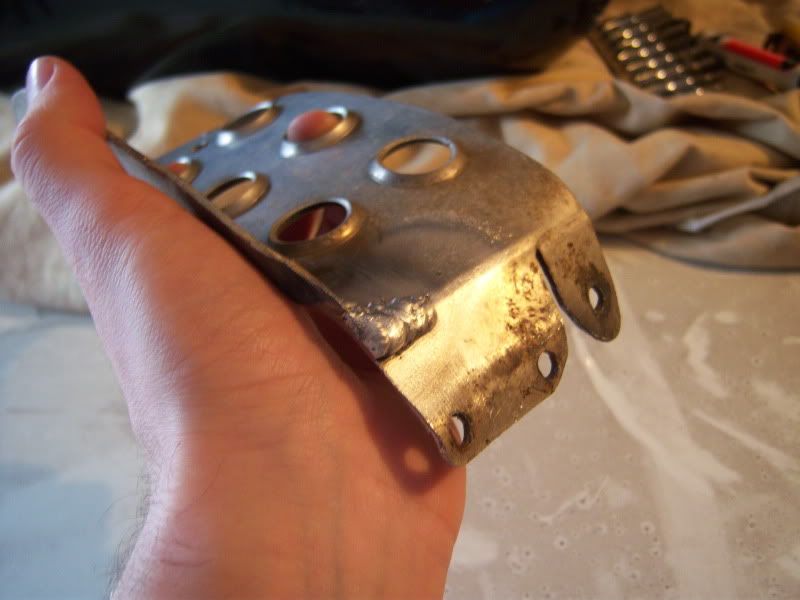
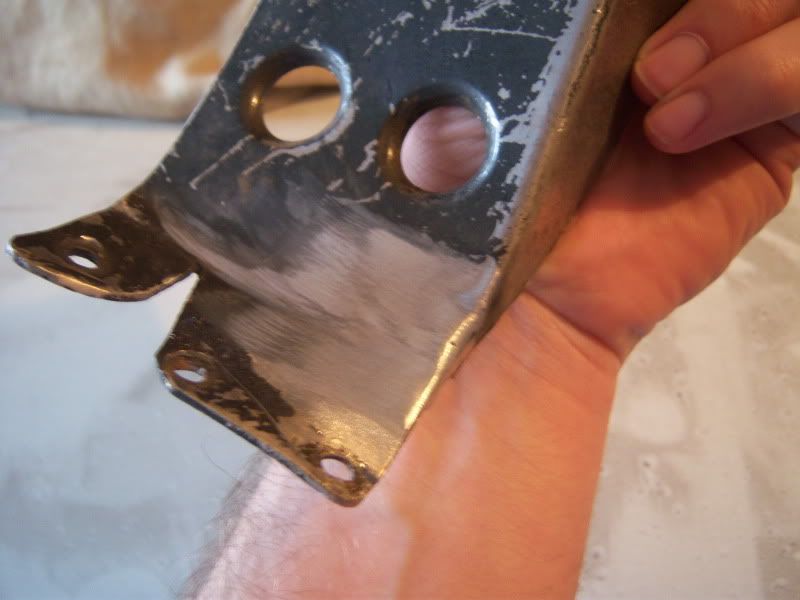
Had to remake a mount to attach it to the rollcage as the old one was awful.Bought some 15mm tube and cut a couple of bits to size, shaped them up to make a mount and welded them up.
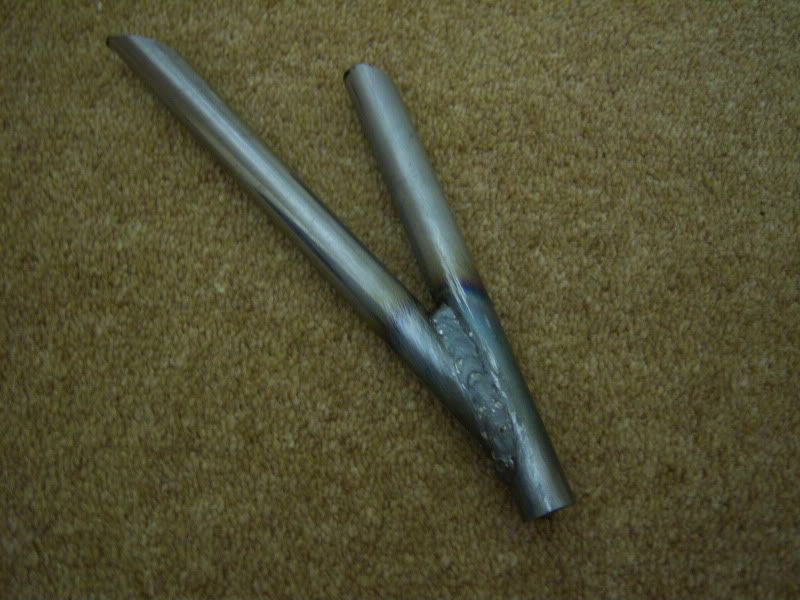
Then things started to get frustrating,had to weld a plate to the end of the Y shaped thing so it can bolt to the footrest.Plate took no time to make up but getting it tacked on it the right place was a nightmare!It was mainly due to everything having to be held in place as it was welded,nothing could be clamped or fixed in the right place.Also Having to lie over the cross member with my legs amongst the cage and head stuck under the dash with a mask on then having to weld with the torch in a funny position didnt help.After a lot more tries than i would have liked (about 10 ),I got it tacked up in the right place.Welding it up properly took 2 minutes but made sure not to weld over the bolt holes.
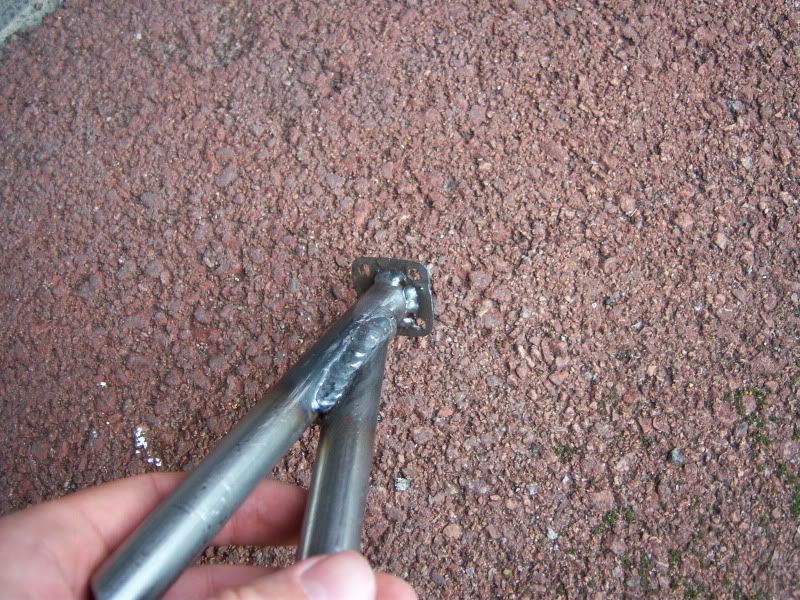
After that was done it was easy to position it to be welded to the cage as i could attach the footrest to the floor,Y piece to the foot rest and it just needed a slight adjustment to get it to the right place on the cage.From here it started to go badly again......got everything ready to go and mangled myself into a horrible position to put down the first weld,it seemed to spit a bit but thought the wire speed was too high as I had just turned it up.Took the mask off and the weld was like an aero bar......forgot to turn the gas on,special moment!
Luckily the weld was so weak that I could just snap it back off.It was about half eleven at night by this point so couldnt get the dremel out to trim everything back so had to hand file the rollcage back down which is easier said than done due to it being right against the bulkhead.Ended up standing in the engine bay ,upside down over the dash filing it back Also a little bit of the Y piece snapped off with the weld so had to build that back up with weld.Eventually after checking i had turned the gas on about 3 times got it welded up and it came out not bad considering how bloody awful a position I had to be in to weld it.
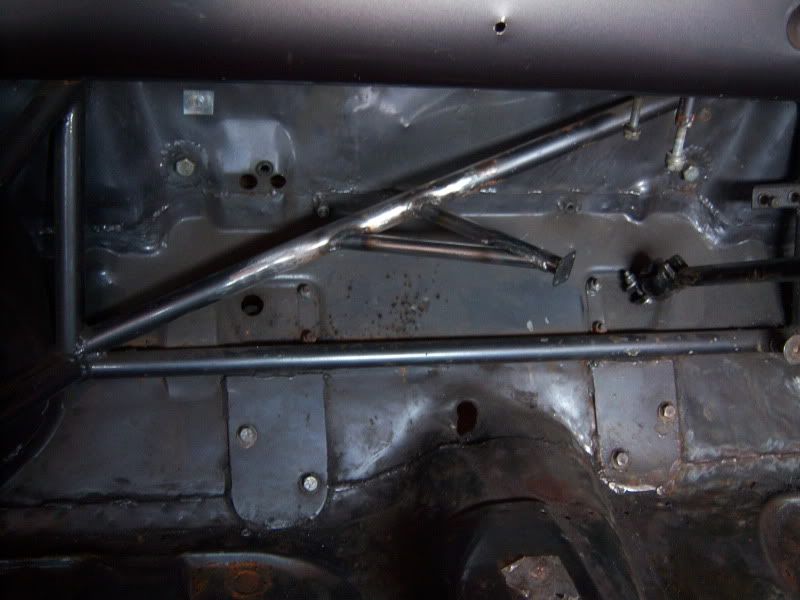
One more to come,Ross.
When I took it out at the start there was a bit of a tear in the mount where someone had messed around with it.Took it down to the fitting shop at work where they have a mig set up to weld aluminium and sorted the tear out,was a bit awkward as it was about 7mm wide at its biggest so I flattened a bit of copper bar to sit behind the gap as i welded and it came out ok.
Had to remake a mount to attach it to the rollcage as the old one was awful.Bought some 15mm tube and cut a couple of bits to size, shaped them up to make a mount and welded them up.
Then things started to get frustrating,had to weld a plate to the end of the Y shaped thing so it can bolt to the footrest.Plate took no time to make up but getting it tacked on it the right place was a nightmare!It was mainly due to everything having to be held in place as it was welded,nothing could be clamped or fixed in the right place.Also Having to lie over the cross member with my legs amongst the cage and head stuck under the dash with a mask on then having to weld with the torch in a funny position didnt help.After a lot more tries than i would have liked (about 10
),I got it tacked up in the right place.Welding it up properly took 2 minutes but made sure not to weld over the bolt holes.After that was done it was easy to position it to be welded to the cage as i could attach the footrest to the floor,Y piece to the foot rest and it just needed a slight adjustment to get it to the right place on the cage.From here it started to go badly again......got everything ready to go and mangled myself into a horrible position to put down the first weld,it seemed to spit a bit but thought the wire speed was too high as I had just turned it up.Took the mask off and the weld was like an aero bar......forgot to turn the gas on,special moment!
Luckily the weld was so weak that I could just snap it back off.It was about half eleven at night by this point so couldnt get the dremel out to trim everything back so had to hand file the rollcage back down which is easier said than done due to it being right against the bulkhead.Ended up standing in the engine bay ,upside down over the dash filing it back
Also a little bit of the Y piece snapped off with the weld so had to build that back up with weld.Eventually after checking i had turned the gas on about 3 times got it welded up and it came out not bad considering how bloody awful a position I had to be in to weld it.One more to come,Ross.
#103
rosco454
-
- Members
-
- 908 posts
One Carb Or Two?
Posted 17 April 2010 - 10:32 AM
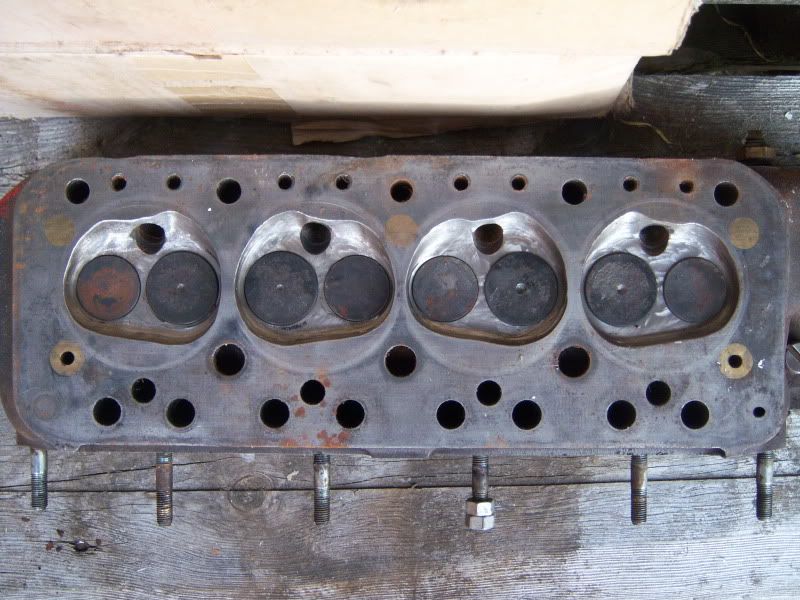
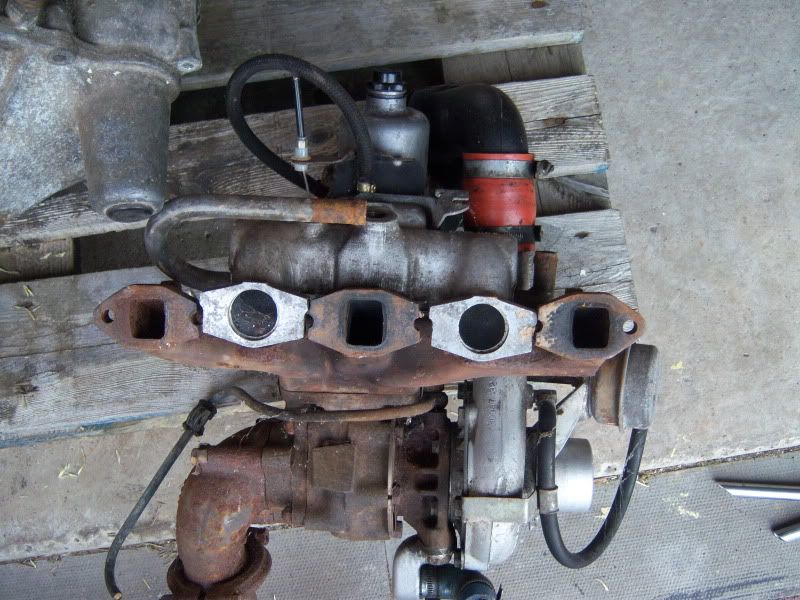
This arrived on tuesday.Full metro turbo setup to be used as the basis for a rebuild.
Block,gearbox,transfer case etc

Head - been modified at some point but will be redone.
Turbo/carb/manifolds.
Also picked these up cheaply on wednesday night from a local lad.
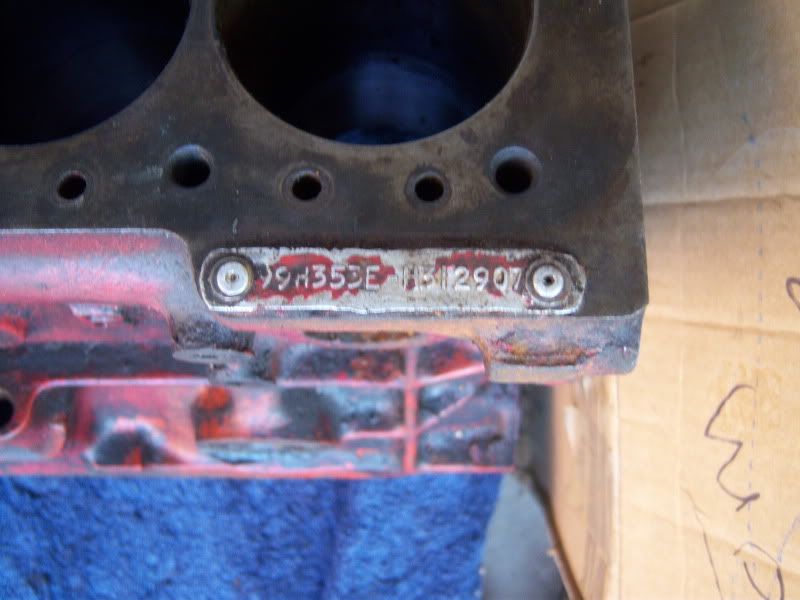
Spare 1275 A+ block with bearing caps,standard bores.
Some plum has put a 998 engine number on it at some point.
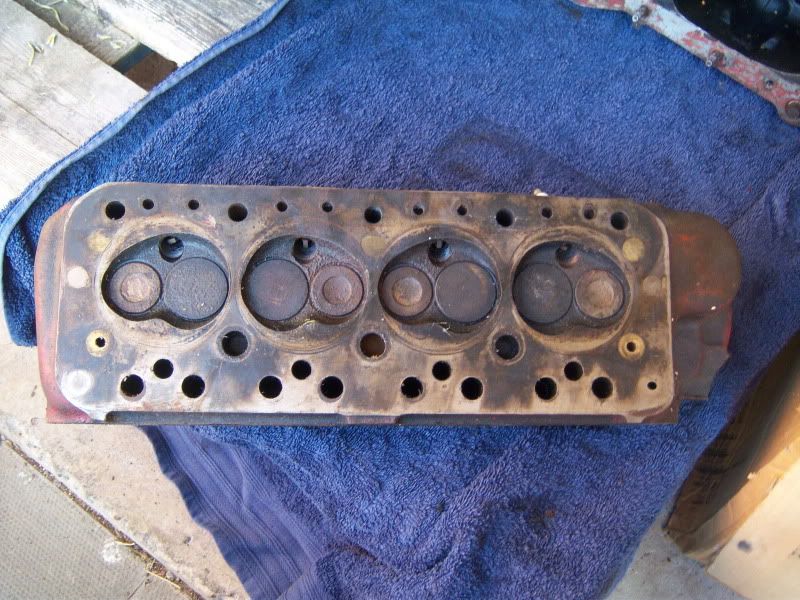
Spare 12G940 head (n/a one but handy to have for the casting),looks to have been skimmed but plenty meat left.

Also picked up a set of 1275 A+ rods (with a set of knackered pistons attached)

Thats all for now really,did a couple more jobs but dont have the pictures so will put them up during the week when i get the camera down to the garage.Need to rearrange the garage as well to fit the growing collection of engine parts in somewhere.
Cheers Ross.
Block,gearbox,transfer case etc
Head - been modified at some point but will be redone.
Turbo/carb/manifolds.
Also picked these up cheaply on wednesday night from a local lad.
Spare 1275 A+ block with bearing caps,standard bores.
Some plum has put a 998 engine number on it at some point.
Spare 12G940 head (n/a one but handy to have for the casting),looks to have been skimmed but plenty meat left.
Also picked up a set of 1275 A+ rods (with a set of knackered pistons attached)
Thats all for now really,did a couple more jobs but dont have the pictures so will put them up during the week when i get the camera down to the garage.Need to rearrange the garage as well to fit the growing collection of engine parts in somewhere.
Cheers Ross.
Edited by rosco454, 02 May 2010 - 01:38 PM.
#104
dougie1142
-
- Members
-
- 500 posts
Super Mini Mad
- Location: Inverness/Elgin
- Local Club: I.M.O.G
Posted 18 May 2010 - 11:13 PM
Very lovely project! Very jealous
Cant wait to see it in glory!
Cant wait to see it in glory!
#105
Pitcrew6464
-
- Members
-
- 1,673 posts
Camshaft & Stage Two Head
- Location: uk
- Local Club: mini 7 racing club
Posted 01 August 2010 - 10:40 AM
any progress?


0 user(s) are reading this topic
0 members, 0 guests, 0 anonymous users


