

Engine Strip Down And Rebuild With Lots Of Confusion :d
Started by
jameslearwood
, Dec 08 2011 09:14 PM
217 replies to this topic
#166

jameslearwood
-
- Members
-

- 525 posts
Super Mini Mad
- Local Club: ALL ALONE
Posted 27 January 2012 - 06:06 PM
watched this but still what am i doing to measure the endfloat how do you set the preload??
#167
jameslearwood
-
- Members
-
- 525 posts
Super Mini Mad
- Local Club: ALL ALONE
Posted 27 January 2012 - 06:56 PM
right i think i have figured it out set it up on the flywheel side put the dti halfway down secured then set the bezel to 0.
this was with levering the crank all the way over to the timing chain end then levered back the other way i have a reading between 3thou to 4thou probably say 3thou happy days.
took me a while to realise what you meant by levering the crank i thought you meant in turning it over not pushing it up tight (horizontally) whoops.
don't know what you mean by preload.
i do like the new toy measured the bearing journals for the big end caps they are perfect no movement at all good job mr engineer.
#168
jameslearwood
-
- Members
-
- 525 posts
Super Mini Mad
- Local Club: ALL ALONE
Posted 27 January 2012 - 08:18 PM
Got a permenant smile on my face now  all going to plan got the pistons in crank installed turning over nicely especially as I now know what I am looking for and what I am doing
  off.
off.
Funny point I have an engine stand I used it on the dismantle and clean up come to the crank and pistons I thought it was easier on the bench. My dad pops in why you doing that on the bench you have an engine stand mmmm good point second time around I use the engine stand and it's so much easier especially for torquing down the nuts silly me looks like I have some lovely scratched paint work needing touching up oh well
all going to plan got the pistons in crank installed turning over nicely especially as I now know what I am looking for and what I am doing off.Funny point I have an engine stand I used it on the dismantle and clean up come to the crank and pistons I thought it was easier on the bench. My dad pops in why you doing that on the bench you have an engine stand mmmm good point second time around I use the engine stand and it's so much easier especially for torquing down the nuts silly me looks like I have some lovely scratched paint work needing touching up oh well
Edited by jameslearwood, 27 January 2012 - 08:20 PM.
#169
AndyMiniMad.
-

- Members
-
- 3,295 posts
Up Into Fourth
- Location: Under The Bonnet.
Posted 28 January 2012 - 12:19 PM
Well done that man..You set the preload without even knowing you did it lol...By putting the DTI halfway down and then zeroing the bezel..you have set the preload..Ta Da!! Told you it was easy!!.. So many folk take one look at the DTI and run a mile...Its way more complicated trying to explain how to use it that it is actually useing it..Errr does that make sense? All we need now are some nice pictures!!
#170
jameslearwood
-
- Members
-
- 525 posts
Super Mini Mad
- Local Club: ALL ALONE
Posted 28 January 2012 - 01:08 PM
I thought it was that just got me confused by thread where it sets the preload to 3thou the specific number confused me but got my head around it eventually I know exactly what you mean it is always harder to explain than do.
Will get some photos up tonight cheers I am glad I did get one now where do you get the protractor for the timing chain setting is there anything else I need for this?
Will get some photos up tonight cheers I am glad I did get one now where do you get the protractor for the timing chain setting is there anything else I need for this?
#171
jameslearwood
-
- Members
-
- 525 posts
Super Mini Mad
- Local Club: ALL ALONE
Posted 28 January 2012 - 05:43 PM
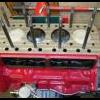
end caps going on with the bearing notches lined up

piston ring compressor in action

thrusts on right way round


My favourite new toy for measuring shiny things

piston ring compressor in action
thrusts on right way round
My favourite new toy for measuring shiny things
Edited by jameslearwood, 28 January 2012 - 05:48 PM.
#172
miniman92
-
- Members
-
- 761 posts
One Carb Or Two?
- Location: Winsford
- Local Club: Crewes Missiles
Posted 28 January 2012 - 06:14 PM
Nice one mate! It's all much easier with the right tools for the job. Should be starting to build my engine next week.
#173
jameslearwood
-
- Members
-
- 525 posts
Super Mini Mad
- Local Club: ALL ALONE
Posted 28 January 2012 - 06:21 PM
The right tools and some careful patient guidance sounds good love doing this rebuild best bit is the knowledge and experience will make it do much easier next time
sounds good love doing this rebuild best bit is the knowledge and experience will make it do much easier next time
#174
jameslearwood
-
- Members
-
- 525 posts
Super Mini Mad
- Local Club: ALL ALONE
Posted 16 February 2012 - 08:15 PM
Been a while had a bit of a break.
So I now have a very bruised hand and damaged 5 drifts but the bloody gear selector is free from the shoulder joint b'jesus it took plenty of heat, blood, wd 40, sweat, a few cuses and then repeated. So happy that is off can now put the quick leak fix kit on.
So block is assembled, head valves fitted and everything else prepped just have to weld the timing cover breather back up then it's all assembly time oh happy days
Photos to follow
#175
PhilipGCaldwell
-

- Members
-
- 870 posts
One Carb Or Two?
Posted 16 February 2012 - 11:20 PM
top stuff James, keep us posted
#176
AndyMiniMad.
-
- Members
-
- 3,295 posts
Up Into Fourth
- Location: Under The Bonnet.
Posted 17 February 2012 - 01:53 PM
Just noticed, You have the same laptop as me!...or do I have the same one as you? Mine pretty much lives in the garage these days. Its all looking good..Keep the pictures coming..
Edited by AndyMiniMad., 17 February 2012 - 01:55 PM.
#177
jameslearwood
-
- Members
-
- 525 posts
Super Mini Mad
- Local Club: ALL ALONE
Posted 17 February 2012 - 06:38 PM
Can't beat the acer for laptop except mine is now well battered but serves the purpose.
Just got into the garage all eager to start rebuild cleaned up and refitted speedo connection then went to fit the minis spares gearbox leak fix kit hmm hit a stumbling block am I right in thinking to get the old seal out I need to take off the diff housing?
If so then god damn it I don't have the gaskets another case of shopping on minis pares and more postage might try uni part first
#178
jameslearwood
-
- Members
-
- 525 posts
Super Mini Mad
- Local Club: ALL ALONE
Posted 17 February 2012 - 07:32 PM
the job that almost defeated me

Ermmm... timing cover modified


Ermmm... timing cover modified
#179
jameslearwood
-
- Members
-
- 525 posts
Super Mini Mad
- Local Club: ALL ALONE
Posted 17 February 2012 - 07:33 PM
Loving the Head now


#180
jameslearwood
-
- Members
-
- 525 posts
Super Mini Mad
- Local Club: ALL ALONE
Posted 18 February 2012 - 08:51 AM
I have Just been looking on minispares website apparantly there is no gasket on diff housing just RTV sealant is this correct?


2 user(s) are reading this topic
0 members, 2 guests, 0 anonymous users


