
Your inner wing looks about the same as mine which I decided to replace with a full heritage inner wing. Yours will also be rotten under the shock absorber bracket. I had not done mini body work before and I was also worried about making everything fit. Getting the inner wing off really was just systematically drilling out the spot welds. The strengthening post behind the inner wing (don't know the part name) was sound so lining up the door hinges was actually quite straightforward and the door remained in the same place. With the inner wing replaced it was also fairly straightforward to replace the full scuttle which lined up with the inner frame of the window so the gap was the same - but I took measurements to check. I replaced both inner wings and foe me the job is a lot neater and satisfying than the patchwork it would need to be. Maybe I was lucky but lining up all the panels was not too bad and required only nibbling the odd edge and a bit of pulling things together. Inner wings cost a bit but for me it meant I could put everything back as it should be.

961 replies to this topic
#167

Gilles1000
-

- Just Joined
-

- 438 posts
Speeding Along Now
- Location: Karlsruhe
Posted 08 June 2021 - 06:39 PM
No big worries about the positioning of the the door, as Richard said.
The A-post is a bosed section made by the inner wing and the A-post itself.
On the top on the inner wing, you miss the closing panel (or better said it's rotted away)
This one is welded to the inner wing on the dash side, on the iner wing engine side, and on the window aperture at the front (rusted away on your picture)
An advice I had from someone over there. Try to start the repairs on the back on the car, once you gained experience you will be able to do better repairs for the front which will look nicer :)
I made the main floor, then the rear, now I am going my way to the front of the car, although it's the first place I started to remove panels... Just like you :)
Gilles
#168
gaspen
-

- TMF+ Member
-
- 1,188 posts
One Carb Or Two?
- Location: Budapest
Posted 08 June 2021 - 06:54 PM
At this point I'd bracing the body with closed sections before continue. And I'd weld positioning points of all four door hinges also - I wish I had made it on mine. I welded fixings only for the toe board.
 IMG_20200906_141615.jpg 43.58K
2 downloads
IMG_20200906_141615.jpg 43.58K
2 downloads
The inner wing upper end is welded to the windshield frame "corner". M-Machine sells repair panel for that area, look for their catalog.
IMG_20200914_123026.jpg 92.98K
2 downloads
The holes for the door hinges are 5/16" diameter, the screws on the hinges are 1/4" , so you have some room but you better adjust the panels around the doors, I think.
If you wish I share my google album about my bodywork, you can see some details how the panels connect to each other. I shoot approx 1000 pictures 
Edited by gaspen, 08 June 2021 - 06:55 PM.
#169
colinf1
-

- Members
-
- 1,064 posts
One Carb Or Two?
- Location: Dundalk
Posted 08 June 2021 - 07:17 PM
Take off the upper shock absorber mount, see what it's like behind there...
Getting the complete inner wing off isn't too bad, plenty of spot welds to drill out and a few seam welds.
Under the inner wing is a door stiffener and outer door frame panel, both with the same mounting holes for doors, so you can use these to align the new panel.
I have my passenger side inner wing bolted in place at the moment, waiting to be welded in, but I'm still debating replacing the drivers side inner wing as it need straightening around the front of it, plus a patch under shock mount and the repair panel isn't great - you have to add a bit on to the top of it above vent.
#170
sonscar
-

- Members
-
- 3,215 posts
Up Into Fourth
- Location: crowle
- Local Club: none
Posted 08 June 2021 - 08:31 PM
All the repairs on the inner wing are "easy" repairs,nothing that cannot be fashioned from steel sheet.Sometimes the availability of so many repair panels appears to me as a curse.Chop,chop,chop oops unfinished project!.If this is your first rodeo tread lightly until you have built up skills and confidence.Have I said to enjoy it yet?
Repair a door,non structural and can be replaced if you kill it.This will have small patches to fabricate,new panels to finesse and I think is ideal to boost your skill base and gain a better understanding of your tools.Have fun( did I already say that?)Steve..
Repair a door,non structural and can be replaced if you kill it.This will have small patches to fabricate,new panels to finesse and I think is ideal to boost your skill base and gain a better understanding of your tools.Have fun( did I already say that?)Steve..
#171
Viktor
-
- Members
-
- 658 posts
Super Mini Mad
- Location: London
Posted 09 June 2021 - 04:37 PM
Your inner wing looks about the same as mine which I decided to replace with a full heritage inner wing. Yours will also be rotten under the shock absorber bracket. I had not done mini body work before and I was also worried about making everything fit. Getting the inner wing off really was just systematically drilling out the spot welds. The strengthening post behind the inner wing (don't know the part name) was sound so lining up the door hinges was actually quite straightforward and the door remained in the same place. With the inner wing replaced it was also fairly straightforward to replace the full scuttle which lined up with the inner frame of the window so the gap was the same - but I took measurements to check. I replaced both inner wings and foe me the job is a lot neater and satisfying than the patchwork it would need to be. Maybe I was lucky but lining up all the panels was not too bad and required only nibbling the odd edge and a bit of pulling things together. Inner wings cost a bit but for me it meant I could put everything back as it should be.
Thanks Richard, that is helpful. I just feel my project is like a snowball. Everytime I check a new panel, there's rust and people recommend me to replace it. At this pace, it might be worth to buy a new shell! Good advice on the scuttle panel, I have to replace that as well...
#172
Viktor
-
- Members
-
- 658 posts
Super Mini Mad
- Location: London
Posted 09 June 2021 - 04:41 PM
No big worries about the positioning of the the door, as Richard said.
The A-post is a bosed section made by the inner wing and the A-post itself.
On the top on the inner wing, you miss the closing panel (or better said it's rotted away)
This one is welded to the inner wing on the dash side, on the iner wing engine side, and on the window aperture at the front (rusted away on your picture)
An advice I had from someone over there. Try to start the repairs on the back on the car, once you gained experience you will be able to do better repairs for the front which will look nicer :)
I made the main floor, then the rear, now I am going my way to the front of the car, although it's the first place I started to remove panels... Just like you :)
Gilles
Hi Gilles, thanks mate. I noticed the closing panel and it is on my list for M-Machine! I agree with you that I should start with the floor and then the back and finally the front. I need to build myself a rotissery jig, but still need to get the materials. In the meantime, I was cleaning up a bit of rust (or actually a lot of rust) from the car...
Cheers.
#173
Viktor
-
- Members
-
- 658 posts
Super Mini Mad
- Location: London
Posted 09 June 2021 - 04:43 PM
At this point I'd bracing the body with closed sections before continue. And I'd weld positioning points of all four door hinges also - I wish I had made it on mine. I welded fixings only for the toe board.
The inner wing upper end is welded to the windshield frame "corner". M-Machine sells repair panel for that area, look for their catalog.
The holes for the door hinges are 5/16" diameter, the screws on the hinges are 1/4" , so you have some room but you better adjust the panels around the doors, I think.
If you wish I share my google album about my bodywork, you can see some details how the panels connect to each other. I shoot approx 1000 pictures

Will you send me the link to the photos? Please send me a PM. Thanks.
#174
Viktor
-
- Members
-
- 658 posts
Super Mini Mad
- Location: London
Posted 09 June 2021 - 04:47 PM
Take off the upper shock absorber mount, see what it's like behind there...
Getting the complete inner wing off isn't too bad, plenty of spot welds to drill out and a few seam welds.
Under the inner wing is a door stiffener and outer door frame panel, both with the same mounting holes for doors, so you can use these to align the new panel.
I have my passenger side inner wing bolted in place at the moment, waiting to be welded in, but I'm still debating replacing the drivers side inner wing as it need straightening around the front of it, plus a patch under shock mount and the repair panel isn't great - you have to add a bit on to the top of it above vent.
Hi Colin, thanks for the comments. I will have a look on the shock absorber mount. I prefer to keep the inner wing, but let's see what the whole situation is and then I can make a decision. To be honest, I don't want to replace panels that can be repaired, especially if they are hidden away and nobody will see my poor welding skills!
Cheers.
#175
Viktor
-
- Members
-
- 658 posts
Super Mini Mad
- Location: London
Posted 09 June 2021 - 04:50 PM
All the repairs on the inner wing are "easy" repairs,nothing that cannot be fashioned from steel sheet.Sometimes the availability of so many repair panels appears to me as a curse.Chop,chop,chop oops unfinished project!.If this is your first rodeo tread lightly until you have built up skills and confidence.Have I said to enjoy it yet?
Repair a door,non structural and can be replaced if you kill it.This will have small patches to fabricate,new panels to finesse and I think is ideal to boost your skill base and gain a better understanding of your tools.Have fun( did I already say that?)Steve..
Thanks Steve, I love your commets and the fact that having fun should be the most important thing! I'm repairing my scrap bonnet as learning instrument, but in the meantime, also assessing the situation and checking which panels I might need to buy in the near future.
Cheers.
#176
Viktor
-
- Members
-
- 658 posts
Super Mini Mad
- Location: London
Posted 09 June 2021 - 08:13 PM
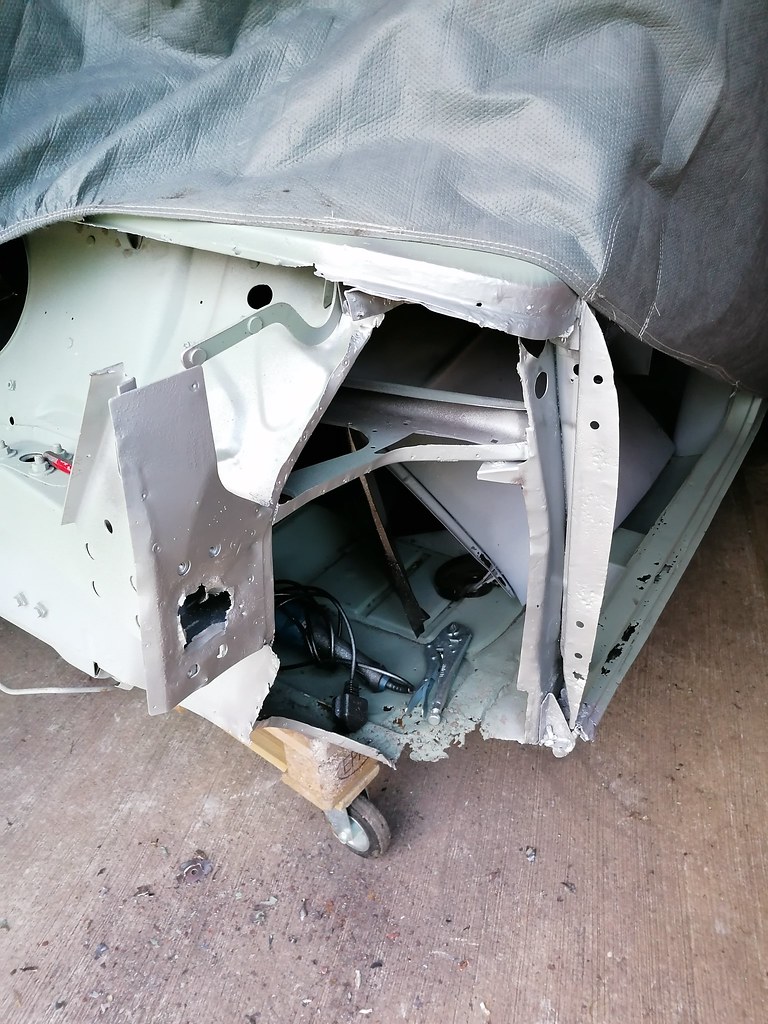
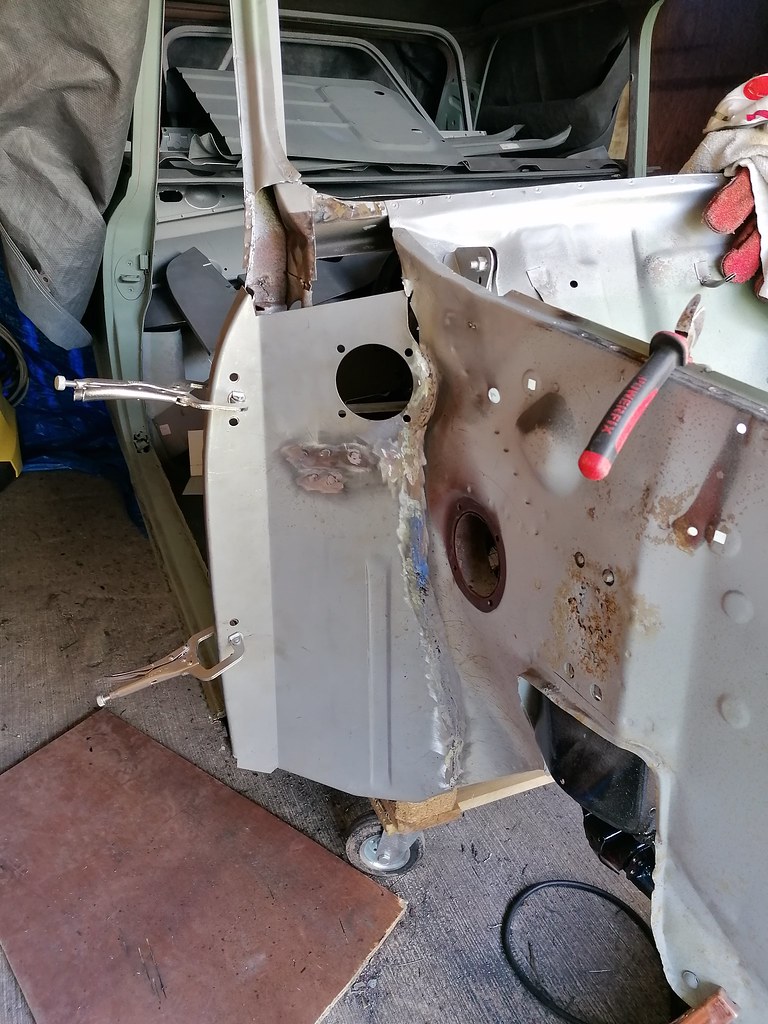
I removed the shock absorbers brackets. This is the left side. Not sure if that is an old repair or the spacer (which was completely rusted) that has also rusted into the inner wing.


And the bracket itself after a bit of grinding with the wire brush

The other side is pretty much the same, but with some holes.

The spacer is completely gone

One of the bolts broke when removing it. Now I need to see how I can get it out.

And this is after a bit of clean. Similar to the other side, but with some holes.

As I said before, I don't want to change the inner wings. I think this can be repaired, however if I am making a big mistake by keeping these, it would be great to know.
Thanks guys.
Cheers.
Victor.
Edited by Viktor, 09 June 2021 - 08:14 PM.
#177
colinf1
-
- Members
-
- 1,064 posts
One Carb Or Two?
- Location: Dundalk
Posted 09 June 2021 - 09:32 PM
I think the inner wing is double skin around the shock mount area, then under the inner wing is the cross member end plate, this is what mine looks like..
It looked similar to this before taking inner wing off...
If you watch Upbuild on YouTube, he does a good video showing the repair process for this..https://youtu.be/lADX0eOPGf8
It looked similar to this before taking inner wing off...
If you watch Upbuild on YouTube, he does a good video showing the repair process for this..https://youtu.be/lADX0eOPGf8
#178
Ben_O
-

- Paint Doctor
-
- 9,794 posts
Mill Road Garage
- Location: Isle of Wight
Posted 09 June 2021 - 10:32 PM
Those shock mount repairs are very straightforward to do and an ideal place to start on.
Have a look through this page on a mini I did a few years ago. It shows that repair being undertaken as well as all the other common inner wing repairs
https://www.theminif...-garage/page-13
#179
Viktor
-
- Members
-
- 658 posts
Super Mini Mad
- Location: London
Posted 10 June 2021 - 05:49 AM
I think the inner wing is double skin around the shock mount area, then under the inner wing is the cross member end plate, this is what mine looks like..
It looked similar to this before taking inner wing off...
If you watch Upbuild on YouTube, he does a good video showing the repair process for this..https://youtu.be/lADX0eOPGf8
Thanks Colin, that looks pretty much like mine.
Cheers.
#180
Viktor
-
- Members
-
- 658 posts
Super Mini Mad
- Location: London
Posted 10 June 2021 - 05:50 AM
Those shock mount repairs are very straightforward to do and an ideal place to start on.
Have a look through this page on a mini I did a few years ago. It shows that repair being undertaken as well as all the other common inner wing repairs
Thanks Ben, that project has almost everything I need right now for my car. As always, very helpful mate. Much appreciated.
Cheers.


Also tagged with one or more of these keywords: roundnose
Projects →
Mini Saloons →
1976 Mini 1000 Le "stripey"Started by cafeclassic , 03 Sep 2025 |
|

|
||
Projects →
Mini Saloons →
Mini Cooper Project - Finally StartsStarted by piphatch , 08 Jan 2025 |
|

|
||
Projects →
Mini Saloons →
1965 Austin Mini Restoration - Canadian Mk1Started by DoubleEh , 14 Nov 2022 |
|

|
||
Projects →
Mini Saloons →
Project Joe - 1991 Mini Mayfair 998Started by Eggers , 02 Jun 2022 |
|
|
||
Projects →
Mini Saloons →
Mpi Dashboad ProblemStarted by mikeprez , 22 Dec 2021 |
|

|
7 user(s) are reading this topic
0 members, 1 guests, 0 anonymous users
-
Bing (6)


